Lecture: The Mascara Shield Guard: Your Secret Weapon for Lash-Curling Domination! ⚔️👁️
(Or, How to Finally Achieve Bat-Worthy Lashes Without Gouging Your Eyeball)
Welcome, my lash-loving disciples! I see a room full of faces yearning for lash perfection. You’ve tried everything, haven’t you? Eyelash curlers that look like torture devices, mascara wands wielded with the precision of a toddler painting a wall, and enough YouTube tutorials to qualify for a minor in cosmetic engineering.
Today, we’re going to delve into a simple yet revolutionary tool that can transform your lash game: The Mascara Shield Guard. Yes, you heard right. A tiny piece of plastic (or silicone, depending on your preference) that will save you from smudges, wonky curls, and the dreaded mascara-on-eyelid crisis.
Think of me as your lash Gandalf, guiding you on a quest to achieve the voluminous, perfectly-curled lashes of your dreams. And the Mascara Shield Guard? That’s your Sting, ready to slay any lash-related Orc that comes your way.
I. Introduction: The Lash Struggle is Real (and Hilarious)
Let’s be honest, achieving perfect lashes is a daily battle. We’ve all been there:
- The Eyelid Picasso: You’re aiming for a delicate coat of mascara, but end up painting your eyelid a Jackson Pollock-esque masterpiece. Abstract expressionism is great, but not on your face at 8 AM. 🎨
- The Curl Catastrophe: You clamp down with the eyelash curler, praying you don’t accidentally rip out all your lashes. The result? Lashes that either resemble a right angle or remain stubbornly straight, mocking your efforts. 📐
- The Smudge Saga: One wrong blink and BAM! Mascara smudged halfway up your forehead. It’s like your lashes are staging a rebellion, determined to sabotage your entire makeup look. 😾
- The Spider Leg Scare: Too much mascara, not enough combing, and suddenly your lashes resemble the hairy legs of a tarantula. Not exactly the look you were going for. 🕷️
These are the trials and tribulations we face, dear friends. But fear not! The Mascara Shield Guard is here to alleviate these cosmetic calamities.
II. What is a Mascara Shield Guard, Anyway? 🤔
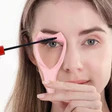
A Mascara Shield Guard is a small, typically curved piece of plastic or silicone that acts as a barrier between your lashes and your eyelid during mascara application. Think of it as a tiny shield, protecting your delicate skin from the dark, inky onslaught of mascara.
Types of Mascara Shield Guards:
| Type | Material | Features | Pros | Cons | Best For |
|---|---|---|---|---|---|
| Curved Plastic Shield | Plastic | Simple, often comes in a pack, can be disposable or reusable (with proper cleaning). | Inexpensive, readily available, easy to clean (if reusable). | Can be a bit flimsy, may not conform perfectly to all eye shapes. | Beginners, those on a budget, quick touch-ups. |
| Silicone Shield | Silicone | Flexible, often with a built-in comb or lash separator, can conform better to the eye’s contours. | More comfortable, molds to the eye shape, often includes added features like a comb. | Can be more expensive than plastic versions, may attract more dust and debris. | Experienced users, those with sensitive skin, those looking for added features. |
| Handle-Mounted Shield | Plastic/Silicone | Attached to a handle for easier grip and maneuverability. Often includes multiple angles. | Easier to hold and position, provides more control, better for reaching inner and outer corners. | Can be bulkier to store, may not be necessary for everyone. | Those with shaky hands, those who struggle with precision, those who want a multi-angle approach. |
III. The Magnificent Benefits of the Mascara Shield 🏆
Why should you embrace the Mascara Shield Guard into your makeup routine? Let me count the ways:
- Smudge-Proof Application: Say goodbye to those accidental eyelid tattoos! The shield acts as a barrier, preventing mascara from transferring to your skin. Hallelujah! 🙏
- Enhanced Lash Curling: This is where the magic really happens. Using the shield as a guide, you can gently push and curl your lashes upwards as you apply mascara. This creates a more dramatic and defined curl that lasts longer than using mascara alone. We’ll delve into the technique later.
- Precise Application: You can get closer to the lash line without fear of poking yourself in the eye. This results in fuller-looking lashes, especially at the base. 👀
- Lash Separation: Some shields come with built-in combs or separators, allowing you to detangle and define your lashes as you apply mascara. No more clumpy spider legs! 🙅♀️
- Time-Saving: Let’s face it, cleaning up mascara smudges takes time. The shield eliminates this step, allowing you to get ready faster. More time for coffee! ☕
- Cost-Effective: A single shield can last for months (or even years!) with proper cleaning. It’s a small investment that yields big results. 💰
- Beginner-Friendly: If you’re new to the world of mascara, the shield provides a safety net, allowing you to experiment without fear of making a mess. 👶
IV. The Secret Sauce: How to Use the Mascara Shield Guard to Curl Your Lashes Like a Pro 🧙♀️
Alright, let’s get down to the nitty-gritty. Here’s how to use the Mascara Shield Guard to achieve that coveted lash curl:
Step 1: Preparation is Key
Step 1: Preparation is Key
- Clean Your Shield: Before each use, make sure your shield is clean and free of any old mascara residue. Use a mild soap and water or a makeup remover wipe.
- Gather Your Supplies: You’ll need your Mascara Shield Guard, your favorite mascara (preferably one with a good curling formula), and a clean spoolie brush.
- Mirror Placement: Position your mirror at a comfortable angle so you can see your lashes clearly. Good lighting is also essential.
Step 2: Positioning the Shield
- Hold the Shield: Hold the shield with your non-dominant hand.
- Align the Curve: Gently align the curved edge of the shield along your upper lash line, as close to the roots of your lashes as possible. Make sure it’s comfortable and not pressing too hard against your eyelid.
- Angle Matters: Experiment with the angle of the shield. A slightly angled position can help to create a more dramatic curl.
Step 3: The Curling Mascara Application Technique (The Grand Finale!)
This is where the magic happens. Remember, practice makes perfect. Don’t get discouraged if you don’t nail it on the first try.
- Apply Mascara to the Wand: Load your mascara wand with a generous amount of product.
- Wiggle at the Base: Starting at the base of your lashes, wiggle the mascara wand back and forth to coat each lash thoroughly.
- The Push-and-Curl: This is the crucial step. Gently press the mascara wand against the back of the shield, using the shield as a support. As you wiggle the wand, push your lashes upwards against the shield, essentially using it as a mini-eyelash curler. Hold this position for a second or two to allow the mascara to set and the curl to form.
- Comb Through: Use a clean spoolie brush to comb through your lashes, separating them and removing any clumps. This will enhance the curl and create a more defined look.
- Repeat: Apply a second coat of mascara, focusing on the roots to build volume. Repeat the push-and-curl technique.
- Lower Lashes (Optional): You can also use the shield to apply mascara to your lower lashes without smudging your under-eye area. Just hold the shield below your lower lash line.
Step 4: The Finishing Touches
- Inspect: Take a close look at your lashes in the mirror. Are there any clumps or smudges? If so, use a clean spoolie or a cotton swab to clean them up.
- Admire Your Work: You’ve done it! You’ve achieved perfectly curled, smudge-free lashes with the help of the Mascara Shield Guard. Go forth and conquer the world with your fabulous lashes! 👑
V. Pro Tips and Tricks for Lash-Curling Mastery 🧠
- Warm Up Your Eyelash Curler (Optional): If you still want to use an eyelash curler, try warming it up slightly with a hairdryer before using it. This can help to create a more dramatic curl. Just be careful not to overheat it! 🔥
- Use a Curling Mascara: Choose a mascara formula that is specifically designed to curl and hold lashes. These mascaras often contain polymers that help to lift and shape the lashes.
- Layer Your Mascara: Apply multiple thin coats of mascara instead of one thick coat. This will prevent clumps and create a more natural-looking curl.
- Experiment with Different Angles: Try holding the shield at different angles to see what works best for your eye shape and lash length.
- Practice Makes Perfect: Don’t get discouraged if you don’t get it right away. Keep practicing, and you’ll eventually master the technique.
- Clean Your Mascara Wand Regularly: A dirty mascara wand can harbor bacteria and lead to eye infections. Clean your wand at least once a week with a mild soap and water.
- Don’t Pump Your Mascara Wand: Pumping the wand in and out of the tube introduces air, which can dry out the mascara and cause it to clump. Instead, gently swirl the wand inside the tube to pick up product.
- Replace Your Mascara Regularly: Mascara should be replaced every 3 months to prevent bacteria growth.
VI. Troubleshooting: When the Shield Fights Back 🦹♂️
Even with the Mascara Shield Guard, you might encounter a few challenges. Here’s how to overcome them:
- Shield Slipping: If the shield keeps slipping out of place, try using a small amount of eyelash glue or double-sided tape to secure it to your eyelid.
- Uneven Curl: If your lashes are curling unevenly, try adjusting the angle of the shield or applying more pressure to the side with less curl.
- Mascara Still Smudging: If you’re still getting smudges, make sure you’re holding the shield firmly against your eyelid and that you’re not applying too much mascara at once.
- Irritation: If you experience any irritation or discomfort, discontinue use immediately. You may be allergic to the material of the shield.
VII. Mascara Shield Guard: A Comparison Table 📊
To help you choose the right Mascara Shield Guard for your needs, here’s a comparison table:
| Feature | Plastic Shield | Silicone Shield | Handle-Mounted Shield |
|---|---|---|---|
| Price | Affordable | Moderate to Expensive | Moderate |
| Durability | Can be flimsy | More durable | Generally durable |
| Comfort | Can be less comfortable | More comfortable | Comfortable |
| Ease of Use | Easy to use | Easy to use | Easier to hold and maneuver |
| Cleaning | Easy to clean | Easy to clean | Easy to clean |
| Best For | Beginners, Budget-conscious users | Sensitive skin, Experienced users | Shaky hands, Precision application |
| Added Features | None | May include comb or separator | Multiple angles, Ergonomic design |
VIII. Conclusion: Embrace the Shield, Embrace the Lashes! 🎉
The Mascara Shield Guard is a simple yet powerful tool that can revolutionize your lash game. It’s a must-have for anyone who wants to achieve perfectly curled, smudge-free lashes without the hassle.
So, go forth, my lash-loving friends! Embrace the shield, master the technique, and unleash your inner lash goddess. May your lashes be ever long, ever curled, and ever fabulous!
Now, if you’ll excuse me, I have a date with my mascara shield and a date with world domination (via fabulous lashes, of course). 😉
For detailed product specifications and purchases, please go to :https://zenamakeup.com/products/3-in-1-mascara-shield-guard-for-sensitive-eyes
Leave a Reply