The Eyeliner Alchemist: Transforming Mascara Shields into Precision Wands 🧙♀️✨
A Lecture on Achieving Eyeliner Nirvana (Using the Humble Mascara Shield)
Welcome, bright-eyed and bushy-tailed beauty enthusiasts! Today, we embark on a quest, a journey of transformation, a pilgrimage to the sacred land of… perfect eyeliner. 🥁 Cue the dramatic music!
Forget mythical creatures and quests for immortality. Our holy grail is that crisp, clean, and envy-inducing eyeliner wing. And our trusty steed? The often-overlooked, frequently underestimated, and sometimes-even-mocked… mascara shield! 🛡️
Yes, you heard right. That little plastic crescent, usually relegated to protecting your freshly-applied eyeshadow from rogue mascara wands, is about to become your new best friend in the eyeliner game. Prepare to have your mind blown. 🤯
Why the Mascara Shield? (Beyond Mascara Protection)
Before we dive into the nitty-gritty, let’s address the elephant in the room. Why on earth would we use a mascara shield for eyeliner? Isn’t that… weird?
Well, my dears, sometimes the best solutions are the unexpected ones. Think of it like using a fork to comb your hair in a zombie apocalypse. Desperate times call for ingenious measures! (Okay, maybe eyeliner isn’t quite a zombie apocalypse, but the frustration levels can sometimes feel similar.)
Here’s why the mascara shield is secretly a genius eyeliner tool:
- Precision Guidance: The curved edge acts as a perfect stencil, guaranteeing a clean, sharp line every time. No more shaky hands ruining your masterpiece! 🙌
- Symmetry Savior: Getting both eyes to match is the bane of every eyeliner wearer’s existence. The shield provides a consistent guide, making symmetrical wings a reality. Finally! 🎉
- Mess Minimizer: Say goodbye to stray eyeliner smudges on your perfectly-applied eyeshadow. The shield acts as a barrier, catching any rogue flicks. Cleaner than your grandma’s kitchen! 🧼
- Versatility Virtuoso: From classic wings to graphic liner, the mascara shield can adapt to various eyeliner styles. It’s the Swiss Army knife of your makeup bag! 🔪
- Budget-Friendly Beauty: Let’s be honest, most of us already own one (or several) of these little guys. Why buy fancy stencils when you already have a perfectly good tool at your disposal? 🤑
The Eyeliner Alchemist’s Arsenal: Gathering Your Tools
Before we begin our transformation, every good alchemist needs their tools. Here’s what you’ll need for your eyeliner adventure:
- The Mascara Shield: Obviously! Any shape or size will do, but ones with a slightly more defined curve can be particularly helpful for creating winged eyeliner.
- Your Eyeliner of Choice: Gel, liquid, pencil – whatever floats your boat! Experiment and find what works best for you.
- A Steady Hand (or a table to rest your elbow on): Eyeliner requires patience and precision. Find a comfortable position and brace yourself.
- Good Lighting: Don’t try to apply eyeliner in the dark! Adequate lighting is crucial for seeing what you’re doing. Natural light is best, but a well-lit vanity mirror will also work.
- Makeup Remover and Cotton Swabs: Mistakes happen! Keep these on hand for quick and easy clean-up.
- A Mirror: A magnifying mirror can be helpful for seeing the details, but a regular mirror will also suffice.
Table 1: Tool Time! 🛠️
| Tool | Purpose | Pro Tip |
|---|---|---|
| Mascara Shield | Provides a stencil and protects eyeshadow from smudges. | Clean it after each use to prevent build-up and ensure a crisp line next time. |
| Eyeliner | Creates the actual line! Choose a formula you’re comfortable working with. | Experiment with different types of eyeliner to find your perfect match. |
| Steady Hand | Essential for drawing a smooth, even line. | Rest your elbow on a table for added stability. Deep breaths can help too! 🧘♀️ |
| Good Lighting | Allows you to see what you’re doing and avoid mistakes. | Position your light source so it’s directly in front of you to minimize shadows. |
| Makeup Remover | Cleans up mistakes and sharpens the line. | Use a pointed cotton swab dipped in makeup remover for precise corrections. |
| Cotton Swabs | Used with makeup remover for cleaning up mistakes. | Choose pointed swabs for better precision. |
| Mirror | Allows you to see your reflection while applying eyeliner. | A magnifying mirror can be helpful for seeing small details. |
The Art of the Wing: Step-by-Step Guide to Eyeliner Mastery
Alright, budding eyeliner artists, let’s get down to business! Here’s a step-by-step guide to achieving eyeliner perfection using our trusty mascara shield:
Step 1: Prep Your Canvas (Your Eyelid)
- Cleanse: Start with a clean, dry eyelid. Remove any excess oil or makeup.
- Prime: Apply an eyeshadow primer to create a smooth base for your eyeliner and prevent it from smudging.
- Base Eyeshadow (Optional): If you’re wearing eyeshadow, apply it before your eyeliner. This will make it easier to clean up any mistakes.
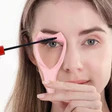
Step 2: Position the Shield
- Cleanse: Start with a clean, dry eyelid. Remove any excess oil or makeup.
- Prime: Apply an eyeshadow primer to create a smooth base for your eyeliner and prevent it from smudging.
- Base Eyeshadow (Optional): If you’re wearing eyeshadow, apply it before your eyeliner. This will make it easier to clean up any mistakes.
Step 2: Position the Shield
- Angle is Key: This is where the magic happens! Hold the mascara shield against your outer corner of your eye, angling it upwards towards the end of your eyebrow. The angle will determine the angle of your wing.
- Experiment: Play around with different angles to find the one that best suits your eye shape and desired look. Don’t be afraid to try something new!
- Firm Pressure: Apply gentle but firm pressure to hold the shield in place. You don’t want it to slip and slide while you’re applying your eyeliner.
Step 3: Trace the Wing
- Short Strokes: Using your eyeliner, start tracing along the edge of the mascara shield, creating the wing. Use short, light strokes to build up the color.
- Connect the Dots: Once you have the outline of your wing, fill it in completely.
- Thickness Matters: You can adjust the thickness of your wing by applying more eyeliner. Remember, you can always add more, but it’s harder to take away!
Step 4: Create the Lash Line
- Remove the Shield: Carefully remove the mascara shield.
- Connect the Wing: Now, extend the eyeliner along your upper lash line, connecting it to the wing you just created.
- Thin to Thick: Start with a thin line at the inner corner of your eye and gradually increase the thickness as you move towards the outer corner.
Step 5: Clean Up and Perfect
- Inspect Your Work: Take a step back and admire your handiwork. Are there any gaps or uneven lines?
- Makeup Remover to the Rescue: Use a cotton swab dipped in makeup remover to clean up any mistakes and sharpen the line.
- Symmetry Check: Compare both eyes to make sure they’re symmetrical. If not, use the mascara shield and makeup remover to make adjustments.
Step 6: Repeat on the Other Eye
- Mirror Image: Repeat steps 2-5 on the other eye, trying to mirror the shape and angle of the first eye.
- Practice Makes Perfect: Don’t get discouraged if it doesn’t look perfect right away. It takes practice to get both eyes to match.
Table 2: The Winged Eyeliner Walkthrough 🚶♀️
| Step | Action | Description | Tip |
|---|---|---|---|
| 1 | Prep Your Eyelid | Cleanse, prime, and apply eyeshadow (if desired). | A smooth, even base is essential for a flawless eyeliner application. |
| 2 | Position the Shield | Hold the mascara shield against the outer corner of your eye, angling it upwards. | Experiment with different angles to find the one that best suits your eye shape. |
| 3 | Trace the Wing | Use short, light strokes to trace along the edge of the shield, creating the wing. | Build up the color gradually to avoid mistakes. |
| 4 | Create the Lash Line | Remove the shield and extend the eyeliner along your upper lash line, connecting it to the wing. | Start with a thin line at the inner corner and gradually increase the thickness as you move towards the outer corner. |
| 5 | Clean Up and Perfect | Use makeup remover and cotton swabs to clean up any mistakes and sharpen the line. | Don’t be afraid to make adjustments until you’re happy with the result. |
| 6 | Repeat on the Other Eye | Repeat steps 2-5 on the other eye, trying to mirror the shape and angle of the first eye. | Practice makes perfect! It takes time and patience to get both eyes to match. |
Eyeliner Styles: Beyond the Basic Wing
Now that you’ve mastered the classic winged eyeliner, let’s explore some other eyeliner styles that you can achieve with the help of your trusty mascara shield:
- The Cat Eye: A more dramatic version of the winged eyeliner, with a thicker line and a more exaggerated flick. Use the shield to create a bolder wing. 😼
- The Foxy Eye: A sultry and elongated eyeliner look that emphasizes the outer corners of the eyes. Position the shield at a more horizontal angle to create a longer wing. 🦊
- The Graphic Liner: A bold and artistic eyeliner style that involves creating geometric shapes and patterns. Use the shield to create sharp, clean lines. 🎨
- The Tightline: Applying eyeliner to the upper waterline to create a fuller lash line and a more defined look. This technique doesn’t directly use the shield but can be incorporated alongside a winged liner created with the shield.
- The Smudged Liner: A softer and more diffused eyeliner look that’s perfect for everyday wear. Apply your eyeliner as usual, then use a brush to smudge it out along the lash line. The shield can help to create the initial line before smudging. 🌫️
Table 3: Eyeliner Styles Cheat Sheet 📝
| Style | Description | Shield Positioning |
|---|---|---|
| Cat Eye | A dramatic winged eyeliner with a thicker line and a more exaggerated flick. | Position the shield at a steeper angle to create a bolder wing. |
| Foxy Eye | A sultry and elongated eyeliner look that emphasizes the outer corners of the eyes. | Position the shield at a more horizontal angle to create a longer wing. |
| Graphic Liner | A bold and artistic eyeliner style that involves creating geometric shapes and patterns. | Use the shield to create sharp, clean lines and precise angles. |
| Tightline | Applying eyeliner to the upper waterline to create a fuller lash line. | Not directly used, but winged liner created with shield can complement. |
| Smudged Liner | A softer and more diffused eyeliner look. | Use the shield to create the initial line, then smudge it out with a brush. |
Troubleshooting: When Things Go Wrong (and They Will)
Let’s be real, even the most seasoned eyeliner veterans have their off days. Here are some common eyeliner problems and how to fix them:
- Uneven Wings: Don’t panic! Use the mascara shield and makeup remover to even them out. Start by cleaning up the larger wing to match the smaller one.
- Shaky Lines: Rest your elbow on a table or counter for added stability. Use short, light strokes to build up the color.
- Smudging: Use a waterproof or smudge-proof eyeliner. Set your eyeliner with a translucent powder.
- Eyeliner Transfer: Avoid applying eyeliner to your lower lash line if you have oily skin. Use an eyeshadow primer to prevent transfer.
- Eye Irritation: Use a hypoallergenic and ophthalmologist-tested eyeliner. Avoid getting eyeliner in your eyes.
Table 4: Eyeliner Emergency Kit 🚨
| Problem | Solution |
|---|---|
| Uneven Wings | Use the mascara shield and makeup remover to even them out. Start by cleaning up the larger wing to match the smaller one. |
| Shaky Lines | Rest your elbow on a table or counter for added stability. Use short, light strokes to build up the color. |
| Smudging | Use a waterproof or smudge-proof eyeliner. Set your eyeliner with a translucent powder. |
| Eyeliner Transfer | Avoid applying eyeliner to your lower lash line if you have oily skin. Use an eyeshadow primer to prevent transfer. |
| Eye Irritation | Use a hypoallergenic and ophthalmologist-tested eyeliner. Avoid getting eyeliner in your eyes. If irritation persists, discontinue use. |
Final Thoughts: Embrace the Imperfection!
Remember, eyeliner is an art, not a science. There will be days when your eyeliner looks flawless, and there will be days when it looks like a toddler attacked your face with a Sharpie. Don’t get discouraged! Embrace the imperfection and have fun with it. After all, makeup is supposed to be a form of self-expression. 💄
With practice, patience, and your trusty mascara shield, you’ll be an eyeliner alchemist in no time. Now go forth and create some magic! ✨
For detailed product specifications and purchases, please go to :https://zenamakeup.com/products/3-in-1-mascara-shield-guard-for-sensitive-eyes
Leave a Reply