Lecture: Taming the Lash Jungle: Using the Comb on the Mascara Shield Guard to Separate Stubborn Lashes 🦁🌿
Alright, settle down class, settle down! Today, we’re diving headfirst into the often-overlooked, yet utterly crucial, art of lash separation. We’re not just talking about avoiding a few clumps here and there. We’re talking about achieving fluttery, fanned-out, “I-woke-up-like-this (but-totally-didn’t)” perfection. 🌟
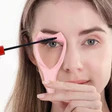
And our weapon of choice? The unsung hero of the makeup bag: The Comb on the Mascara Shield Guard! 🛡️ Believe it or not, that seemingly insignificant comb, often found attached to your mascara shield guard, is a secret weapon against even the most stubbornly tangled lashes.
Think of this lecture as your crash course in "Lash De-Clumping 101." Consider me your Professor Lash, ready to bestow upon you the wisdom accumulated over years of battling rogue mascara and rebellious lash formations. So grab your notebooks (or your phones, I’m not judging), and let’s get started!
I. The Problem: Lash Clusterphobia (and why it’s a real thing!)
Before we can conquer the beast, we need to understand it. Why do our lashes clump in the first place? The culprit is often a combination of factors:
- Mascara Formulation: Some mascaras are simply thicker and more prone to clumping. Think of them as the over-enthusiastic huggers of the mascara world. They mean well, but they leave you feeling suffocated. 🐻
- Multiple Coats: Layering on mascara is a recipe for dramatic length and volume, but also a high risk of clumping. Each coat builds upon the previous, potentially gluing lashes together.
- Application Technique: How you apply your mascara plays a significant role. A wobbly hand or too much pressure can lead to uneven distribution and, you guessed it, clumps! 🤦♀️
- Old Mascara: Mascara dries out over time, becoming thicker and stickier. This is like turning your mascara into a super-glue, specifically designed to weld your lashes together. 💀 Replace your mascara every 3 months, people!
- Natural Lash Type: Some of us are simply blessed (or cursed, depending on your perspective) with lashes that are naturally inclined to stick together. Think of it as the lash equivalent of having naturally frizzy hair. 🤷♀️
The Symptoms of Lash Clusterphobia:
- Spider Legs: Lashes that are thick, chunky, and resemble arachnid appendages. Not the desired look, unless you’re going for a Halloween theme. 🕷️
- Loss of Definition: When lashes are clumped together, they lose their individual definition, resulting in a flat, uninspired look. Boooring! 😴
- Heavy, Weighted Feeling: Clumped lashes can feel heavy and uncomfortable, especially if you’re wearing multiple coats of mascara.
- Overall Unnatural Appearance: The goal is to enhance your natural beauty, not to create a fake, plastic-y effect. Clumps scream "fake!" 📢
II. The Solution: The Mascara Shield Guard Comb – Your Secret Weapon
Now that we understand the enemy, let’s talk strategy. The mascara shield guard comb is a simple yet incredibly effective tool for separating and defining lashes. It’s like a tiny, portable lash therapist, ready to rescue your lashes from the clutches of clumpiness. 🧘♀️
Why is it so effective?
- Precision: The comb allows for precise separation of individual lashes, reaching even the smallest and most stubborn clumps.
- Gentle: When used correctly, the comb is gentle on your lashes, minimizing the risk of damage or breakage.
- Accessibility: It’s usually attached to your mascara shield guard, making it readily available whenever you need it. Plus, it’s usually a part of a larger kit to keep your mascara on point.
- Versatility: The comb can be used on both upper and lower lashes, and even on eyebrow hairs if you’re feeling adventurous! 😜
III. Mastering the Technique: A Step-by-Step Guide
Alright, let’s get practical. Here’s a step-by-step guide on how to use the mascara shield guard comb to achieve perfectly separated lashes:
Alright, let’s get practical. Here’s a step-by-step guide on how to use the mascara shield guard comb to achieve perfectly separated lashes:
1. Preparation is Key:
- Clean Your Comb: Before each use, make sure your comb is clean and free of any mascara residue. Use a tissue or a damp cloth to wipe it down. Nobody wants to transfer old, dried mascara back onto their lashes! 🤢
- Apply Mascara: Apply your mascara as usual, using your preferred technique. Don’t go overboard with the coats just yet. We’re aiming for buildable coverage, not instant spider legs.
- Immediate Action: The key is to use the comb immediately after applying your mascara, while it’s still wet and pliable. If you wait too long, the mascara will dry and become more difficult to separate. Think of it like trying to untangle a wet knot versus a dried-out one.
2. The Combing Process:
- Positioning: Hold the mascara shield guard comb horizontally, with the teeth facing upwards. You can position it either in front of your lashes or behind them, depending on what feels more comfortable and gives you better control.
- Gentle Strokes: Starting at the base of your lashes, gently wiggle the comb back and forth, moving upwards towards the tips. Use light pressure and avoid pulling or tugging on your lashes. We’re aiming for separation, not hair removal! 😭
- Focus on Clumps: Pay special attention to any areas where you see clumps or lashes sticking together. Use the comb to gently separate these lashes, working from the base to the tips.
- Multiple Passes: You may need to make several passes with the comb to achieve the desired level of separation. Be patient and persistent, but avoid over-combing, which can irritate your eyes.
- Lower Lashes: For your lower lashes, use the comb in the same way, but with even more gentle pressure. Lower lashes are typically thinner and more delicate than upper lashes, so handle them with care.
3. Troubleshooting:
- Stubborn Clumps: If you encounter particularly stubborn clumps, try using the tip of the comb to gently break them apart. You can also use a clean mascara wand or a lash separator tool for extra help.
- Mascara on the Comb: If the comb becomes coated with mascara, wipe it clean with a tissue before continuing. This will prevent you from transferring more mascara back onto your lashes.
- Accidental Smudging: If you accidentally smudge your mascara while combing, don’t panic! Use a cotton swab dipped in makeup remover to gently clean up the smudge.
- Redness/Irritation: If you experience any redness or irritation, stop using the comb immediately and consult a doctor or eye care professional. You may be allergic to the mascara or have sensitive eyes.
4. The Finishing Touches:
- Additional Coats: Once you’ve achieved the desired level of separation, you can apply additional coats of mascara to build up length and volume. Just remember to comb your lashes after each coat to prevent clumping.
- Lash Curler: If you want to add extra curl to your lashes, use an eyelash curler before applying your mascara. Curling your lashes after applying mascara can damage them.
- Lash Serum: Consider using a lash serum to nourish and strengthen your lashes. Healthy lashes are less prone to breakage and clumping.
IV. Pro Tips and Tricks from Professor Lash!
Alright, listen up class! Here are some extra tips and tricks to take your lash separation game to the next level:
- Warm Up Your Mascara: Before applying your mascara, try warming it up by holding it in your hands for a few minutes. This will make the formula more fluid and less prone to clumping.
- Use a Lash Primer: Lash primer can help to create a smooth, even base for your mascara, preventing clumping and enhancing its longevity. It’s like the primer for your face, but for your lashes! 👩🏫
- Experiment with Different Mascaras: Not all mascaras are created equal. Experiment with different formulations and wands to find one that works best for your lash type and desired look.
- Clean Your Mascara Wand: Just like your comb, your mascara wand can accumulate mascara residue over time. Clean it regularly with a tissue or a damp cloth to prevent clumping and bacterial growth.
- Practice Makes Perfect: The more you practice using the mascara shield guard comb, the better you’ll become at separating your lashes. Don’t get discouraged if you don’t get it right away. Just keep experimenting and refining your technique.
- Angle Matters: Try tilting your head back slightly and looking down into a mirror while applying mascara. This will help you to see your lashes more clearly and apply the mascara more evenly.
- Zig-Zag Motion: When applying mascara, use a slight zig-zag motion at the base of your lashes. This will help to coat each lash evenly and prevent clumping.
- Don’t Pump the Wand: Avoid pumping your mascara wand in and out of the tube, as this can introduce air and dry out the formula.
- Invest in a Good Lash Separator: If you’re serious about lash separation, consider investing in a high-quality lash separator tool. These tools typically have metal teeth that are designed to glide through your lashes and remove clumps with ease.
- Embrace the Natural Look: Sometimes, less is more. Don’t feel like you have to apply multiple coats of mascara to achieve a dramatic look. A single coat of mascara, combined with proper lash separation, can be just as effective.
V. Conclusion: Go Forth and Conquer the Clump!
Congratulations, class! You’ve successfully completed Lash De-Clumping 101. You are now armed with the knowledge and skills to conquer even the most stubborn lash clumps and achieve perfectly separated, fluttery lashes.
Remember, the key to success is practice, patience, and a little bit of experimentation. Don’t be afraid to try different techniques and find what works best for you. And most importantly, have fun! Makeup should be an enjoyable and empowering experience.
Now go forth and conquer the clump! May your lashes always be long, luscious, and perfectly separated. Class dismissed! 🎓🎉
For detailed product specifications and purchases, please go to :https://zenamakeup.com/products/3-in-1-mascara-shield-guard-for-sensitive-eyes
Leave a Reply