Mascara Mastery: Applying Mascara Mess-Free (Even on Those Pesky Bottom Lashes!) with a Shield Guard – A Lecture in Lash Perfection
(🎤 clears throat dramatically, adjusts glasses, and flashes a dazzling smile)
Alright, class, settle down! Today, we’re not dissecting frogs 🐸 or memorizing the periodic table 🧪. We’re diving into something far more important, something that separates the makeup amateurs from the makeup maestros: Mascara Application!
Specifically, we’re tackling the age-old problem of achieving perfectly coated lashes, both top AND bottom, without resembling a raccoon who just lost a fight with a tube of black goo 🦝🥊.
Fear not, my beauty-loving brethren! We shall conquer this challenge with the power of the Mascara Shield Guard! 🛡️
This isn’t just a tutorial; it’s a comprehensive lecture, a journey of discovery, a veritable Mascara Manifesto! We’ll cover everything from choosing the right shield to mastering the application technique, and even address some common mascara mishaps (and how to avoid them!).
(✨ lights dim slightly, a single spotlight illuminates a mascara wand)
I. The Mascara Mayhem: Why We Need a Shield
Let’s be honest, applying mascara can be a precarious dance. One wrong move, one sneeze at the wrong moment (bless you!), and BAM! You’ve got mascara smudged on your eyelids, your under-eye area, and possibly even your forehead (don’t judge, we’ve all been there!).
Here’s a breakdown of why mascara application can be so…challenging:
- The Blink Reflex: Our bodies are programmed to protect our precious eyeballs. This means blinking! And blinking is the sworn enemy of a clean mascara application. 👁️
- Uneven Application: Getting every lash perfectly coated, especially those tiny inner and outer corner lashes, is like trying to herd cats 🐈. They just don’t want to cooperate!
- Transfer Trouble: Wet mascara + skin = guaranteed transfer. Especially problematic for those with hooded eyes or oily skin. 😩
- Bottom Lash Blues: Applying mascara to the bottom lashes is like performing surgery with a butter knife. It’s just…messy. They’re so close to the skin, and one wrong wiggle results in instant raccoon eyes. 🐼
(🤔 poses dramatically with hand on chin)
So, what’s a beauty enthusiast to do? Embrace the smudges and accept our fate as perpetually panda-eyed creatures? Absolutely not! That’s where our trusty shield guard comes in!
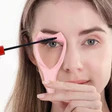
II. The Shield Guard: Our Knight in Shining Armor (or Plastic)
The mascara shield guard, also known as a mascara applicator, separator, or comb, is a simple but ingenious tool designed to protect your skin from mascara mishaps. It acts as a barrier, catching any stray mascara particles before they land on your perfectly prepped face.
Think of it as a superhero for your makeup routine. 🦸♀️ It’s not flashy, but it’s incredibly effective.
(📊 a table appears on the screen showcasing different shield guard types)
Table 1: Types of Mascara Shield Guards
| Type of Shield Guard | Description | Pros | Cons | Ideal For | Image (Placeholder) |
|---|---|---|---|---|---|
| Handheld Shield | Typically made of plastic or silicone, held in place with your hand. | Inexpensive, easy to find, reusable, provides good coverage. | Requires a steady hand, can be difficult to maneuver around the eyes. | Beginners, those on a budget, those who need basic protection. | (Image) |
| Curved Shield | Designed with a curved shape to fit the natural curve of the eye. | Provides more precise coverage, easier to reach inner and outer corner lashes. | Can be more expensive than handheld shields, may require some practice to use effectively. | Those with hooded eyes, those who want precise application, those who struggle with inner/outer corners. | (Image) |
| Built-in Comb Shield | A mascara wand with a built-in shield or comb. | Comb helps separate lashes, applies mascara evenly, convenient for on-the-go touch-ups. | Can be difficult to clean, may not provide as much protection as a separate shield. | Those who want to combine application and separation, those who travel frequently. | (Image) |
| Silicone Shield | Made of flexible silicone, often with textured surfaces for better grip. | Comfortable to hold, easy to clean, flexible and adaptable to different eye shapes. | Can be more expensive than plastic shields, may not be as durable. | Those with sensitive skin, those who prefer a comfortable grip. | (Image) |
| Disposable Shield (Patches/Strips) | Adhesive patches or strips that stick to the under-eye area. | Convenient, hygienic, disposable, provides excellent protection for the under-eye area. | Can be more expensive than reusable shields, may not be suitable for those with sensitive skin or adhesive allergies. | Those who want maximum protection, makeup artists, those who prioritize hygiene. | (Image) |
(💡 a lightbulb appears above the table)
Pro Tip: Experiment with different types to find the shield that best suits your eye shape and personal preference!
III. The Application Process: From Zero to Lash Hero
(🥁 a drumroll begins softly)
Now, for the main event! Let’s break down the step-by-step process of applying mascara mess-free using a shield guard.
A. Prep Work: The Foundation of Flawless Lashes
Before we even THINK about touching that mascara wand, we need to prepare our canvas.
- Cleanse and Moisturize: Ensure your eyelids and under-eye area are clean and moisturized. This will prevent mascara from clinging to dry patches and ensure smooth application. 💧
- Apply Eyeshadow (If Desired): Apply your eyeshadow before mascara. Trust me on this one. Cleaning up eyeshadow fallout is much easier than cleaning up mascara smudges. 🎨
- Curl Your Lashes: Curling your lashes opens up your eyes and creates a beautiful, lifted look. Use an eyelash curler and hold for a few seconds. 👀 (Don’t forget to clean your curler regularly!)
- Prime Your Lashes (Optional): Lash primer adds volume and length to your lashes and helps mascara adhere better. Think of it as a base coat for your lashes! 💅
(🛑 a stop sign appears)
Important Note: Always, always use a clean mascara wand. Bacteria can build up in your mascara tube and lead to eye infections. Nobody wants that!
B. The Top Lash Tango: Mastering the Upper Lash Application
This is where the magic happens!
This is where the magic happens!
- Position the Shield: Hold the shield guard close to your upper lash line, positioning it so that the curved edge follows the natural curve of your eyelid. Ensure it’s snug against your skin to prevent any mascara from slipping through. 📏
- Apply Mascara: Using your favorite mascara wand, apply mascara to your upper lashes, wiggling the wand at the base of your lashes and pulling upwards. Apply one to two coats, allowing each coat to dry slightly before applying the next. ⬆️
- Focus on the Roots: Pay special attention to the roots of your lashes. This will create a fuller, thicker look.
- Reach the Corners: Use the tip of the mascara wand to reach those tiny inner and outer corner lashes. These lashes are often neglected, but they can make a big difference in the overall look.
- Comb Through (Optional): If your lashes tend to clump, use a lash comb to separate them. This will create a more defined and polished look. 梳子
(🎉 confetti rains down as you successfully apply mascara to your top lashes)
C. The Bottom Lash Ballet: Conquering the Lower Lash Challenge
This is the moment of truth. Applying mascara to the bottom lashes is notoriously tricky, but with the help of our trusty shield guard, we can conquer this challenge!
- Position the Shield: Hold the shield guard under your lower lash line, ensuring it’s snug against your skin. This will protect your under-eye area from smudges. 👇
- Apply Mascara: Using the tip of the mascara wand, gently apply mascara to your lower lashes. Use a light touch and avoid applying too much mascara. 🤏
- Vertical Application: Try holding the mascara wand vertically and tapping the mascara onto your lower lashes. This will help prevent clumping and create a more natural look.
- Less is More: Remember, less is more when it comes to bottom lash mascara. You want to define your lashes, not create spider legs. 🕷️
(🎶 triumphant music plays as you successfully apply mascara to your bottom lashes)
D. Clean Up Crew: The Art of Smudge Removal
Even with the best shield guard, accidents can happen. Don’t panic! Here’s how to handle mascara smudges like a pro:
- Let it Dry: Resist the urge to wipe away fresh mascara smudges immediately. This will only smear the mascara and make the problem worse. Let the mascara dry completely. ⏳
- Use a Cotton Swab: Dip a cotton swab in makeup remover and gently roll it over the dried mascara smudge. The dried mascara should come off easily. 🧼
- Conceal (If Necessary): If you accidentally remove some of your foundation or concealer while cleaning up the smudge, reapply a small amount of concealer to the area. 🎨
(😎 you strike a confident pose, knowing you’ve mastered the art of mess-free mascara application)
IV. Mascara Mistakes: Avoiding the Lash Landmines
(⚠️ a warning sign appears)
Let’s talk about some common mascara mistakes and how to avoid them:
Table 2: Common Mascara Mistakes and Solutions
| Mistake | Solution |
|---|---|
| Clumpy Mascara | Use a lash comb to separate your lashes. Apply thinner coats of mascara and allow each coat to dry slightly before applying the next. Consider using a different mascara formula. |
| Spider Lashes | Apply less mascara to your bottom lashes. Focus on defining your lashes rather than adding volume. Use a vertical application technique. |
| Mascara Smudges | Use a mascara shield guard. Let smudges dry before attempting to remove them. Use a cotton swab dipped in makeup remover to gently remove smudges. |
| Flaking Mascara | Use a lash primer to help mascara adhere better. Avoid applying too many coats of mascara. Consider using a different mascara formula. |
| Drooping Lashes | Use a waterproof mascara. Curl your lashes before applying mascara. Avoid applying too much mascara to your bottom lashes. |
| Eye Irritation | Use a hypoallergenic mascara. Check the expiration date of your mascara. Avoid sharing your mascara with others. |
| Pumping the Mascara Wand | This forces air into the tube, drying out the mascara and introducing bacteria. Instead, gently twist the wand inside the tube. |
(🧠 a brain icon appears)
Key Takeaway: Practice makes perfect! The more you use a mascara shield guard, the better you’ll become at applying mascara mess-free.
V. Choosing the Right Mascara: The Lash Lottery
(🎰 a slot machine spins, showcasing different mascara formulas)
The right mascara can make all the difference in the world. Consider these factors when choosing a mascara:
- Formula: Do you want a volumizing mascara, a lengthening mascara, a waterproof mascara, or a tubing mascara?
- Wand: Do you prefer a traditional bristle wand, a plastic wand, or a curved wand?
- Ingredients: Do you have sensitive eyes? If so, look for a hypoallergenic mascara.
- Price: Mascara prices can range from drugstore to high-end. Choose a mascara that fits your budget.
(📜 a scroll appears listing different mascara types)
Mascara Cheat Sheet:
- Volumizing Mascara: Adds thickness and fullness to your lashes. Ideal for those with thin or sparse lashes.
- Lengthening Mascara: Extends the length of your lashes. Ideal for those with short lashes.
- Waterproof Mascara: Resists water and sweat. Ideal for special occasions or humid weather.
- Tubing Mascara: Coats each lash in a tube-like polymer. Doesn’t smudge or flake and is easy to remove with warm water.
- Clear Mascara: Can be used as a lash primer or to define lashes naturally.
(🛍️ a shopping bag icon appears)
Recommendation: Don’t be afraid to experiment with different mascaras until you find the one that’s perfect for you!
VI. Conclusion: Lash Out with Confidence!
(🏆 a trophy appears)
Congratulations, class! You’ve officially completed Mascara Mastery 101! You are now armed with the knowledge and tools to apply mascara mess-free, even on those tricky bottom lashes.
Remember, the key to success is practice, patience, and a good mascara shield guard. So go forth, experiment, and lash out with confidence!
(🎤 bows dramatically as the lights come up)
Now, if you’ll excuse me, I have a date with my mascara wand. Class dismissed! 🎉
For detailed product specifications and purchases, please go to :https://zenamakeup.com/products/3-in-1-mascara-shield-guard-for-sensitive-eyes
Leave a Reply