Lecture: Operation Glitter Bomb – Mastering the 5-Stick Glitter Cream Eyeshadow Set for Eye-Popping On-The-Go Glam 🚀✨
Alright, glam gurus, gather ’round! Today, we’re embarking on a mission of glittery proportions! Forget complicated palettes and brushes that end up scattered in the bottom of your bag like lost socks. We’re talking laser-focused precision, maximum impact, and minimal fuss, all thanks to the unsung hero of the beauty world: the Glitter Cream Eyeshadow Stick Set! 🌟
Imagine this: you’re rushing to a last-minute date, a surprise happy hour, or maybe just trying to look vaguely human after a particularly brutal Monday. No time for a full face, but you need something. This, my friends, is where the Glitter Cream Eyeshadow Stick Set swoops in like a shimmering superhero! 🦸♀️
This lecture will be your definitive guide to unlocking the full potential of these magical sticks. We’ll cover everything from understanding the formula to mastering quick and coordinated looks that will have you turning heads faster than you can say "sparkle."
Lecture Outline:
- The Glitter Cream Eyeshadow Stick: A Love Story 💖 (Understanding the Formula & Benefits)
- Decoding the 5-Stick Arsenal: Color Theory for Dummies (Like Me!) 🎨 (Identifying Your Set’s Colors and How to Use Them)
- Tool Time! 🛠️ (Essential Tools & Techniques – Hint: Less is More!)
- Mission: Quick Glam! ⏰ (Step-by-Step Tutorials for On-The-Go Looks)
- Troubleshooting: Avoiding Glitter Catastrophes! 😿 (Common Mistakes and How to Fix Them)
- Beyond the Basics: Leveling Up Your Glitter Game 🏆 (Advanced Techniques and Creative Exploration)
- Maintenance & Storage: Keeping Your Sticks Happy & Healthy 🏡 (Proper Care for Longevity)
- The Verdict: Is the Glitter Cream Eyeshadow Stick Set Worth It? 🤔 (Pros, Cons, and Final Thoughts)
1. The Glitter Cream Eyeshadow Stick: A Love Story 💖 (Understanding the Formula & Benefits)
Let’s be honest, glitter can be a fickle beast. It’s messy, it gets everywhere (seriously, years later you’ll still be finding rogue sparkles), and it often feels like you’re applying craft supplies to your eyelids. But the Glitter Cream Eyeshadow Stick? It’s glitter’s cooler, more sophisticated cousin.
-
What Makes it Special?
These sticks typically boast a creamy, blendable formula infused with finely milled glitter particles. This means:
- Less Fallout: The creamy base helps the glitter adhere to the skin, minimizing the dreaded "glitter beard" situation.
- Ease of Application: The stick format allows for precise application and effortless blending, even without brushes.
- Buildable Coverage: You can create a subtle shimmer or a full-on disco ball effect, depending on how much you apply.
- Long-Lasting Wear: Many formulas are designed to be crease-resistant and long-wearing, so your sparkle stays put all day (or night!).
-
Benefits in a Nutshell:
Benefit Explanation Emoji Speed & Convenience Perfect for on-the-go application and quick touch-ups. 🏃♀️ Minimal Fallout Less mess, more sparkle! ✨ Blendability Creates seamless transitions and a professional-looking finish. 🖌️ Versatility Can be used as an eyeshadow, liner, or even a highlighter. 💫 Beginner-Friendly Easy to use, even if you’re a makeup newbie. 👶
Essentially, these sticks are the lazy girl’s (or busy bee’s) secret weapon for achieving a glamorous eye look in minutes.
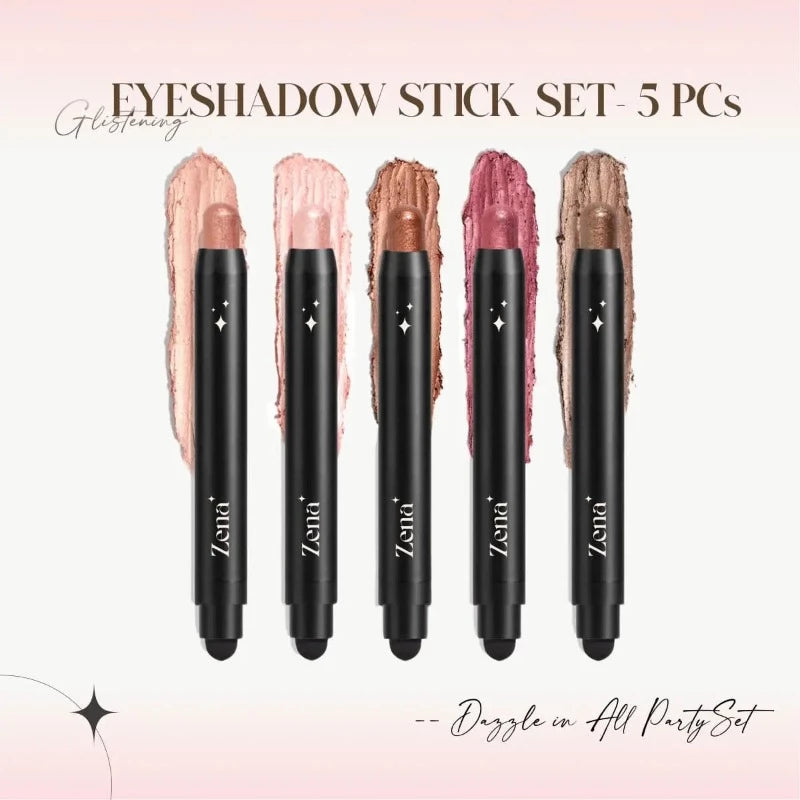
2. Decoding the 5-Stick Arsenal: Color Theory for Dummies (Like Me!) 🎨 (Identifying Your Set’s Colors and How to Use Them)
Okay, so you’ve got your 5 sticks of sparkly goodness. But staring at them can feel like staring into a swirling vortex of glittery confusion. Fear not! We’re going to break down how to identify your set’s colors and, more importantly, how to use them effectively.
-
Understanding Your Colors:
Most 5-stick sets offer a range of colors designed to complement each other. Think of it like a mini eyeshadow palette, but in stick form! Common variations include:
- Light/Highlight Shade: Usually a champagne, ivory, or light gold. Perfect for highlighting the inner corner of the eye, the brow bone, and the center of the lid.
- Medium Shade: A neutral bronze, taupe, or rose gold. Ideal for all-over lid color or blending the crease.
- Dark Shade: A deeper brown, plum, or charcoal. Used to add definition to the outer corner of the eye or as a smoky liner.
- Pop of Color Shade: A vibrant blue, green, purple, or pink. Adds a playful touch and can be used on the lid, lower lash line, or as a statement liner.
- Transformer Shade: Often a sheer or iridescent shade that can be layered over other colors to add dimension and a unique finish. Think opal, duochrome, or holographic.
-
Color Harmony 101 (Simplified!)
Don’t let "color theory" scare you. We’re not painting the Sistine Chapel here. Just a few simple rules to keep in mind:
- Neutral + Pop: Pair a neutral shade on the lid with a pop of color on the lower lash line for a subtle yet eye-catching look.
- Light, Medium, Dark: Use the light shade to highlight, the medium shade on the lid, and the dark shade to define the crease. This creates a classic, sculpted eye.
- Monochromatic Magic: Stick to shades within the same color family (e.g., various shades of bronze or rose gold) for a cohesive and effortless look.
- Opposites Attract (Sometimes!): Colors opposite each other on the color wheel (e.g., blue and orange, purple and yellow) can create a dramatic contrast. Use with caution! ⚠️
-
Example Color Combinations:
Combination Name Light Shade Medium Shade Dark Shade Pop of Color Transformer Shade Golden Hour Champagne Bronze Deep Brown (Optional) Gold Iridescent Gold Rose Romance Ivory Rose Gold Plum Dusty Rose Duochrome Pink/Gold Smoky Night Light Silver Taupe Charcoal Gray (Optional) Sapphire Holographic Silver Mermaid Dreams Light Turquoise Teal Deep Navy Emerald Green Opal Berry Bliss Light Pink Mauve Burgundy Raspberry Shimmering Lilac
Experiment! The best way to learn is to play around with different combinations and see what you like. Don’t be afraid to break the rules (as long as you look fabulous doing it!).
3. Tool Time! 🛠️ (Essential Tools & Techniques – Hint: Less is More!)
The beauty of these sticks is that you can often get away with using just your fingers. But a few key tools can elevate your application and create a more polished look.
-
Essential Tools:
- Your Fingers: Seriously! They’re warm, readily available, and surprisingly effective for blending.
- Blending Brush: A fluffy, tapered blending brush helps to diffuse the edges of the eyeshadow and create a seamless transition between colors.
- Pencil Brush: A small, pointed brush is perfect for applying eyeshadow to the lower lash line or creating a precise line.
- Eyelash Curler: Curling your lashes before applying mascara will instantly open up your eyes.
- Mascara: The final touch that ties everything together.
-
Application Techniques:
- Direct Application: Swipe the eyeshadow stick directly onto your eyelid. This works best for applying an all-over lid color.
- Finger Application: Apply the eyeshadow stick to your finger and then dab it onto your eyelid. This allows for more controlled application and better blending.
- Brush Application: Apply the eyeshadow stick to a brush and then apply the color to your eyelid. This is ideal for creating a more precise application or for blending multiple colors.
- Layering: Start with a light layer of eyeshadow and build up the color as needed. This will help to prevent creasing and fallout.
- Blending is Key! Don’t be afraid to blend, blend, blend! This will create a seamless and professional-looking finish.
-
Pro Tip: Warm up the eyeshadow stick on the back of your hand before applying it to your eyelid. This will help to make the formula more creamy and blendable.
4. Mission: Quick Glam! ⏰ (Step-by-Step Tutorials for On-The-Go Looks)
Alright, cadets, it’s time to put our knowledge to the test! Here are a few quick and easy eye looks you can create using your 5-stick Glitter Cream Eyeshadow Set:
-
Look 1: The "5-Minute Shimmer"
-
Look 1: The "5-Minute Shimmer"
- Prime: Apply an eyeshadow primer (optional, but recommended for longer wear).
- Base: Swipe the Medium Shade all over your eyelid, from lash line to crease.
- Highlight: Dab the Light Shade in the inner corner of your eye and under your brow bone.
- Blend: Use your finger or a blending brush to blend the edges of the eyeshadow.
- Mascara: Apply mascara to your upper and lower lashes.
Result: A subtle, shimmering eye that’s perfect for everyday wear.
-
Look 2: The "Smoky Liner"
- Base: Apply a neutral eyeshadow base (optional).
- Line: Use the Dark Shade to draw a line along your upper lash line, as close to the lashes as possible.
- Smudge: Use a pencil brush or your finger to smudge the liner, creating a soft, smoky effect.
- Highlight: Dab the Light Shade in the inner corner of your eye.
- Mascara: Apply mascara to your upper and lower lashes.
Result: A quick and easy smoky eye that’s perfect for a night out.
-
Look 3: The "Pop of Color"
- Base: Apply a neutral eyeshadow base (optional).
- Lid: Swipe the Medium Shade all over your eyelid.
- Color: Apply the Pop of Color Shade to the lower lash line, using a pencil brush or your finger.
- Blend: Blend the edges of the eyeshadow.
- Mascara: Apply mascara to your upper and lower lashes.
Result: A fun and playful eye look that adds a touch of personality.
-
Look 4: The "Halo Eye"
- Prime: Apply eyeshadow primer.
- Outer & Inner Corner: Apply the Dark Shade to the outer and inner corners of your eye, leaving the center of your lid bare. Use a pencil brush for precision.
- Center Lid: Apply the Light Shade or Transformer Shade to the center of your lid.
- Blend: Blend the edges of the dark shade into the light shade, creating a seamless halo effect.
- Mascara: Apply mascara to upper and lower lashes.
Result: A striking eye look that makes your eyes appear larger and brighter.
5. Troubleshooting: Avoiding Glitter Catastrophes! 😿 (Common Mistakes and How to Fix Them)
Even with the best tools and techniques, things can sometimes go wrong. Here are a few common mistakes and how to fix them:
-
Creasing:
- Cause: Applying too much eyeshadow, not using an eyeshadow primer, or having oily eyelids.
- Solution: Use an eyeshadow primer, apply thinner layers of eyeshadow, and blot your eyelids with blotting paper throughout the day.
-
Fallout:
- Cause: Using a loose glitter formula, not tapping off excess product from your brush, or having dry eyelids.
- Solution: Use a cream-based glitter formula, tap off excess product from your brush, and apply a moisturizing eye cream before applying eyeshadow.
-
Uneven Application:
- Cause: Not blending the eyeshadow properly, using the wrong brush, or having uneven eyelids.
- Solution: Blend the eyeshadow thoroughly, use a blending brush, and apply a small amount of eyeshadow to the uneven areas.
-
Color Clash:
- Cause: Using colors that don’t complement each other, applying too many colors, or not considering your skin tone.
- Solution: Stick to colors within the same color family, apply a maximum of three colors, and consider your skin tone when choosing colors.
6. Beyond the Basics: Leveling Up Your Glitter Game 🏆 (Advanced Techniques and Creative Exploration)
Once you’ve mastered the basics, it’s time to get creative! Here are a few advanced techniques to take your glitter game to the next level:
- Ombre Effect: Apply a light shade to the inner corner of your eye and gradually transition to a darker shade on the outer corner.
- Cut Crease: Define your crease with a dark shade and then apply a light shade to the lid.
- Glitter Liner: Use a fine-tipped brush to apply a glitter shade along your upper or lower lash line.
- Layering with Powder Shadows: Use your glitter cream eyeshadow sticks as a base for powder shadows to intensify the color and add extra dimension.
- Experiment with Different Textures: Combine your glitter cream eyeshadow sticks with other textures, such as matte shadows or liquid liners, to create a unique and interesting look.
7. Maintenance & Storage: Keeping Your Sticks Happy & Healthy 🏡 (Proper Care for Longevity)
To keep your Glitter Cream Eyeshadow Sticks in tip-top shape, follow these simple guidelines:
- Close the Caps Tightly: This will prevent the formula from drying out.
- Store in a Cool, Dry Place: Avoid storing your sticks in direct sunlight or humid environments.
- Clean the Tips Regularly: Use a tissue or makeup wipe to clean the tips of the sticks after each use to prevent contamination.
- Sharpen (If Applicable): Some eyeshadow sticks are designed to be sharpened. If yours is, sharpen it regularly to maintain a precise tip.
- Check Expiration Dates: Like all makeup products, eyeshadow sticks have an expiration date. Be sure to check the expiration date and discard the sticks if they’re expired.
8. The Verdict: Is the Glitter Cream Eyeshadow Stick Set Worth It? 🤔 (Pros, Cons, and Final Thoughts)
So, are these glittery sticks worth the hype? Let’s weigh the pros and cons:
-
Pros:
- Convenience: Perfect for on-the-go application and quick touch-ups.
- Ease of Use: Beginner-friendly and requires minimal tools.
- Versatility: Can be used as eyeshadow, liner, or highlighter.
- Minimal Fallout: Less mess than traditional glitter eyeshadows.
- Long-Lasting Wear: Many formulas are designed to be crease-resistant and long-wearing.
-
Cons:
- Limited Color Selection: Sets typically offer a limited range of colors compared to eyeshadow palettes.
- Potential for Creasing: Can crease if applied too thickly or without an eyeshadow primer.
- May Not Be Suitable for All Skin Types: Some formulas may be too oily for very oily skin.
- Price: Can be more expensive than individual eyeshadows.
-
Final Thoughts:
The Glitter Cream Eyeshadow Stick Set is a fantastic option for anyone looking for a quick, easy, and glamorous eye look. They’re especially great for busy individuals, makeup beginners, and those who love a touch of sparkle. While they may have a few limitations, the convenience and ease of use make them a worthwhile addition to any makeup collection. Just remember to blend, blend, blend, and don’t be afraid to experiment!
Now go forth and conquer the world, one glittery eyelid at a time! ✨🌍🎉 You’ve got this!
For detailed product specifications and purchases, please go to :https://zenamakeup.com/products/glimmer-glow-5-piece-glitter-cream-eyeshadow-stick-set
-
Leave a Reply