Lecture Hall of Sparkle: Mastering the 5-Stick Symphony for Professional-Looking Sparkling Eyes
Welcome, Glamour Gladiators, to Eye Makeup Academy! Today, we’re diving headfirst into the shimmering sea of sparkly eye makeup, and our trusty vessel is a set of… drumroll please… 5 magical sticks! 🎉
Forget the dusty palettes overflowing with forgotten shades. Forget the brushes that shed more than your cat. Today, we’re simplifying, streamlining, and sparkling! We’re going from "meh" to "mesmerizing" with just five little sticks.
This isn’t just about slapping on some glitter and hoping for the best. We’re going to learn the art of creating professional-looking sparkling eye makeup, even if your artistic skills currently peak at stick figures. We’ll cover everything from understanding the tools to mastering techniques that will make your eyes pop like champagne corks 🥂.
So, buckle up buttercups, grab your coffee (or your mimosa, no judgment here 🍹), and let’s get this party started!
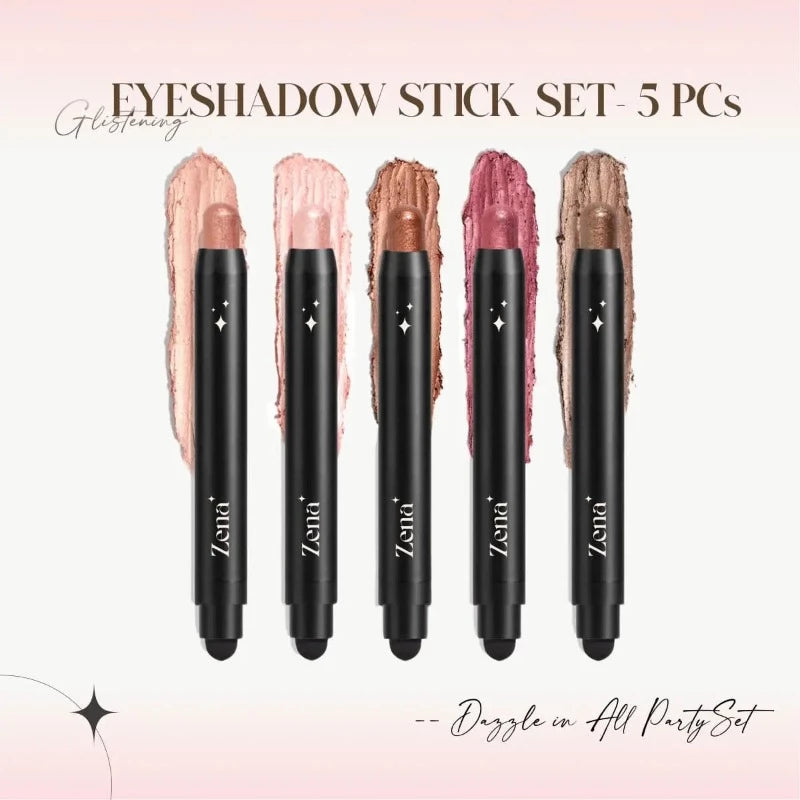
I. The 5-Stick Arsenal: Knowing Your Weapons
Before we charge into battle, we need to know our weaponry. Not all 5-stick sets are created equal. Understanding the purpose of each stick is crucial.
Here’s a breakdown of what you might find in a typical 5-stick set, and how to wield them like a pro:
| Stick Type | Description | Purpose | Potential Textures | How to Choose |
|---|---|---|---|---|
| 1. Base Shadow Stick (The Foundation) 🧱 | Usually a cream or shimmery shadow in a neutral shade like beige, brown, or taupe. | Creates a smooth, even base for other shadows to adhere to. Acts as a primer, extending the wear time of your eye makeup. | Cream, shimmer, satin | Consider your skin tone. Light skin: light beige/taupe. Medium skin: warm brown/bronze. Dark skin: deep brown/bronze. Ensure good blendability! |
| 2. Transition Shade Stick (The Blending Buddy) ☁️ | Typically a matte shadow, slightly darker than the base shadow. | Used in the crease to create depth and dimension. Helps blend harsh lines and transition between colors seamlessly. | Matte, satin | Choose a shade that’s 1-2 shades darker than your base. Think browns, taupes, or even a muted mauve. |
| 3. Shimmer/Glitter Topper Stick (The Star of the Show!) ✨ | The main source of sparkle! Can be a fine shimmer, chunky glitter, or a combination of both. | Adds dimension, light, and a touch of glamour to your eye look. | Shimmer, Glitter, Metallic | Consider the occasion. Fine shimmer for everyday wear, chunky glitter for parties. Ensure the glitter adheres well and doesn’t flake excessively. |
| 4. Deepening/Liner Stick (The Definition Dynamo) ✒️ | Usually a dark shade like black, brown, or navy. Can be matte or shimmery. | Used to define the lash line, create a smoky effect, or add depth to the outer corner of the eye. | Matte, Shimmer, Creamy | Choose a color that complements your eye color. Brown for blue/green eyes, black for brown eyes. Ensure it’s pigmented and easy to blend. |
| 5. Highlighting Stick (The Illuminator) 💡 | A light, shimmery shade, often in white, champagne, or light pink. | Used to highlight the inner corner of the eye, the brow bone, and the center of the eyelid, creating a brighter, more awake look. | Shimmer, Metallic | Choose a shade that complements your skin tone. Champagne for warm skin, light pink/white for cool skin. Ensure it has a smooth, refined shimmer. |
Important Note: Your 5-stick set might vary! Some sets might include a specific color corrector or a more unique color. Adapt the following techniques to suit your specific kit.
II. Prepping for Perfection: The Canvas is Key
Even the most spectacular sparkle will fall flat if your eyelid is a wrinkled, oily mess. Think of your eyelid as a canvas. You wouldn’t paint a masterpiece on a dirty, uneven surface, would you? (Unless you’re going for abstract expressionism… in which case, go wild!).
Here’s your pre-sparkle checklist:
- Cleanse: Remove any existing makeup, dirt, or oil with a gentle cleanser.
- Moisturize (Lightly!): Hydrated skin is happy skin. But avoid heavy creams, which can make your eyeshadow crease. A lightweight eye cream is your best friend.
- Prime Time!: This is crucial. A good eye primer will create a smooth, even surface, prevent creasing, and extend the wear time of your shadows. Apply a thin layer and let it set for a minute or two. If your Base Shadow Stick is highly emollient, you might need to use a powder primer on top to control oil.
- Conceal (Optional): If you have dark circles or discoloration on your eyelids, apply a thin layer of concealer to even out your skin tone. Set it with a translucent powder to prevent creasing.
III. The 5-Stick Symphony: Creating Eye Looks
Now, for the fun part! Let’s create some dazzling eye looks using our 5-stick arsenal. Remember, practice makes perfect (and sparkles make everything better!).
A. The Basic Sparkle:
This is your everyday, effortless glam. Perfect for brunch, coffee dates, or just feeling fabulous while running errands.
- Base Shadow: Apply the Base Shadow Stick all over your eyelid, from lash line to brow bone. Blend well with your finger or a blending brush. This creates a smooth, even canvas.
- Transition Shade: Apply the Transition Shade Stick in the crease of your eye, using a blending brush to soften the edges. This adds depth and dimension.
- Sparkle Topper: Apply the Shimmer/Glitter Topper Stick to the center of your eyelid, blending outwards. You can use your finger or a flat eyeshadow brush for more precise application.
- Highlight: Use the Highlighting Stick in the inner corner of your eye and under your brow bone to brighten and lift.
- Liner (Optional): Use the Deepening/Liner Stick along your upper lash line for definition. You can smudge it out for a softer look.
B. The Smoky Sparkle:
This look is perfect for a night out. It’s sultry, sophisticated, and undeniably sparkly.
- Base Shadow: Apply the Base Shadow Stick all over your eyelid.
- Transition Shade: Apply the Transition Shade Stick in the crease and blend it outwards, towards the outer corner of your eye.
- Deepening/Liner: Apply the Deepening/Liner Stick along your upper and lower lash lines. Smudge it out with a pencil brush or your finger to create a smoky effect.
- Sparkle Topper: Apply the Shimmer/Glitter Topper Stick to the center of your eyelid, blending outwards. Focus the glitter on the center for maximum impact.
- Highlight: Use the Highlighting Stick in the inner corner of your eye and under your brow bone.
- Mascara: Don’t forget mascara! A few coats of volumizing mascara will complete the look.
C. The Colorful Sparkle:
Let your personality shine with a pop of color! This look is fun, playful, and perfect for festivals or any occasion where you want to stand out.
-
Adaptation: You’ll need to get creative here! Find other eyeshadow sticks in shades you love. A turquoise, emerald, or amethyst shade would be stunning! Use these colored sticks in place of the transition shade, or even layer them with the deepening/liner stick. The sky’s the limit!
- Apply base.
- Apply a color shadow across the eyelid.
- Apply the deepening stick to the outer corner.
- Blend everything together.
- Add sparkle.
- Add highlighting.
IV. Pro Tips & Tricks: From Novice to Ninja
Want to take your sparkle game to the next level? Here are some pro tips and tricks to help you achieve a flawless, long-lasting look:
- Layering is Key: Don’t be afraid to layer different textures and shades to create depth and dimension. For example, you can apply a matte shadow as a base, followed by a shimmer shadow on top.
- Blending is Your Best Friend: Harsh lines are a no-no. Use a blending brush to soften the edges of your eyeshadow and create a seamless transition between colors.
- Tap, Don’t Smear: When applying glitter, gently tap it onto your eyelid rather than smearing it. This will prevent fallout and keep the glitter in place.
- Use a Setting Spray: A setting spray will help lock in your makeup and prevent creasing or fading.
- Clean Up Fallout: If you experience glitter fallout, use a piece of tape to gently remove it from your face.
- Experiment! Don’t be afraid to experiment with different colors and techniques to find what works best for you. Makeup is all about having fun and expressing yourself.
V. Troubleshooting: Sparkle SOS!
Uh oh! Things aren’t going according to plan? Don’t panic! Here are some common sparkle snafus and how to fix them:
| Problem | Solution |
|---|---|
| Shadow Creasing: | Use a good eye primer. Set your concealer with a translucent powder. Avoid applying too much product. |
| Glitter Fallout: | Use a glitter glue or primer. Tap, don’t smear. Use a setting spray. Clean up fallout with tape. |
| Uneven Application: | Use a blending brush to smooth out any harsh lines. Layer and blend your shadows gradually. |
| Eyeshadow Fading: | Use a good eye primer. Set your makeup with a setting spray. Reapply eyeshadow throughout the day if necessary. |
| Too Much Sparkle!: | Tone it down by applying a matte shadow on top of the glitter. Use a cotton swab to remove excess glitter. |
VI. Beyond the Basics: Advanced Sparkle Techniques
Ready to become a true sparkle sorceress? Here are some advanced techniques to elevate your eye makeup game:
- Cut Crease with Glitter: Create a defined cut crease using a concealer or eyeshadow primer, then apply glitter to the lid for a dramatic effect.
- Halo Eye with Sparkle: Apply a dark shadow to the inner and outer corners of your eye, leaving the center of the lid open. Apply glitter to the center of the lid to create a halo effect.
- Graphic Liner with Glitter: Create a bold graphic liner using a liquid or gel liner, then apply glitter along the liner for a touch of sparkle.
- Reverse Smokey Eye with Glitter: Apply a dark shadow to your lower lash line and blend it upwards. Apply glitter to the upper lid for a unique twist on the classic smokey eye.
VII. The Grand Finale: Confidence is the Best Sparkle
Ultimately, the most important thing you can wear is confidence. Embrace your inner sparkle goddess, experiment with different looks, and most importantly, have fun! Don’t be afraid to make mistakes – that’s how we learn and grow.
So go forth, my Glamour Gladiators, and conquer the world with your dazzling eye makeup! Remember, a little sparkle can go a long way! ✨
Class dismissed! 🎓 (But the sparkle party never ends!)
For detailed product specifications and purchases, please go to :https://zenamakeup.com/products/glimmer-glow-5-piece-glitter-cream-eyeshadow-stick-set
Leave a Reply