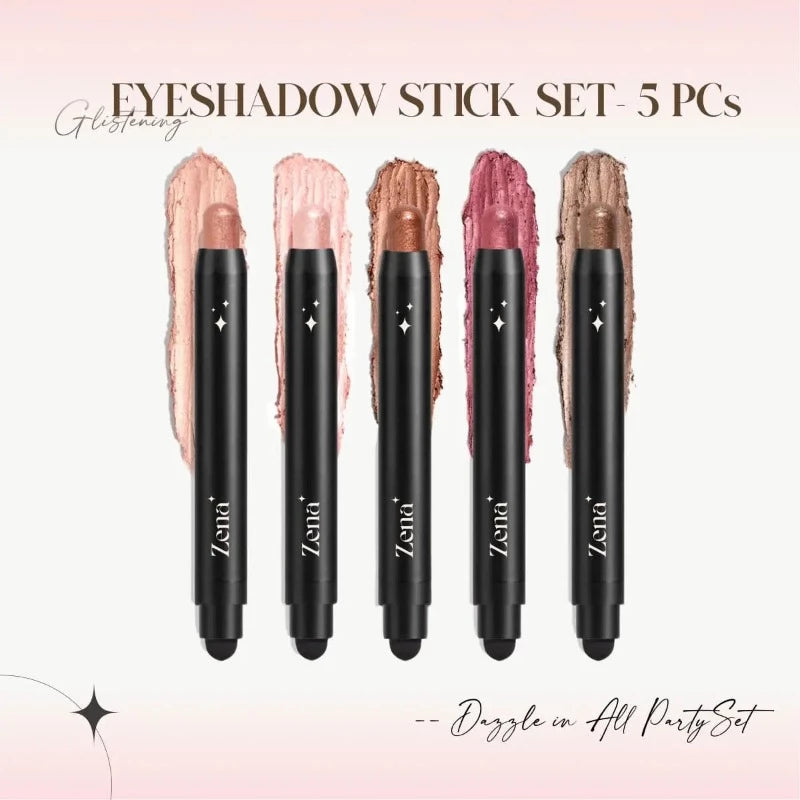
Glitter, Glamour, and Goodness, Oh My! A Beginner’s Guide to Conquering the 5-Piece Glitter Cream Eyeshadow Stick Set
(A Lecture for Aspiring Eye Artists)
Alright, class, settle down, settle down! Today, we’re diving headfirst into the shimmering, sparkling, and sometimes slightly terrifying world of glitter cream eyeshadow sticks! Specifically, we’re addressing the burning question: Is the 5-Piece Glitter Cream Eyeshadow Stick Set suitable for a makeup newbie? The answer, my friends, is a resounding… it depends! But fear not, because by the end of this lecture, you’ll be armed with the knowledge (and maybe a few strategically placed glitter particles) to confidently wield these dazzling tools.
(Lecture Outline: Prepare for Sparkle!)
- The Glitter Cream Eyeshadow Stick: Unveiled! (What are these things, anyway?)
- The Beginner’s Burden (and Benefit!): Why this set might be perfect (or a slight challenge) for you.
- Glitter 101: Application Techniques for the Novice. (Seriously, don’t just swipe and pray.)
- Blending is Your Best Friend: The Key to a Non-Clownish Look. (Learn to love the brush!)
- Color Theory Crash Course: Choosing the Right Shade (and Avoiding Disaster). (Think beyond just ‘pretty’.)
- Set Expectations vs. Reality: What These Sticks CAN and CANNOT Do. (Manage your glitter dreams!)
- Product Recommendations: Beyond the 5-Piece Set. (Expanding your sparkly horizon.)
- Troubleshooting: Common Glitter Cream Eyeshadow Stick Woes (and How to Fix Them!). (We’ve all been there.)
- Maintenance and Storage: Keep Your Glitter Alive! (Don’t let them dry out and die.)
- The Glitter Mindset: Embracing the Sparkle Within (and Without!). (Confidence is key!)
(1. The Glitter Cream Eyeshadow Stick: Unveiled!)
So, what is a glitter cream eyeshadow stick? Imagine a lipstick, but instead of pigment designed for your pout, it’s packed with creamy, often shimmering, color designed for your eyelids. They’re typically housed in a retractable stick, making application seemingly simple and mess-free.
✨ Key Features:
- Creamy Texture: Offers a smooth, blendable base.
- Glitter Infusion: Obviously! The defining characteristic, providing sparkle and dimension.
- Convenient Application: The stick format allows for direct application to the lid.
- Potential for Buildable Coverage: Can be layered for a more intense look.
- Variety of Finishes: From subtle shimmer to full-on disco ball.
Think of it as the lazy girl’s (or guy’s!) shortcut to a glamorous eye look. But, like any shortcut, there are potential pitfalls.
(2. The Beginner’s Burden (and Benefit!): Why this set might be perfect (or a slight challenge) for you.)
Now, the million-dollar question: Is a 5-piece glitter cream eyeshadow stick set a good choice for a beginner? Let’s weigh the pros and cons:
🎉 Pros for the Beginner:
- Ease of Application: The stick format is inherently user-friendly. No brushes required (initially!). Just swipe and go (sort of).
- Affordability: 5 for the price of… well, depends on the brand! But sets often offer a better value than individual sticks.
- Color Variety: A set allows you to experiment with different shades and find what suits you. Think of it as a glittery tasting menu.
- Travel-Friendly: Compact and portable, perfect for on-the-go glam. Imagine touch-ups on a long flight!
- Low Commitment: If you decide glitter cream eyeshadow sticks aren’t your thing, you haven’t invested a fortune.
😬 Cons for the Beginner:
- Blending Challenges: Cream shadows, particularly glittery ones, can be tricky to blend seamlessly. It requires practice and the right tools (more on that later!).
- Potential for Creasing: Cream formulas are more prone to creasing than powder shadows, especially on oily lids. Primer is your new best friend!
- Color Intensity: Some glitter cream eyeshadow sticks are very pigmented. A heavy hand can lead to an overly dramatic (or clownish) look.
- Glitter Fallout: Glitter has a mind of its own. Expect some stray sparkles on your cheeks, clothes, and possibly your pet hamster.
- Limited Control: The stick format offers less precision than a brush, which can be a challenge for intricate eye looks.
⚖️ The Verdict:
Ultimately, the suitability of a 5-piece glitter cream eyeshadow stick set for a beginner depends on their willingness to learn and practice. It’s a great starting point, but be prepared to invest time in mastering the application and blending techniques.
(3. Glitter 101: Application Techniques for the Novice)
Okay, so you’ve got your glitter sticks. Now what? Here’s a step-by-step guide to applying them like a pro (or at least like someone who knows what they’re doing):
-
Prep Your Lids: This is CRUCIAL. Apply an eyeshadow primer to create a smooth, even base and prevent creasing. Think of it as the foundation for your glitter masterpiece.
- Pro Tip: Choose a primer specifically designed for cream shadows for best results.
-
Apply the Color:
- Option A: Direct Application: Gently swipe the eyeshadow stick across your eyelid, starting close to the lash line. You can cover the entire lid or just a portion, depending on the look you’re going for.
- Option B: Finger Application: Swipe the stick onto your fingertip and then pat the color onto your lid. This allows for more controlled placement and prevents dragging.
-
Blend, Blend, Blend! (This is where the magic happens.) Use a blending brush (synthetic bristles are best for cream formulas) to soften the edges and create a seamless transition. More on blending in the next section!
-
Build the Intensity: If you want a more dramatic look, layer the color. Apply a second coat after the first one has dried slightly.
-
Clean Up: Use a cotton swab dipped in makeup remover to clean up any stray glitter or smudges.
🚫 Common Mistakes to Avoid:
- Applying Too Much Product: Start with a thin layer and build up the intensity gradually. It’s easier to add more than to remove excess.
- Dragging the Stick Across Your Lid: This can cause tugging and irritation, especially around the delicate eye area. Use a gentle patting motion instead.
- Forgetting to Blend: Unblended glitter cream eyeshadow looks patchy and uneven. Blend until your arm feels like it’s going to fall off! (Okay, maybe not that much, but you get the idea.)
(4. Blending is Your Best Friend: The Key to a Non-Clownish Look)
Blending is the unsung hero of any eyeshadow look, but it’s especially crucial when working with cream formulas. Here’s why and how:
Why Blending Matters:
- Creates a Seamless Transition: Blending eliminates harsh lines and creates a smooth, gradient effect.
- Diffuses the Glitter: Blending helps to distribute the glitter evenly, preventing it from looking chunky or overwhelming.
- Prevents Patchiness: Blending ensures that the color is evenly distributed across the lid, avoiding a patchy or uneven appearance.
How to Blend Like a Pro (or at Least Like Someone Who Tries):
-
Choose the Right Brush: A fluffy blending brush with synthetic bristles is ideal for cream shadows. Avoid brushes that are too dense or stiff.
-
Choose the Right Brush: A fluffy blending brush with synthetic bristles is ideal for cream shadows. Avoid brushes that are too dense or stiff.
- Brush Recommendation: A tapered blending brush allows for precise application and effortless blending in the crease.
-
Use Small, Circular Motions: Gently swirl the brush in small, circular motions along the edges of the eyeshadow.
-
Blend Outwards: Focus on blending the color outwards, towards the crease and brow bone.
-
Keep it Moving: Don’t stop blending until you’re satisfied with the result. It may take a few minutes to achieve a seamless blend.
-
Add a Transition Shade: If you’re using multiple colors, apply a matte transition shade in the crease to help blend the colors together. This will create a more natural and polished look.
💡 Pro Tip: Clean your blending brush regularly to prevent product buildup and ensure a smooth blend.
(5. Color Theory Crash Course: Choosing the Right Shade (and Avoiding Disaster))
Color theory can seem intimidating, but it’s essential for choosing eyeshadow shades that complement your skin tone and eye color. Here’s a simplified guide:
Understanding Your Skin Tone:
- Warm: Yellow or golden undertones.
- Cool: Pink or blue undertones.
- Neutral: A balance of warm and cool undertones.
Matching Eyeshadow to Eye Color:
- Blue Eyes: Warm shades like bronze, copper, gold, and peach will make your blue eyes pop.
- Green Eyes: Purple, plum, and brown shades will enhance the green in your eyes.
- Brown Eyes: Lucky you! Brown eyes can wear almost any color. Experiment with different shades to find what you like best.
- Hazel Eyes: Hazel eyes have a mix of colors, so you can choose eyeshadow shades that will bring out specific tones. Purple will emphasize the green, while gold will highlight the brown.
Choosing Colors for Your Skin Tone:
- Warm Skin Tone: Gold, bronze, copper, and warm browns will look beautiful on warm skin tones.
- Cool Skin Tone: Silver, rose gold, cool browns, and jewel tones like sapphire and emerald will complement cool skin tones.
- Neutral Skin Tone: You can wear almost any color! Experiment with different shades to find what you like best.
🚫 Colors to Avoid (Generally):
- Matching Your Eyeshadow to Your Eye Color: This can make your eyes look flat and one-dimensional.
- Using Too Many Colors: Stick to a maximum of three or four colors to avoid a messy or overwhelming look.
- Ignoring Your Undertones: Choosing colors that clash with your undertones can make your skin look dull or sallow.
(6. Set Expectations vs. Reality: What These Sticks CAN and CANNOT Do)
Glitter cream eyeshadow sticks are amazing, but they’re not miracle workers. It’s important to have realistic expectations.
✅ What They CAN Do:
- Add a Pop of Shimmer and Sparkle: They’re perfect for adding a touch of glam to your everyday look.
- Create a Quick and Easy Eye Look: They’re ideal for busy mornings when you don’t have time for a full eyeshadow routine.
- Be Used as an Eyeshadow Base: They can be used as a base for powder eyeshadows to enhance their color and longevity.
- Create a Smokey Eye (with Practice): With some blending and layering, you can create a stunning smokey eye using glitter cream eyeshadow sticks.
❌ What They CANNOT Do:
- Replace a Full Eyeshadow Palette: They’re not as versatile as a palette with multiple shades and finishes.
- Stay Perfect All Day Without Touch-Ups: Cream formulas are prone to creasing, so you may need to touch up your eyeshadow throughout the day.
- Magically Blend Themselves: Blending is essential for a seamless look.
- Eliminate Glitter Fallout Completely: Glitter is glitter. It’s going to stray. Embrace it!
(7. Product Recommendations: Beyond the 5-Piece Set)
Once you’ve mastered the basics, you might want to expand your glitter cream eyeshadow stick collection. Here are some other products to consider:
Product Category Recommendation Why? High-End Stick Laura Mercier Caviar Stick Eye Colour Known for its creamy, blendable formula and long-lasting wear. Available in a variety of shades, including glittery options. Drugstore Stick NYX Professional Makeup Jumbo Eye Pencil Affordable and versatile. Can be used as an eyeshadow, eyeliner, or eyeshadow base. Loose Glitter (for layering) Lemonhead.LA Spacepaste Intensely sparkly and long-lasting. Perfect for adding extra glitter to your look. Eyeshadow Primer Urban Decay Eyeshadow Primer Potion Helps to prevent creasing and extend the wear of your eyeshadow. Blending Brush Morphe M433 Pro Firm Blending Fluff Brush A fluffy blending brush that’s perfect for blending cream shadows. Makeup Remover Wipes Neutrogena Makeup Remover Cleansing Towelettes Essential for cleaning up stray glitter and removing your makeup at the end of the day. (8. Troubleshooting: Common Glitter Cream Eyeshadow Stick Woes (and How to Fix Them!))
Even the most experienced makeup artists encounter problems. Here are some common glitter cream eyeshadow stick woes and how to fix them:
Problem Solution Creasing Use an eyeshadow primer! Set your eyeshadow with a translucent powder. Avoid applying too much product. Patchy Application Apply the eyeshadow in thin layers. Blend, blend, blend! Use a damp sponge to pat the eyeshadow into the skin. Glitter Fallout Apply a glitter glue or primer to your eyelid before applying the eyeshadow. Use a damp brush to pick up and apply the glitter. Gently pat the glitter onto your lid instead of swiping. Use a piece of tape to remove any stray glitter from your face. Dryness If your glitter cream eyeshadow stick is dry, try warming it up slightly by rubbing it between your fingers. You can also add a drop of eye drops to the stick to rehydrate it. Uneven Blending Use a clean blending brush. Apply a transition shade in the crease to help blend the colors together. Blend until your arm feels like it’s going to fall off! (Just kidding… mostly.) Too Much Glitter Use a cotton swab to gently remove some of the glitter. Apply a matte eyeshadow over the glitter to tone it down. Embrace the sparkle! (9. Maintenance and Storage: Keep Your Glitter Alive!)
Proper storage and maintenance are essential for keeping your glitter cream eyeshadow sticks in good condition.
- Store in a Cool, Dry Place: Avoid storing your eyeshadow sticks in direct sunlight or in a humid environment. This can cause them to melt or dry out.
- Close the Lid Tightly: Always close the lid tightly after each use to prevent the eyeshadow from drying out.
- Clean the Tip Regularly: Use a tissue to wipe off any excess product from the tip of the stick. This will prevent it from becoming clogged.
- Sharpen When Necessary: If your eyeshadow stick has a sharpenable tip, sharpen it regularly to maintain a precise point.
- Don’t Share Your Makeup: Sharing makeup can spread bacteria and cause infections.
(10. The Glitter Mindset: Embracing the Sparkle Within (and Without!))
Finally, the most important ingredient for success with glitter cream eyeshadow sticks is confidence! Don’t be afraid to experiment, make mistakes, and have fun. Makeup is a form of self-expression, so embrace your inner sparkle and create looks that make you feel good.
🎉 Remember:
- Practice makes perfect.
- There are no rules in makeup.
- Glitter is always a good idea (in moderation, of course).
So go forth, my students, and conquer the world, one sparkly eyelid at a time! Class dismissed! 🌟
For detailed product specifications and purchases, please go to :https://zenamakeup.com/products/glimmer-glow-5-piece-glitter-cream-eyeshadow-stick-set
-
Leave a Reply