Lecture: Dazzling Eyes in Minutes: Mastering the Pigmented Liquid Glitter Cream Eyeshadow Stick
Professor: Professor Sparkle, PhD (Doctor of Dazzle), at your service! 🧙♀️✨
Welcome, future makeup maestros! Are you tired of eyeshadow palettes that look like a geological survey of boring browns? Do you dream of shimmering, dazzling eyes but lack the time (or patience) for a full-blown smoky eye masterpiece? Then you, my friend, have come to the right place! Today, we’re diving deep into the wonderful world of Pigmented Liquid Glitter Cream Eyeshadow Sticks.
Prepare to have your beauty routines revolutionized! We’ll explore everything from the science behind the sparkle to the practical application techniques that will have you looking like a glittery goddess in mere minutes. Buckle up, buttercups, because this is going to be a dazzling ride! 🚀
Course Outline:
- What IS a Pigmented Liquid Glitter Cream Eyeshadow Stick, Anyway? (The Anatomy of Awesome)
- The Science of Sparkle: Ingredient Breakdown and Choosing Wisely
- Color Theory for Glitter Gods and Goddesses: Selecting Your Perfect Shade
- Application 101: From Novice to Ninja in 5 Minutes Flat!
- Troubleshooting: Common Glitter Gripes and How to Fix Them!
- Beyond the Lid: Creative Ways to Use Your Glitter Stick
- Maintenance and Storage: Keeping Your Sparkle Alive!
- Product Recommendations: My Personal Glitter Hall of Fame
- Q&A: Ask Professor Sparkle Anything! (Almost)
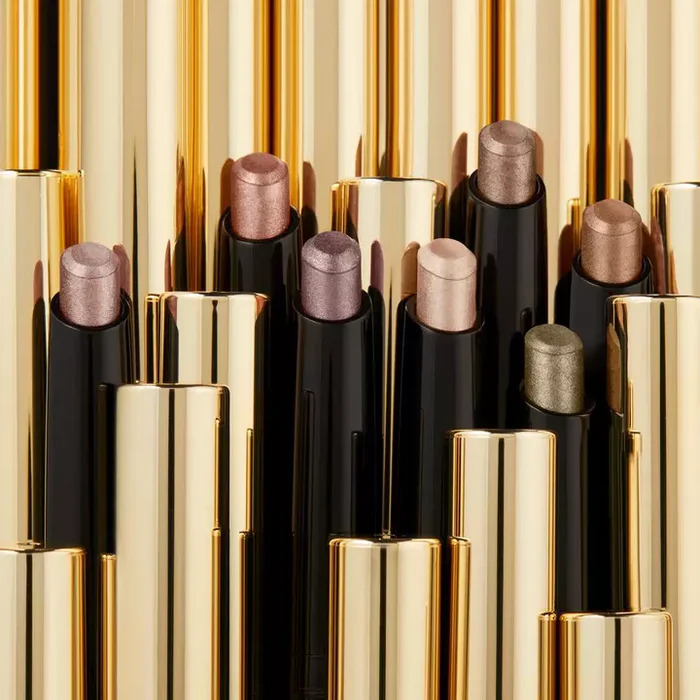
1. What IS a Pigmented Liquid Glitter Cream Eyeshadow Stick, Anyway? (The Anatomy of Awesome)
Let’s face it, beauty product names can be ridiculously long and confusing. But fear not! In essence, a Pigmented Liquid Glitter Cream Eyeshadow Stick is exactly what it sounds like:
- Pigmented: It delivers a vibrant, noticeable color. We’re not talking sheer washes of barely-there tint here. We’re talking BAM! color payoff. 💥
- Liquid Glitter: This isn’t your grandma’s chunky, scratchy glitter. This is a finely milled, suspended-in-liquid glitter that catches the light beautifully without feeling like sandpaper on your eyelids. Think sophisticated sparkle, not disco ball disaster. 💃
- Cream: The creamy base is key to smooth application, blendability, and staying power. It prevents the glitter from migrating all over your face like a rogue glitter bomb. 💣
- Eyeshadow Stick: The stick format is what makes this product so incredibly convenient. It’s portable, easy to apply directly to the lid, and requires minimal blending. It’s basically makeup for lazy geniuses (like us!). 🧠
Think of it as the superhero of eyeshadows: quick, effective, and glamorous!
Here’s a handy visual breakdown:
| Feature | Description | Benefit |
|---|---|---|
| Pigment | Provides a rich, opaque color base. | Creates a noticeable and impactful eye look. No need for layers and layers of product! |
| Liquid Glitter | Finely milled glitter particles suspended in a liquid formula. | Delivers a smooth, even sparkle without feeling gritty or irritating. Catches the light beautifully for a multidimensional effect. |
| Cream Base | A creamy formula that acts as the glue holding the pigment and glitter together. | Allows for smooth application, easy blending, and long-lasting wear. Prevents glitter fallout and creasing. |
| Stick Format | A convenient, twist-up or crayon-like applicator. | Makes application quick, easy, and precise. Perfect for on-the-go touch-ups and beginners. No brushes required! |
2. The Science of Sparkle: Ingredient Breakdown and Choosing Wisely
Alright, let’s get a little nerdy. Knowing what’s in your glitter stick is crucial for both your skin’s health and the overall performance of the product. Here’s a look at some key ingredients to consider:
-
Base Ingredients (The Creamy Foundation): Look for ingredients like silicones (dimethicone, cyclopentasiloxane), emollients (caprylic/capric triglyceride, isononyl isononanoate), and waxes (synthetic beeswax, carnauba wax). These create the smooth, blendable texture and help the product adhere to your skin. Avoid products with high alcohol content, which can be drying.
-
Pigments (The Color Creators): Pigments are what give the eyeshadow its color. Common pigments include iron oxides, titanium dioxide, and ultramarines. The quality and concentration of these pigments determine the intensity and longevity of the color.
-
Glitter (The Star of the Show!): This is where things get interesting. Glitter can be made from various materials, including plastic (PET glitter) and natural minerals (mica). Opt for products that use microplastic-free glitter, as PET glitter is harmful to the environment and can be irritating to the eyes. Mica-based glitter is a more sustainable and skin-friendly option. Always check the ingredient list!
-
Binders and Stabilizers (The Team Players): These ingredients help hold everything together and prevent the product from separating or drying out. Common examples include polymers, silicones, and preservatives.
Choosing Wisely: The Key Considerations
- Ingredient List: Read it! Know what you’re putting on your skin, especially around your delicate eye area.
- Texture: The cream base should be smooth, not sticky or greasy. It should glide effortlessly across the lid without tugging.
- Pigmentation: Look for a product that delivers a strong color payoff with minimal effort. Swatch it on your hand to test the pigmentation before applying it to your eyes.
- Glitter Particle Size: Finer glitter particles tend to be more flattering and less irritating than larger, chunkier glitter.
- Staying Power: A good glitter stick should last for several hours without creasing, fading, or transferring.
- Ethical Considerations: Look for brands that are cruelty-free and use ethically sourced ingredients.
Table of Ingredient Good vs. Bad:
| Ingredient Category | Good (Generally) | Bad (Potentially) | Why? |
|---|---|---|---|
| Base | Dimethicone, Caprylic Triglyceride | Alcohol Denat, Mineral Oil | Good bases are smooth, hydrating. Bad bases can be drying or pore-clogging. |
| Pigments | Iron Oxides, Mica | Dyes with high potential for irritation | Good pigments are stable and safe. Some dyes can cause allergic reactions in sensitive individuals. |
| Glitter | Mica-based Glitter | PET Glitter (Microplastic Glitter) | Mica is natural and biodegradable. PET glitter is environmentally harmful and can be irritating. |
| Preservatives | Phenoxyethanol, Ethylhexylglycerin | Parabens (controversial) | Preservatives prevent bacterial growth. Parabens are being phased out due to potential health concerns. |
3. Color Theory for Glitter Gods and Goddesses: Selecting Your Perfect Shade
Choosing the right glitter eyeshadow color can make or break your look. Fear not, color theory isn’t as intimidating as it sounds! Here’s a simplified guide to help you find your perfect match:
-
Eye Color Harmony:
- Blue Eyes: Warm tones like gold, bronze, copper, and peach will make your blue eyes pop. Don’t be afraid to experiment with contrasting colors like burnt orange or burgundy.
- Green Eyes: Purple, plum, mauve, and rose gold shades will enhance the green in your eyes. Earthy tones like brown, olive, and khaki also work well.
- Brown Eyes: You lucky ducks! Brown eyes can pull off almost any color. Experiment with jewel tones like emerald green, sapphire blue, and amethyst purple. Gold and bronze will also make your brown eyes sparkle.
- Hazel Eyes: Hazel eyes are chameleons, shifting between green and brown. Experiment with colors that bring out the green (purples, greens) or brown (browns, golds) in your eyes.
-
Skin Tone Considerations:
- Fair Skin: Lighter shades like champagne, rose gold, and light peach will complement fair skin without looking too harsh. Avoid overly dark or intense colors.
- Medium Skin: You have a wide range of options! Gold, bronze, copper, and jewel tones will all look stunning on medium skin.
- Dark Skin: Rich, saturated colors like emerald green, sapphire blue, and ruby red will look gorgeous on dark skin. Gold and bronze will also add a beautiful warmth.
-
Undertones: Determine whether you have warm (yellow/golden), cool (pink/blue), or neutral undertones. Choose colors that complement your undertones.
- Warm Undertones: Gold, bronze, copper, and warm-toned browns will look best.
- Cool Undertones: Silver, icy blue, purple, and cool-toned browns will look best.
- Neutral Undertones: You can wear almost anything!
Don’t be afraid to experiment! Makeup is all about having fun and expressing yourself. Try different colors and see what makes you feel confident and beautiful. ✨
Example Color Palette Table:
| Eye Color | Skin Tone | Undertone | Recommended Glitter Shades |
|---|---|---|---|
| Blue | Fair | Cool | Icy Silver, Light Pink, Champagne Gold |
| Green | Medium | Warm | Bronze, Rose Gold, Plum |
| Brown | Dark | Neutral | Emerald Green, Sapphire Blue, Gold |
| Hazel | Medium | Cool | Mauve, Purple, Olive Green |
4. Application 101: From Novice to Ninja in 5 Minutes Flat!
Alright, let’s get down to business! Here’s a step-by-step guide to applying your glitter stick like a pro:
- Prep Your Lids: Start with a clean, dry eyelid. If you have oily lids, apply an eyeshadow primer to prevent creasing and ensure long-lasting wear.
- Apply the Glitter Stick: Gently swipe the glitter stick across your eyelid, close to the lash line. You can apply it all over the lid or just in the center for a pop of sparkle.
- Blend (Optional): Use your finger or a soft eyeshadow brush to blend the edges of the glitter stick. This will create a seamless transition and prevent harsh lines. A little goes a long way, so start with a small amount and build up the intensity as needed.
- Layer (Optional): For a more intense glitter effect, apply a second layer of the glitter stick.
- Clean Up: Use a cotton swab dipped in makeup remover to clean up any stray glitter or smudges.
- Complete Your Look: Apply mascara and eyeliner (if desired) to complete your dazzling eye look.
Pro Tips for Application Perfection:
- Start Small: It’s easier to add more glitter than to remove it. Start with a small amount and build up the intensity as needed.
- Use Your Finger: Your finger is your best blending tool! The warmth of your finger will help to melt the product into your skin for a seamless finish.
- Pat, Don’t Rub: When blending, gently pat the product into your skin rather than rubbing it. This will prevent glitter fallout and ensure even coverage.
- Set with Spray (Optional): For extra long-lasting wear, set your eyeshadow with a setting spray.
Visual Guide to Application
(Imagine icons or simple drawings here – I can’t provide actual images!):
- (Icon: Clean Eyelid) Clean eyelid, ready for primer.
- (Icon: Eyeshadow Primer) Apply eyeshadow primer.
- (Icon: Eyeshadow Stick) Swipe glitter stick across eyelid.
- (Icon: Finger) Blend edges with finger.
- (Icon: Cotton Swab) Clean up any stray glitter.
- (Icon: Mascara) Apply mascara.
- (Icon: Sparkly Eye) Dazzling finished eye!
5. Troubleshooting: Common Glitter Gripes and How to Fix Them!
Even the best glitter stick can sometimes misbehave. Here are some common problems and how to solve them:
- Glitter Fallout:
- Cause: Poor quality glitter, dry skin, excessive application.
- Solution: Choose a glitter stick with finely milled glitter and a creamy base. Apply a hydrating moisturizer before applying your makeup. Use a light hand when applying the glitter stick. Set your eyeshadow with a setting spray.
- Creasing:
- Cause: Oily eyelids, excessive product application, lack of primer.
- Solution: Apply an eyeshadow primer before applying your makeup. Use a blotting paper to remove excess oil from your eyelids throughout the day. Avoid applying too much product.
- Fading:
- Cause: Poor quality glitter, dry skin, lack of primer.
- Solution: Choose a glitter stick with long-lasting pigmentation. Apply a hydrating moisturizer before applying your makeup. Use an eyeshadow primer. Set your eyeshadow with a setting spray.
- Irritation:
- Cause: Sensitive skin, allergic reaction to ingredients, poor quality glitter.
- Solution: Choose a glitter stick with hypoallergenic ingredients. Patch test the product on a small area of your skin before applying it to your eyelids. Avoid using glitter sticks with large, chunky glitter. If irritation occurs, discontinue use immediately.
Table of Troubleshooting Tips:
| Problem | Cause | Solution |
|---|---|---|
| Glitter Fallout | Poor quality, dry skin, over-application | Choose high-quality, creamy formula, moisturize, light application, setting spray |
| Creasing | Oily lids, over-application, no primer | Use primer, blot excess oil, avoid heavy application |
| Fading | Poor quality, dry skin, no primer | Choose long-lasting formula, moisturize, use primer, setting spray |
| Irritation | Sensitivity, allergies, poor quality | Choose hypoallergenic products, patch test, avoid chunky glitter, discontinue use if irritation occurs |
6. Beyond the Lid: Creative Ways to Use Your Glitter Stick
Don’t limit your glitter stick to just your eyelids! Here are some creative ways to incorporate it into your makeup routine:
- Inner Corner Highlight: Apply a small amount of glitter stick to the inner corner of your eyes to brighten your eyes and make them appear larger.
- Eyeliner: Use a thin brush to apply the glitter stick as eyeliner. This is a fun and festive way to add some sparkle to your everyday look.
- Brow Bone Highlight: Apply a small amount of glitter stick to your brow bone to highlight your brows and create a lifted effect.
- Lip Topper: Apply a small amount of glitter stick to the center of your lips for a dazzling lip look. (Make sure the formula is lip-safe!)
- Body Highlight: Apply a small amount of glitter stick to your collarbones, shoulders, or décolletage for a subtle shimmer. (Again, ensure it’s skin-safe!)
Remember to always use a light hand when applying glitter to areas other than your eyelids.
7. Maintenance and Storage: Keeping Your Sparkle Alive!
Proper maintenance and storage will help prolong the life of your glitter stick and ensure that it performs at its best.
- Close the Lid Tightly: Always close the lid tightly after each use to prevent the product from drying out.
- Store in a Cool, Dry Place: Avoid storing your glitter stick in direct sunlight or in a humid environment, as this can cause the product to melt or degrade.
- Clean the Tip Regularly: Use a tissue or a cotton swab to clean the tip of the glitter stick regularly to remove any excess product or debris.
- Sharpen (If Applicable): If your glitter stick is a crayon-style pencil, sharpen it regularly to maintain a sharp point for precise application.
- Check the Expiration Date: Most makeup products have an expiration date. Check the packaging for the expiration date and discard the product if it has expired.
8. Product Recommendations: My Personal Glitter Hall of Fame
(Disclaimer: These are just suggestions based on personal experience and research. Individual results may vary.)
This is where I would list several products, giving a brief description of each, its pros and cons, and a price range. For example:
- Stila Glitter & Glow Liquid Eyeshadow: (Description, Pros, Cons, Price Range)
- ColourPop Super Shock Shadow: (Description, Pros, Cons, Price Range)
- NYX Professional Makeup Jumbo Eye Pencil: (Description, Pros, Cons, Price Range – a good budget option!)
(Remember to replace these with actual product recommendations you believe are good and safe!)
9. Q&A: Ask Professor Sparkle Anything! (Almost)
Alright, my dazzling darlings, now’s your chance to pick my brain! Ask me anything about pigmented liquid glitter cream eyeshadow sticks, application techniques, color theory, or anything else related to the wonderful world of sparkle! (Please keep it PG, though. Professor Sparkle has standards!)
(This section would be interactive in a real lecture. I can’t provide that here, but imagine a lively back-and-forth between the professor and the students!)
Concluding Remarks:
Congratulations, you’ve officially completed Glitter Stick 101! You are now equipped with the knowledge and skills to create dazzling eye looks in minutes. Remember to experiment, have fun, and most importantly, shine bright like a diamond! 💎✨
Now go forth and bedazzle the world! Class dismissed! 👩🏫💖
For detailed product specifications and purchases, please go to :https://zenamakeup.com/products/liquid-glitter-waterproof-eyeshadow-stick
Leave a Reply