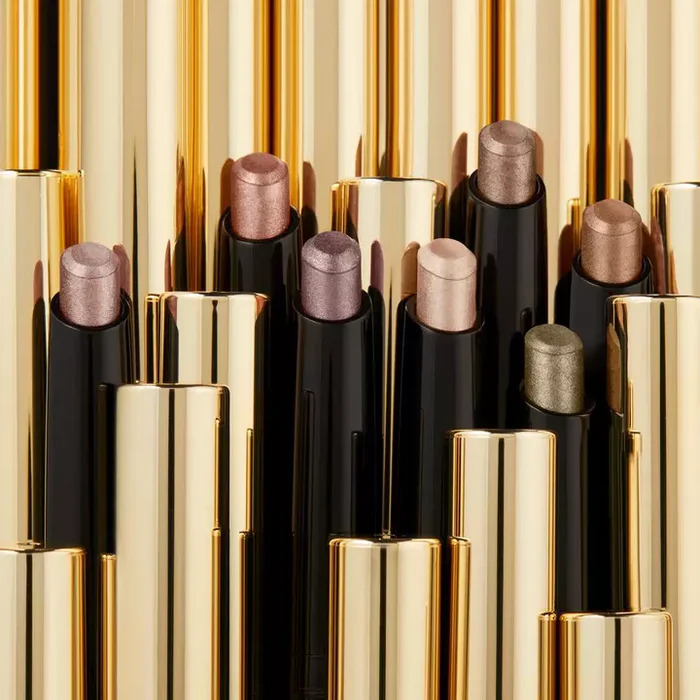
Deluxe Liquid Glitter Cream Eyeshadow Stick: A Deep Dive into Opaque, Sparkly Goodness ✨
Welcome, glitterati, to Glitter Application 101! Forget your sticky pots of loose glitter that end up everywhere but your eyelids (and your significant other’s hair, much to their chagrin). We’re diving headfirst into the glorious, mess-free world of Deluxe Liquid Glitter Cream Eyeshadow Sticks! 🤩
This isn’t just a makeup tutorial; it’s a journey, a sparkly pilgrimage, a quest for the ultimate in dazzling eye looks. Consider me your glitter guru, your shimmery sensei, here to guide you from glitter newbie to sparkling savant.
Course Outline:
- Module 1: The Glitter Genesis – What IS This Magical Stick? (Composition, Benefits, and Why We’re All Obsessed)
- Module 2: The Color Wheel of Wonder – Choosing the Perfect Shade for Your Sparkle Saga. (Skin Tones, Eye Colors, and Occasion Considerations)
- Module 3: Application Alchemy – From Swipe to Slay! (The Step-by-Step Guide to Opaque Glitter Perfection)
- Module 4: Troubleshooting the Twinkle – Common Mistakes and How to Avoid a Glitter-tastrophe! (Creasing, Fading, and the dreaded Glitter Fall-Out)
- Module 5: Beyond the Lid – Creative Glitter Looks & Hacks. (Glitter Cut Creases, Glitter Eyeliner, and More!)
- Module 6: Glitter Aftercare – Removal & Storage for a Long and Sparkly Life. (Gentle Removal Techniques and Keeping Your Stick Pristine)
- Final Exam: (Just kidding… Mostly. Prepare to sparkle!)
Module 1: The Glitter Genesis – What IS This Magical Stick?
Let’s face it, glitter has a reputation. It’s the confetti of the craft world, known for its relentless pursuit of world domination, clinging to every surface imaginable. But the Deluxe Liquid Glitter Cream Eyeshadow Stick? This is glitter, reformed. It’s glitter, grown up. It’s glitter…with boundaries!
What exactly is it?
Think of it as a creamy, pigment-packed eyeshadow base infused with a generous helping of ultra-fine glitter particles. It’s typically housed in a convenient, twist-up stick format, making application a breeze. No more digging around in messy pots or accidentally inhaling a cloud of sparkly death! ☠️
Composition Breakdown (The Not-So-Secret Sauce):
| Ingredient Category | Typical Function | Notes |
|---|---|---|
| Base Emollients | Provide a smooth, creamy texture for easy application and blendability. Common ingredients include silicones (like dimethicone), esters, and waxes. | Look for non-comedogenic options if you have acne-prone skin. |
| Pigments | Deliver the base color of the eyeshadow. This can include both natural and synthetic pigments. | Pigment quality is crucial for color payoff and longevity. |
| Glitter Particles | The star of the show! Typically made from finely milled plastic (often PET), these particles create the shimmering, reflective effect. | Size and shape of the glitter particles impact the overall look. Finer glitter creates a smoother, more subtle shimmer, while larger glitter provides a bolder, more textured effect. |
| Binders | Help the pigments and glitter adhere to the skin and prevent fall-out. Common binders include polymers and film formers. | Look for formulas with good staying power. |
| Preservatives | Prevent bacterial growth and extend the shelf life of the product. | Essential for hygiene! |
| Solvents | Help to dissolve and disperse the other ingredients, creating a smooth, even consistency. Water and volatile silicones are common solvents. | These evaporate after application, leaving behind the pigments and glitter. |
Why We’re Obsessed (The Benefits of Glitter Stick Life):
- Effortless Application: Swipe, blend, repeat! It’s that easy. Even those with shaky hands (like yours truly after a triple espresso) can achieve a flawless glitter look.
- Mess-Free: Say goodbye to glitter explosions! The stick format keeps everything contained and prevents that dreaded glitter migration. Hallelujah! 🙌
- Intense Color Payoff: Deluxe formulas are usually packed with pigment, delivering vibrant, opaque color in a single swipe.
- Long-Lasting Wear: Many formulas are designed to resist creasing and fading, keeping your sparkle alive all day (or night!) long.
- Travel-Friendly: Toss it in your makeup bag and go! No spills, no fuss. Perfect for on-the-go glam. ✈️
Module 2: The Color Wheel of Wonder – Choosing the Perfect Shade for Your Sparkle Saga.
Choosing the right glitter shade is like finding the perfect pair of shoes – it can make or break your entire look. Let’s explore the art of color selection, taking into account your skin tone, eye color, and the occasion.
Skin Tone Considerations:
- Fair Skin: Embrace lighter, cooler tones like silver, champagne, pale pink, and icy blue. These shades will complement your complexion without overpowering it. Avoid overly dark or warm tones that can make you look washed out.
- Medium Skin: You’re in luck! You can rock a wide range of shades, from golds and bronzes to jewel tones like emerald green and sapphire blue. Experiment and have fun!
- Olive Skin: Warm, golden tones like bronze, copper, and olive green will enhance your natural radiance. You can also pull off more vibrant hues like fuchsia and coral.
- Dark Skin: Rich, saturated colors like gold, bronze, purple, and sapphire blue look absolutely stunning on dark skin. Don’t be afraid to go bold! A deep emerald green is also a showstopper.
Eye Color Harmony:
- Blue Eyes: Warm shades like bronze, gold, copper, and peach will make your blue eyes pop. Contrasting colors like orange-toned golds are particularly effective.
- Green Eyes: Purple, plum, and bronze shades will bring out the green in your eyes. Rose gold is also a fantastic choice.
- Brown Eyes: Lucky you! Brown eyes are incredibly versatile. Experiment with a wide range of colors, from jewel tones to metallics. Gold and bronze are always winners.
- Hazel Eyes: Highlight the different flecks of color in your hazel eyes with shades like bronze, gold, olive green, and purple.
Occasion Matters (The Glitter Etiquette Guide):
- Everyday Glam: Opt for subtle, neutral shades like champagne, light gold, or a sheer wash of glitter.
- Night Out: Amp up the drama with bolder shades like deep gold, emerald green, or sapphire blue. Don’t be afraid to layer multiple shades for a multi-dimensional effect.
- Special Occasions (Weddings, Parties): Go all out with glitter! Choose shades that complement your outfit and overall look. Think rose gold for a romantic vibe, or silver for a touch of elegance.
- Business Casual (Yes, really!): A very subtle wash of champagne or light gold glitter can add a touch of sophistication without being over the top. Proceed with caution, and maybe test the waters with your HR department first… 😉
Table of Glittery Goodness: Shade Recommendations by Skin Tone and Eye Color:
| Skin Tone | Eye Color | Recommended Glitter Shades |
|---|---|---|
| Fair | Blue | Silver, champagne, light peach, icy blue |
| Fair | Green | Light bronze, rose gold, pale purple |
| Medium | Brown | Gold, bronze, emerald green, sapphire blue, rose gold |
| Medium | Hazel | Bronze, gold, olive green, plum, rose gold |
| Olive | Blue | Gold, bronze, copper, fuchsia |
| Olive | Green | Bronze, copper, olive green, purple |
| Dark | Brown | Gold, bronze, purple, sapphire blue, emerald green |
| Dark | Hazel | Gold, bronze, purple, sapphire blue, deep olive green |
Module 3: Application Alchemy – From Swipe to Slay! (The Step-by-Step Guide to Opaque Glitter Perfection)
Alright, glitter gladiators, it’s time to get our sparkle on! Follow these steps for a flawless, opaque glitter application that will turn heads and leave everyone wondering how you achieved such dazzling results.
Step 1: Prep is Key (The Foundation for Flawless Glitter):
- Cleanse and Moisturize: Start with a clean, hydrated base. This will help the glitter adhere better and prevent creasing.
- Eyeshadow Primer (Essential!): Apply a thin layer of eyeshadow primer to your eyelids. This will create a smooth, even surface and help the glitter stay in place all day. Think of it as the glue that holds your glitter dreams together. ✨
- Optional: Base Eyeshadow (for Dimension): If you want to add depth and dimension to your glitter look, apply a matte eyeshadow shade that complements your chosen glitter color. This will create a more nuanced and sophisticated effect.
Step 2: The Swipe and Blend (The Art of Application):
- Direct Application (for Opaque Coverage): Gently swipe the glitter cream eyeshadow stick directly onto your eyelids, starting from the inner corner and working your way outwards. Apply in thin, even layers.
- Blend, Blend, Blend!: Use your finger (for maximum control and warmth) or a synthetic eyeshadow brush to blend the edges of the glitter eyeshadow. Focus on blending the edges into your crease and towards your brow bone.
- Layer for Intensity: For a more opaque and vibrant glitter effect, apply a second (or even third!) layer of the glitter cream eyeshadow, blending in between each layer.
Step 3: Setting the Sparkle (Locking in the Glam):
- Optional: Setting Spray (for Extra Hold): If you’re going to be wearing your glitter look for an extended period, consider setting it with a makeup setting spray. This will help prevent creasing and fading. Just be sure to hold the spray at arm’s length and mist lightly.
Application Tips & Tricks (Secrets of the Glitter Gurus):
- Use a Patting Motion: Instead of swiping back and forth, use a patting motion to apply the glitter. This will help to pack the glitter onto your eyelids and prevent fall-out.
- Warm the Product: If the glitter cream eyeshadow stick feels a little stiff, warm it up slightly by rolling it between your fingers before application. This will make it easier to apply and blend.
- Work in Sections: Apply the glitter to one section of your eyelid at a time, blending as you go. This will prevent the glitter from drying out before you have a chance to blend it.
- Clean Up Any Fall-Out: Use a piece of tape or a clean eyeshadow brush to gently remove any glitter fall-out from your cheeks or under-eye area. Prevention is always better than cure, though!
Module 4: Troubleshooting the Twinkle – Common Mistakes and How to Avoid a Glitter-tastrophe!
Even the most experienced glitter enthusiasts can encounter hiccups along the way. Let’s address some common glitter-related woes and learn how to prevent them.
Problem #1: Creasing
- Cause: Oily eyelids, applying too much product, not using an eyeshadow primer.
- Solution:
- Primer is Your Best Friend: Never skip the eyeshadow primer!
- Blot Away Excess Oil: Use blotting papers to remove excess oil from your eyelids before applying your makeup.
- Apply in Thin Layers: Avoid applying too much glitter cream eyeshadow at once. Build up the color gradually.
- Set with Powder: Lightly dust a translucent setting powder over your eyelids to help absorb excess oil and prevent creasing.
Problem #2: Fading
- Cause: Poor quality glitter formula, not using a primer, exposure to heat or humidity.
- Solution:
- Invest in a Quality Formula: Choose a Deluxe Liquid Glitter Cream Eyeshadow Stick from a reputable brand known for its long-lasting wear.
- Lock it Down with Setting Spray: A makeup setting spray can help to keep your glitter look vibrant and prevent fading.
- Avoid Touching Your Eyes: Resist the urge to touch your eyes throughout the day, as this can transfer the glitter and cause it to fade.
Problem #3: Glitter Fall-Out
- Cause: Loose glitter particles, applying too much product, using the wrong application technique.
- Solution:
- Pat, Don’t Swipe: As mentioned before, use a patting motion to apply the glitter.
- Apply Over a Sticky Base: Applying the glitter over a sticky eyeshadow base or glitter glue can help to prevent fall-out.
- Clean Up with Tape or a Brush: If you do experience fall-out, gently remove it with a piece of tape or a clean eyeshadow brush.
- Do Your Eye Makeup First: If you’re concerned about fall-out, do your eye makeup before applying your foundation and concealer. This will make it easier to clean up any stray glitter particles.
Problem #4: Uneven Application
- Cause: Applying too much pressure, not blending properly, using a dry brush.
- Solution:
- Use a Light Hand: Apply the glitter with a light touch.
- Blend, Blend, Blend!: Take your time and blend the edges of the glitter eyeshadow thoroughly.
- Use a Damp Brush (Optional): Dampening your eyeshadow brush slightly can help to create a smoother, more even application.
Module 5: Beyond the Lid – Creative Glitter Looks & Hacks.
The Deluxe Liquid Glitter Cream Eyeshadow Stick is more than just an eyeshadow – it’s a versatile tool for creating a variety of dazzling looks. Let’s explore some creative applications.
- Glitter Cut Crease: Create a dramatic cut crease and then fill the crease with your favorite glitter shade. This is a show-stopping look that’s perfect for special occasions.
- Glitter Eyeliner: Use a thin eyeliner brush to apply the glitter cream eyeshadow along your lash line for a sparkly take on classic eyeliner.
- Inner Corner Highlight: Add a touch of shimmer to the inner corner of your eyes with a light glitter shade. This will brighten your eyes and make you look more awake.
- Under-Eye Glitter: Apply a thin line of glitter underneath your lower lash line for a subtle yet playful touch.
- Glitter Lips (Proceed with Caution!): Mix a small amount of glitter cream eyeshadow with a clear lip gloss and apply to your lips for a dazzling pout. Important Note: Use only cosmetic-grade glitter and avoid ingesting the product.
Hacks for Glitter Greatness:
- Create Custom Shades: Mix different glitter cream eyeshadow shades together to create your own unique colors.
- Use as a Topper: Apply a thin layer of glitter cream eyeshadow over your favorite matte eyeshadow to add a touch of sparkle.
- Extend the Wear: Apply a glitter primer or glitter glue underneath your glitter cream eyeshadow to extend its wear time.
- DIY Glitter Eyeliner: Use an angled eyeliner brush to pick up product directly from the stick and create a precise glitter wing.
Module 6: Glitter Aftercare – Removal & Storage for a Long and Sparkly Life.
Even the most glamorous glitter look must eventually come to an end. Proper removal and storage are essential for keeping your skin healthy and your glitter stick in tip-top shape.
Gentle Removal Techniques:
- Oil-Based Makeup Remover: Oil-based makeup removers are the most effective for removing glitter. They help to break down the glitter particles and lift them away from your skin.
- Micellar Water: Micellar water is another gentle option for removing glitter. Soak a cotton pad with micellar water and gently swipe it over your eyelids until all the glitter is removed.
- Double Cleansing: For a thorough cleanse, follow up with a gentle facial cleanser to remove any remaining traces of makeup.
- Avoid Harsh Rubbing: Resist the urge to rub your eyes vigorously, as this can irritate your skin and cause glitter particles to get into your eyes.
Storage for Sparkly Longevity:
- Keep it Cool: Store your Deluxe Liquid Glitter Cream Eyeshadow Stick in a cool, dry place away from direct sunlight and heat. This will help to prevent the formula from melting or drying out.
- Close the Lid Tightly: Always make sure to close the lid tightly after each use to prevent the product from drying out.
- Clean the Tip: Periodically clean the tip of the stick with a tissue to remove any excess product or debris.
- Check the Expiration Date: Like all makeup products, glitter cream eyeshadow sticks have an expiration date. Be sure to check the expiration date and discard the product if it’s past its prime.
Final Exam:
Okay, okay, no actual exam! But consider this your final challenge:
Go forth and SPARKLE! Experiment with different shades, techniques, and looks. Embrace the glitter, own the shimmer, and let your inner sparkle shine! Remember, makeup is all about having fun and expressing yourself. So don’t be afraid to get creative and try something new.
And most importantly, remember the golden rule of glitter: a little goes a long way… unless you’re feeling extra fabulous, then go all out! ✨🎉
For detailed product specifications and purchases, please go to :https://zenamakeup.com/products/liquid-glitter-waterproof-eyeshadow-stick
Leave a Reply