Earth Heartbeat: Mastering the Art of Seamless Blending with the 9-Shade Palette
(Professor Chroma, PhD in Chromatic Harmony, takes the stage amidst a flurry of glitter and the faint aroma of sandalwood. She adjusts her oversized spectacles and beams.)
Alright, my aspiring makeup maestros! Welcome, welcome to "Earth Heartbeat: Mastering the Art of Seamless Blending with the 9-Shade Palette!" I see a lot of bright-eyed, bushy-tailed faces, eager to conquer the chromatic cosmos. And that, my dears, is precisely what we shall do!
(Professor Chroma gestures dramatically towards a large screen displaying the Earth Heartbeat 9-Shade Palette.)
Today, we’re diving deep into the heart of this exquisite palette. Forget your anxieties, banish your blending blunders, and prepare to embrace the blissful beauty that awaits when you unlock the secrets to seamless shade transitions. We’re talking eyeshadow that looks like it grew there, organically blending with your very being. No harsh lines, no muddy messes, just pure, unadulterated eye-catching artistry!
(Professor Chroma winks.)
Consider this your chromatic boot camp. We’ll cover everything from understanding the palette’s personality to wielding your brushes like seasoned sorcerers. So, grab your notebooks, your favorite brushes (I prefer squirrel, but a well-trained pony will do in a pinch!), and let’s embark on this colorful quest!
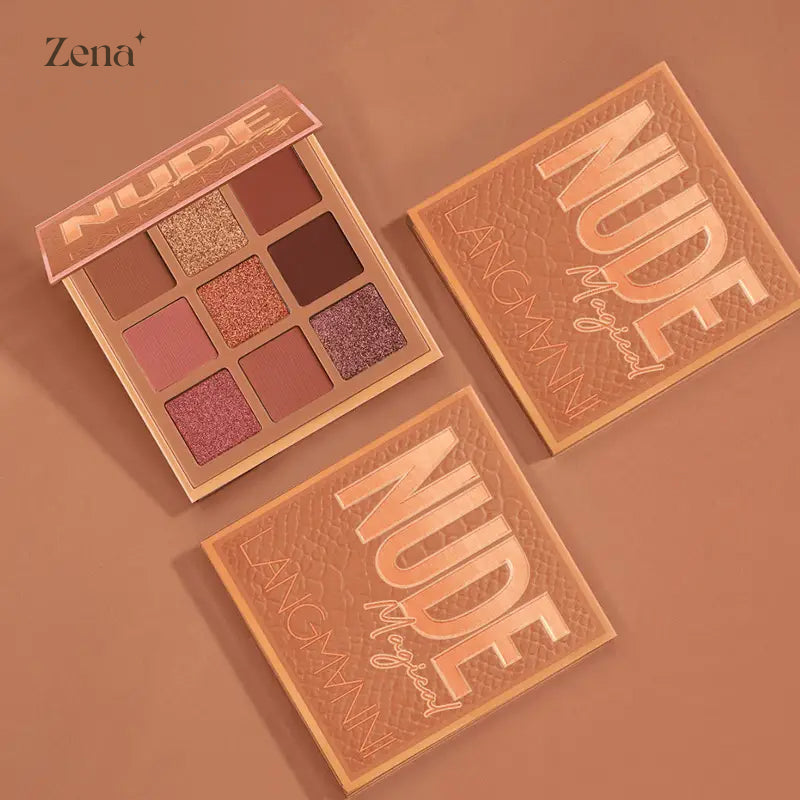
I. Knowing Your Earth Heartbeat:
(Professor Chroma points to the screen again.)
First things first: you can’t conquer what you don’t understand. Let’s get intimate with our Earth Heartbeat palette. Each shade is a precious gem, a note in a symphony of color. Knowing their individual characteristics is crucial for harmonious blending.
(A table appears on the screen, detailing each shade.)
| Shade Name | Color Description | Finish | Undertone | Best For | Blending Notes |
|---|---|---|---|---|---|
| Terra Firma | Matte Rich Brown | Matte | Warm | Crease, Outer Corner, Defining Eyeliner | Excellent base shade, builds easily, blend in small circular motions. |
| Golden Hour | Shimmering Warm Gold | Shimmer | Warm | Lid, Inner Corner Highlight | Press onto the lid for maximum impact, blend edges with a fluffy brush to avoid harsh lines. |
| Desert Rose | Matte Dusty Rose | Matte | Neutral | Crease, Transition Shade, All-Over Lid | A fantastic transition shade, blend generously to create a soft, diffused look. |
| Mystic Meadow | Shimmering Emerald Green with Gold Flecks | Shimmer | Cool | Lid, Lower Lash Line, Accent Color | Apply with a dampened brush for increased intensity, blend carefully to avoid muddying. |
| Canyon Clay | Matte Burnt Orange | Matte | Warm | Crease, Outer Corner, Lower Lash Line | Use a light hand, this shade is highly pigmented. Blend in windshield wiper motions. |
| Moonlit Pearl | Shimmering Ivory | Shimmer | Cool | Inner Corner Highlight, Brow Bone Highlight | Use a light hand to avoid looking too frosty. Blend seamlessly with surrounding shades. |
| Twilight Mauve | Matte Cool-Toned Mauve | Matte | Cool | Crease, Transition Shade, All-Over Lid | Works well with cool-toned looks, blend thoroughly to prevent patchiness. |
| Rustic Copper | Shimmering Reddish-Brown | Shimmer | Warm | Lid, Outer Corner, Accent Color | Beautiful on its own or layered over other shades. Blend to create a smoky effect. |
| Obsidian Night | Matte Deep Black | Matte | Neutral | Outer Corner, Defining Eyeliner, Smoking | Use sparingly! This shade is powerful. Apply with a small, dense brush and blend meticulously. |
(Professor Chroma taps the table with a dramatic flourish.)
Observe! Each shade has a unique personality. Terra Firma is your dependable, grounding brown, while Golden Hour is the life of the party, ready to shimmer and shine. Understanding their individual qualities is the key to orchestrating a beautiful, harmonious blend.
II. The Tools of the Trade: Brushes are Your Best Friends (and Enemies!)
(Professor Chroma holds up a dazzling array of brushes.)
Ah, brushes! The extensions of our artistic souls! But choose wisely, my friends. A bad brush can sabotage even the most expertly crafted eyeshadow look.
(Professor Chroma displays a slide showing different types of brushes.)
Here’s a quick rundown of essential brushes for seamless blending:
- Fluffy Blending Brush: The MVP! Large and fluffy, perfect for diffusing edges and creating a soft, seamless transition. Think of it as your eyeshadow eraser. 🖌️
- Crease Brush: Tapered and slightly denser than a blending brush, ideal for applying and blending color into the crease of your eye. Think precision blending. 📐
- Small Shader Brush: Flat and dense, perfect for packing color onto the lid. Think maximum color payoff. 🎨
- Pencil Brush: Small and precise, ideal for detail work, smudging eyeliner, and applying color to the lower lash line. Think tiny, perfect strokes. ✏️
(Professor Chroma nods sagely.)
Invest in good quality brushes. They’ll last longer, apply product more evenly, and make your blending life infinitely easier. Think of it as an investment in your own artistry!
III. The Blending Bible: Techniques for Seamless Transitions
(Professor Chroma clicks to a slide titled "Blending Techniques.")
Now for the meat of the matter: how do we achieve that elusive, seamless blend? Here are a few tried-and-true techniques:
Now for the meat of the matter: how do we achieve that elusive, seamless blend? Here are a few tried-and-true techniques:
- The Windshield Wiper Technique: This is your go-to technique for blending color into the crease. Hold your brush lightly and sweep it back and forth in a windshield wiper motion. Start with a light touch and build up the color gradually. Remember, you can always add more, but it’s harder to take away! 🚗
- The Circular Motion Technique: Perfect for blending shades on the lid and diffusing edges. Use small, circular motions to gently blend the colors together. Think tiny whirlpools of color. 🌀
- The Tap and Blend Technique: Ideal for shimmer shades. Gently tap the shimmer shade onto the lid with a flat brush, then use a fluffy brush to blend the edges. This prevents fallout and maximizes shimmer payoff. ✨
- The Layering Technique: Start with your lightest shade and gradually layer on darker shades, blending as you go. This allows you to build depth and dimension without creating harsh lines. Think of it as building a chromatic skyscraper, one beautiful layer at a time! 🏢
- The Buffing Technique: Use a clean, fluffy brush to buff out any harsh lines or uneven patches. This is your final step to achieving that airbrushed, seamless finish. Think of it as your magic eraser. 🪄
(Professor Chroma stresses a crucial point.)
The key to successful blending is a light hand and patience. Don’t rush the process. Take your time, blend gradually, and remember to step back and assess your work. A little perspective goes a long way!
IV. Earth Heartbeat Looks: Putting Theory into Practice
(Professor Chroma displays several makeup looks created using the Earth Heartbeat palette.)
Let’s put our newfound knowledge into action! Here are a few looks you can create using the Earth Heartbeat palette:
Look 1: The Desert Sunset: 🌅
- Goal: A warm, sun-kissed look perfect for everyday wear.
- Shades Used: Desert Rose (transition), Canyon Clay (crease), Golden Hour (lid), Moonlit Pearl (inner corner).
- Instructions:
- Apply Desert Rose to the crease as a transition shade. Blend well.
- Apply Canyon Clay to the outer crease and blend into the Desert Rose.
- Pat Golden Hour onto the lid.
- Highlight the inner corner with Moonlit Pearl.
- Blend, blend, blend!
Look 2: The Mystic Forest: 🌲
- Goal: A cool-toned, emerald green look with a touch of shimmer.
- Shades Used: Twilight Mauve (transition), Mystic Meadow (lid), Obsidian Night (outer corner), Moonlit Pearl (inner corner).
- Instructions:
- Apply Twilight Mauve to the crease as a transition shade. Blend well.
- Apply Mystic Meadow to the lid, using a dampened brush for increased intensity.
- Apply Obsidian Night to the outer corner and blend into the Mystic Meadow, creating a smoky effect.
- Highlight the inner corner with Moonlit Pearl.
- Blend, blend, blend!
Look 3: The Rustic Romance: ❤️
- Goal: A warm, romantic look with a touch of copper and brown.
- Shades Used: Terra Firma (crease), Rustic Copper (lid), Canyon Clay (lower lash line), Golden Hour (inner corner).
- Instructions:
- Apply Terra Firma to the crease as a transition shade. Blend well.
- Apply Rustic Copper to the lid.
- Apply Canyon Clay to the lower lash line and blend.
- Highlight the inner corner with Golden Hour.
- Blend, blend, blend!
(Professor Chroma emphasizes.)
These are just starting points! Don’t be afraid to experiment and create your own unique looks. The Earth Heartbeat palette is your playground, so let your creativity run wild!
V. Troubleshooting Blending Blunders: Common Mistakes and How to Fix Them
(Professor Chroma displays a slide titled "Blending SOS.")
Even the most seasoned makeup artists make mistakes. Here are a few common blending blunders and how to fix them:
- Harsh Lines: This is the most common blending problem. Use a clean, fluffy brush to buff out the harsh lines. You can also add a transition shade to soften the edges. Remember, blend, blend, blend!
- Muddy Colors: This happens when you over-blend too many dark shades together. Use a light hand and avoid over-blending. You can also try adding a lighter shade to brighten the area.
- Patchy Application: This can happen if your brush is dirty or if you’re not applying enough product. Make sure your brushes are clean and use a light hand to build up the color gradually.
- Fallout: This is when eyeshadow falls onto your cheeks. Apply your eye makeup before your foundation to avoid ruining your base. You can also use an eyeshadow shield or hold a tissue under your eye while applying eyeshadow.
(Professor Chroma offers some words of encouragement.)
Don’t get discouraged if you make mistakes. Blending is a skill that takes practice. The more you practice, the better you’ll become. And remember, even the most disastrous blending attempts can be salvaged with a little patience and a good blending brush!
VI. The Final Flourish: Tips & Tricks for Blending Like a Pro
(Professor Chroma concludes with a flourish.)
Finally, here are a few extra tips and tricks to help you blend like a pro:
- Use an eyeshadow primer: This will help your eyeshadow adhere to your lid and prevent creasing.
- Set your eyeshadow: Use a setting spray to lock your eyeshadow in place and prevent fading.
- Experiment with different brushes: Find the brushes that work best for you and your eye shape.
- Practice, practice, practice! The more you practice, the better you’ll become at blending.
- Don’t be afraid to try new things! Makeup is all about having fun and expressing yourself.
(Professor Chroma smiles warmly.)
And that, my dear artists, concludes our journey into the heart of the Earth Heartbeat palette! Remember, blending is an art, not a science. Embrace the process, experiment with different techniques, and most importantly, have fun! Now go forth and create some chromatic masterpieces!
(Professor Chroma bows to thunderous applause as glitter rains down from the ceiling.)
For detailed product specifications and purchases, please go to :https://zenamakeup.com/products/earth-heartbeat-9-shade-glimmer-eyeshadow-palette
Leave a Reply