Glitterati 101: Achieving Effortless Glitter Eye Glam with a Deluxe Liquid Glitter Cream Eyeshadow Stick 💫✨
(A Lecture for Aspiring Sparkle Queens and Kings)
Alright, glitter goddesses and glamour gurus, settle in! Professor Sparkle here, ready to deconstruct the art of achieving the perfect, effortlessly stunning glitter eye. Forget the days of loose glitter explosions rivaling a craft store gone rogue! We’re entering a new era of controlled chaos, a realm of refined shimmer, all thanks to the magnificent invention that is the Deluxe Liquid Glitter Cream Eyeshadow Stick. 🤩
Think of this lecture as your shimmering survival guide to navigating the world of glitter application. We’ll cover everything from choosing the right stick to avoiding common glitter-related catastrophes. So grab your coffee (or your champagne, no judgment here!), and let’s get this glitter party started! 🎉
Course Outline:
- Why Liquid Glitter Cream Eyeshadow Sticks are the MVP: Leaving Loose Glitter in the Dust! 💨
- Choosing Your Weapon: Selecting the Perfect Glitter Stick (Color, Texture, and Formula Considerations) 🎨
- Prep Talk: Preparing Your Canvas for Glittery Greatness (Eyelid Priming & Base Shadows) ✍️
- Application Techniques: Mastering the Glitter Stick Like a Pro (Direct Application, Blending, and Layering) 🖌️
- Troubleshooting: Conquering Common Glitter Woes (Fallout, Creasing, and Fading – Oh My!) 🆘
- Locking in the Look: Setting and Sealing Your Sparkle (Setting Sprays and Glitter Glues – The Secret Weapons) 🛡️
- Glitter Eye Looks: Inspiration for Every Occasion (From Subtle Shimmer to Full-On Glam) ✨
- Removal Rituals: Eradicating Glitter Like a Ninja (Gentle Techniques for Removing Every Last Sparkle) 🥷
- Maintenance & Storage: Keeping Your Glitter Stick Happy and Healthy (Prolonging Its Sparkling Life) 💖
- The Final Sparkle: Embracing Your Inner Glitter Queen/King! 👑
1. Why Liquid Glitter Cream Eyeshadow Sticks are the MVP: Leaving Loose Glitter in the Dust! 💨
Let’s be honest, loose glitter is the bane of many makeup enthusiasts’ existence. It’s like the Houdini of the beauty world – it mysteriously appears everywhere except where you intended. Your face, your clothes, your dog, your neighbor’s cat… the glittery invasion knows no bounds! 😼
Liquid glitter cream eyeshadow sticks are here to rescue us from this glittering guerilla warfare. Here’s why they’re the ultimate game-changer:
- Controlled Application: The stick format allows for precise placement, minimizing fallout and mess. Say goodbye to glitter-covered countertops and hello to targeted shimmer!🎯
- Ease of Use: They’re incredibly user-friendly, even for makeup newbies. No fancy brushes or complex techniques required. Just swipe and go! 🚀
- Long-Lasting Power: The cream formula adheres beautifully to the skin, providing long-lasting wear without excessive flaking. ⏳
- Versatility: From a subtle daytime shimmer to a dramatic evening sparkle, these sticks can do it all. 🎭
- Travel-Friendly: Compact and convenient, they’re perfect for on-the-go glitter emergencies. ✈️
Think of it this way: Loose glitter is like trying to herd cats. Liquid glitter cream eyeshadow sticks are like having a well-trained glitter poodle – obedient, manageable, and always ready to shine! 🐩
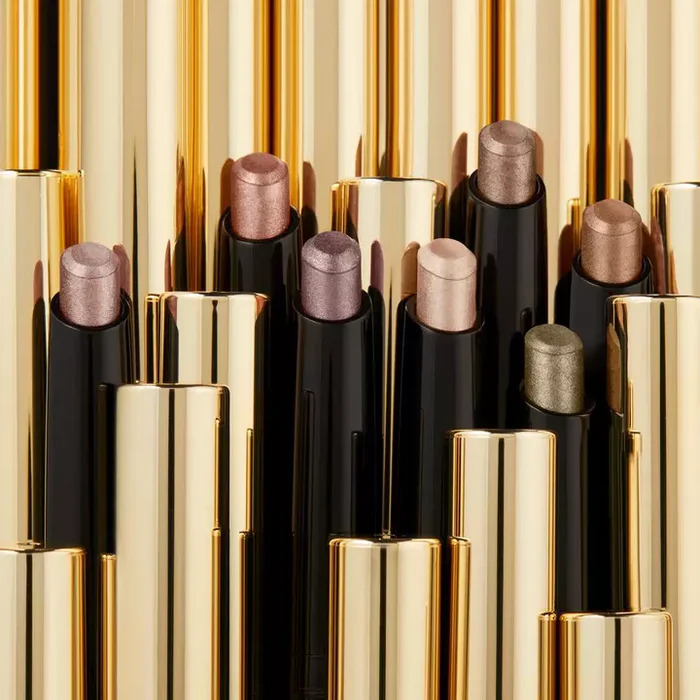
2. Choosing Your Weapon: Selecting the Perfect Glitter Stick (Color, Texture, and Formula Considerations) 🎨
Not all glitter sticks are created equal. Choosing the right one is crucial for achieving your desired look. Here’s a breakdown of the key factors to consider:
- Color: This is where your personality can truly shine!
- Neutrals (Gold, Silver, Bronze, Champagne): Versatile classics that complement any skin tone and eye color. ✨
- Brights (Pink, Purple, Blue, Green): Perfect for adding a pop of color and creating a bold, playful look. 🌈
- Dark Hues (Black, Brown, Gunmetal): Ideal for creating a smoky, edgy glitter effect. 🖤
- Texture: The texture affects the application and overall finish.
- Fine Glitter: Offers a subtle, sophisticated shimmer. Think candlelight glow. 🕯️
- Chunky Glitter: Creates a more dramatic, eye-catching sparkle. Prepare to blind people with your brilliance! 😎
- Iridescent Glitter: Shifts colors in the light, adding a multi-dimensional effect. Like a disco ball for your eyelids! 🕺
- Formula: Consider the following aspects of the formula:
- Creaminess: A creamy formula will glide on smoothly and blend easily. 🧈
- Pigmentation: A highly pigmented formula will deliver intense color payoff. 🎨
- Longevity: Look for a long-wearing formula that won’t fade or crease throughout the day. ⏳
- Cruelty-Free & Vegan: If these are important to you, be sure to check the product’s label. 🐰🌱
Pro-Tip: Swatch the glitter stick on the back of your hand or arm to test its color, texture, and longevity before applying it to your eyes. This will help you avoid any glittery surprises. 🙈
Table: Glitter Stick Selection Guide
| Feature | Fine Glitter | Chunky Glitter | Iridescent Glitter |
|---|---|---|---|
| Texture | Small, subtle glitter particles | Large, noticeable glitter particles | Glitter particles that shift colors |
| Effect | Soft shimmer, sophisticated glow | Bold sparkle, dramatic impact | Multi-dimensional, color-shifting effect |
| Occasion | Everyday wear, office, subtle glam | Parties, events, bold statement looks | Special occasions, creative makeup looks |
| Application | Easy to blend, buildable | Requires careful placement, less blendable | Easy to blend, can be layered for intensity |
3. Prep Talk: Preparing Your Canvas for Glittery Greatness (Eyelid Priming & Base Shadows) ✍️
Just like a painter needs a properly primed canvas, your eyelids need to be prepped before you unleash the glitter. This will ensure a smooth application, prevent creasing, and enhance the longevity of your glitter look.
- Eyelid Primer: This is your best friend! A good eyelid primer will create a smooth base, prevent creasing, and help the glitter adhere better. Apply a thin layer of primer to your entire eyelid and allow it to dry completely before proceeding. 🛡️
- Base Eyeshadow (Optional but Recommended): Applying a base eyeshadow that complements your glitter color can enhance the overall look.
- Matching Shade: A shadow that is close in color to the glitter will intensify the glitter’s color. 🎨
- Neutral Shade: A neutral shadow (like a matte brown or beige) will create a subtle base that allows the glitter to be the star of the show. 🌟
- Contrasting Shade: A contrasting shade can create a bold, eye-catching effect. Think a warm bronze eyeshadow with a cool blue glitter. 🔥❄️
Pro-Tip: If you’re using a cream or liquid eyeshadow as a base, make sure it’s completely dry before applying the glitter. This will prevent smudging and creasing. ⏳
Why is Priming Important? Imagine trying to paint a masterpiece on a wrinkled piece of paper. The primer smooths out the eyelid surface, making it ideal for the glitter to adhere evenly and preventing those annoying creases that can ruin your sparkle. Don’t skip this step! 🙏
4. Application Techniques: Mastering the Glitter Stick Like a Pro (Direct Application, Blending, and Layering) 🖌️
Now for the fun part – applying the glitter! Here are a few techniques to help you achieve the perfect glitter eye:
- Direct Application:
- Swipe & Go: For a quick and easy glitter look, simply swipe the glitter stick directly onto your eyelid. Start at the inner corner of your eye and work your way outwards. ➡️
- Dot & Dab: For more precise placement, dot the glitter stick onto your eyelid and then gently dab it with your finger or a brush to blend. This is especially useful for applying glitter to the inner corner of your eye or along the lash line. 📍
- Blending:
- Finger Blending: Your finger is a surprisingly effective blending tool! Gently tap and blend the glitter with your fingertip to soften the edges and create a seamless transition. 👆
- Brush Blending: Use a soft, fluffy eyeshadow brush to blend the glitter. This is a great option for creating a more diffused look or for blending the glitter with other eyeshadows. 🖌️
- Layering:
- Building Intensity: For a more dramatic glitter effect, layer the glitter stick. Apply a thin layer, let it dry slightly, and then apply another layer on top. 🧱
- Combining Colors: Experiment with layering different colors of glitter for a unique, multi-dimensional look. 🌈
Pro-Tip: Start with a small amount of glitter and build up the intensity as needed. It’s always easier to add more glitter than it is to remove it. 🤏
Important! When applying glitter near your lash line, be extra careful not to get any glitter in your eyes. This can cause irritation and discomfort. 😢
5. Troubleshooting: Conquering Common Glitter Woes (Fallout, Creasing, and Fading – Oh My!) 🆘
Even with the best intentions, glitter can sometimes be a bit… temperamental. Here’s how to troubleshoot some common glitter-related problems:
Even with the best intentions, glitter can sometimes be a bit… temperamental. Here’s how to troubleshoot some common glitter-related problems:
- Fallout: Glitter ending up on your cheeks? The horror!
- Solution: Apply your eye makeup before your face makeup. This way, you can easily clean up any fallout without ruining your foundation. Use a piece of tape or a clean, dry brush to gently remove the glitter. 🧹
- Prevention: Use a glitter glue or adhesive to help the glitter adhere better to your eyelids.
- Creasing: Glitter settling into the creases of your eyelids? Not cute!
- Solution: Use an eyelid primer to create a smooth base and prevent creasing. You can also set your eyeshadow with a translucent powder to help absorb excess oil. 🍚
- Prevention: Avoid using too much glitter, as this can weigh down your eyelids and increase the likelihood of creasing.
- Fading: Your glitter looking dull and lifeless after a few hours? Sad sparkle!
- Solution: Use a long-wearing glitter stick and set it with a setting spray to help it last longer. ⏳
- Prevention: Avoid touching your eyes throughout the day, as this can transfer the glitter and cause it to fade.
Table: Glitter Troubleshooting Guide
| Problem | Solution | Prevention |
|---|---|---|
| Fallout | Apply eye makeup first, use tape/brush to clean | Use glitter glue, apply glitter carefully |
| Creasing | Use eyelid primer, set with powder | Use less glitter, choose a creamy formula |
| Fading | Use long-wearing stick, set with setting spray | Avoid touching eyes, choose a pigmented formula |
6. Locking in the Look: Setting and Sealing Your Sparkle (Setting Sprays and Glitter Glues – The Secret Weapons) 🛡️
To ensure your glitter eye stays put all day (or all night!), you need to lock it in with some secret weapons:
- Setting Spray: A setting spray will help to keep your makeup in place and prevent it from fading or smudging. Choose a setting spray that is specifically designed for long-lasting wear. 🌬️
- Glitter Glue/Adhesive: This is your ultimate weapon against glitter fallout! Apply a thin layer of glitter glue to your eyelids before applying the glitter. This will create a sticky base that helps the glitter adhere better and prevents it from straying. ✨ (Glue and adhesive are slightly different. Adhesives are generally stronger and used for larger glitters)
Pro-Tip: When using a setting spray, hold the bottle about 8-10 inches away from your face and spray in a "T" and "X" motion. This will ensure even coverage. 🙅♀️
Why is Setting Important? Think of it like hairspray for your glitter. It keeps everything in place and prevents your sparkle from going rogue. 🚀
7. Glitter Eye Looks: Inspiration for Every Occasion (From Subtle Shimmer to Full-On Glam) ✨
Now that you’ve mastered the techniques, let’s explore some glitter eye looks for every occasion:
- Subtle Shimmer (Daytime Glam): Apply a neutral glitter stick to the center of your eyelid for a touch of understated sparkle. Pair it with a soft, neutral eyeshadow and a coat of mascara. ☀️
- Pop of Color (Fun & Playful): Apply a bright-colored glitter stick to your lower lash line for a fun and unexpected pop of color. Pair it with a neutral eyeshadow and a winged eyeliner. 🌈
- Smoky Glitter (Edgy & Sultry): Apply a dark glitter stick to your eyelids and blend it outwards to create a smoky effect. Pair it with a black eyeliner and a bold lip. 🖤
- Full-On Glam (Party Ready): Apply a chunky glitter stick to your entire eyelid for a dramatic, eye-catching look. Pair it with a bold eyeliner, false lashes, and a statement lip. 🎉
- Halo Eye (Dimensional Sparkle): Apply a darker matte shade to the outer and inner corners of the eye, leaving the center open. Apply a light, shimmery or glittery shade to the center of the eyelid to create a halo effect.
Remember: The possibilities are endless! Don’t be afraid to experiment and create your own unique glitter eye looks. 🎨
8. Removal Rituals: Eradicating Glitter Like a Ninja (Gentle Techniques for Removing Every Last Sparkle) 🥷
Removing glitter can be a bit of a challenge, but with the right techniques, you can eradicate every last sparkle without irritating your skin.
- Oil-Based Makeup Remover: This is your best friend for removing glitter! Oil-based removers dissolve the glitter and make it easier to wipe away. 💧
- Micellar Water: Micellar water is another gentle option for removing glitter. Soak a cotton pad with micellar water and gently press it against your eyelid for a few seconds to dissolve the glitter. 💦
- Gentle Wipes: If you’re on the go, makeup wipes can be a convenient option for removing glitter. Choose wipes that are specifically designed for sensitive skin. 🧻
- Avoid Rubbing: Rubbing your eyes can irritate your skin and cause the glitter to spread. Instead, gently pat and wipe the glitter away. 🙅♀️
Pro-Tip: After removing your makeup, use a damp cotton swab to clean up any stray glitter particles.
Important! Always be gentle when removing glitter from your eyes. Avoid using harsh chemicals or abrasive scrubs, as these can damage your delicate skin. 🙏
9. Maintenance & Storage: Keeping Your Glitter Stick Happy and Healthy (Prolonging Its Sparkling Life) 💖
To keep your glitter stick in tip-top shape, follow these maintenance and storage tips:
- Close the Cap Tightly: This will prevent the glitter stick from drying out. 🔒
- Store in a Cool, Dry Place: Avoid storing your glitter stick in direct sunlight or in a humid environment, as this can damage the formula. ☀️
- Clean the Tip Regularly: Use a clean tissue or cloth to wipe the tip of the glitter stick after each use. This will prevent bacteria from building up. 🦠
- Don’t Share: Sharing your glitter stick can spread bacteria. It’s best to keep it to yourself. 🙅♀️
- Replace When Necessary: If the glitter stick starts to dry out, change color, or develop an odor, it’s time to replace it. 🗑️
Why is Maintenance Important? Taking care of your glitter stick will prolong its life and ensure that it continues to deliver stunning sparkle for years to come! ⏳
10. The Final Sparkle: Embracing Your Inner Glitter Queen/King! 👑
Congratulations, you’ve reached the end of Glitterati 101! You are now armed with the knowledge and skills to create effortless, stunning glitter eye looks that will turn heads and make you feel like a true sparkle superstar. ✨
Remember, makeup is all about having fun and expressing yourself. Don’t be afraid to experiment with different colors, textures, and techniques to find what works best for you. And most importantly, embrace your inner glitter queen/king and shine bright! 💖
Now go forth and sparkle! 🌟 And remember, if anyone asks how you achieved such glittery perfection, just tell them Professor Sparkle sent you. 😉
(Class Dismissed!) 🎓
For detailed product specifications and purchases, please go to :https://zenamakeup.com/products/liquid-glitter-waterproof-eyeshadow-stick
Leave a Reply