Applying Mascara with a Mascara Shield Guard: Level Up Your Lash Game! 🚀 (A Lecture for Aspiring Lash Masters)
Alright, students! Settle down, settle down! Today, we’re diving deep into the fascinating, sometimes frustrating, but ultimately fabulous world of mascara application. Specifically, we’re tackling a topic near and dear to my heart (and my smudge-free eyelids): the Mascara Shield Guard.
Think of this lecture as your passport ✈️ to flawless lash land, a place where spider lashes are banished, raccoon eyes are a myth, and perfectly defined lashes are the only acceptable currency.
Now, I know what you’re thinking. “A mascara shield? Sounds a bit… extra.” And maybe it is. But so is wearing shoes with socks – practical and potentially life-saving (from blisters!). Trust me, mastering the mascara shield is like unlocking a secret level in the makeup game. It’s the cheat code to a professional finish.
Lecture Outline:
- The Mascara Mayhem: Why We Need Help! (The Problem)
- Enter the Hero: The Mascara Shield Guard, Explained! (The Solution)
- Anatomy of a Shield: Different Types and How to Choose! (The Options)
- Shielding 101: Step-by-Step Application with Pro Tips! (The Method)
- Beyond Basic: Advanced Techniques and Troubleshooting! (The Mastery)
- Shield Maintenance: Keeping Your Guard in Tip-Top Shape! (The Upkeep)
- The Verdict: Is a Mascara Shield Right for YOU? (The Conclusion)
1. The Mascara Mayhem: Why We Need Help! 😭 (The Problem)
Let’s face it, applying mascara can be a battlefield. We’ve all been there:
- The Smudge Attack: You’re meticulously applying mascara, feeling like a beauty guru, and then BAM! A rogue stroke leaves a dark splotch on your eyelid. Cue the frantic Q-tip dance. 💃
- The Clump Conspiracy: Despite your best efforts, your lashes decide to form a united front, creating a clumpy, spidery mess. 🕷️
- The Untamed Lower Lashes: Applying mascara to your lower lashes is like trying to herd cats. You end up with more product on your under-eye area than on your actual lashes. 🐼
- The Uneven Application: One eye looks like it’s ready for the red carpet, while the other looks like it barely woke up. Symmetry? What symmetry? 🤔
- The Time Suck: Spending precious minutes (or even hours!) perfecting your mascara application, only to be perpetually late. ⏰
The struggle is real, my friends. And it’s precisely why the mascara shield was invented – to bring order to the chaos and help us achieve those coveted, flawlessly separated, and beautifully defined lashes.
2. Enter the Hero: The Mascara Shield Guard, Explained! 🦸 (The Solution)
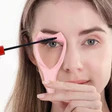
So, what exactly is this magical tool? A mascara shield guard is essentially a small, curved piece of plastic (or silicone, or metal) designed to be held against your eyelid while applying mascara. Its primary purpose is to:
- Prevent Smudges: Acts as a barrier between the mascara wand and your skin, catching any stray swipes.
- Guide Application: Helps you achieve a more even and controlled application, especially for lower lashes.
- Separate Lashes: Some shields have built-in comb teeth to help separate lashes and prevent clumping.
- Create a Base for Volume: By applying mascara against the shield, you can build volume at the base of your lashes without fear of smudging.
Think of it as a tiny, personal bodyguard for your eyelids. Protecting you from mascara mishaps one lash at a time. 🛡️
3. Anatomy of a Shield: Different Types and How to Choose! 🧐 (The Options)
Not all mascara shields are created equal. They come in various shapes, sizes, and materials, each with its own set of pros and cons. Let’s explore some of the most common types:
| Type of Shield | Material | Features | Pros | Cons | Best For |
|---|---|---|---|---|---|
| Curved Shield | Plastic/Silicone | Basic curved shape, often with a handle. | Simple to use, affordable, good for preventing smudges on the upper eyelid. | May not be ideal for lower lashes or separating lashes. | Beginners, those primarily concerned with upper eyelid smudges. |
| Comb Shield | Plastic/Metal | Curved shape with comb teeth along the edge. | Helps separate lashes, prevents clumping, good for defining lashes. | Can be tricky to clean, may not be comfortable for sensitive eyes. | Those prone to clumpy lashes, those seeking definition. |
| Angled Shield | Plastic/Silicone | Angled shape, designed to fit the contours of the eye. | Versatile, can be used for both upper and lower lashes, good for reaching inner corners. | May require some practice to master the angle. | Those seeking versatility, those who struggle with inner corner application. |
| Reusable Sticker Shield | Silicone | Sticky backing, adheres to the skin. | Hands-free, allows for more precision, good for elaborate eye makeup looks. | Can be irritating for sensitive skin, may lose stickiness over time. | Experienced users, those doing elaborate eye makeup, those who want hands-free application. |
| Disposable Shield | Paper/Plastic | Single-use shields, often with a handle. | Hygienic, convenient for travel, no cleaning required. | Can be less precise than reusable shields, not environmentally friendly. | Travelers, makeup artists, those prioritizing hygiene. |
| Multi-Functional Tools | Various | Often included in lash tools, comb, separator, and shield all in one | Can be useful for beginners to try out a variety of tools and see what they like. | Often not as effective as dedicated individual tools. | Beginners who want to experiment with various lash tools. |
Choosing the Right Shield:
- Consider your skill level: Start with a simple curved shield if you’re a beginner.
- Identify your biggest mascara challenge: If you struggle with clumping, opt for a comb shield. If smudges are your nemesis, a curved or angled shield will be your best friend.
- Think about your lifestyle: If you travel frequently, disposable shields might be a good option.
- Read reviews: See what other users have to say about different shields before making a purchase.
Remember, the best shield is the one that works best for you. Don’t be afraid to experiment until you find your perfect match!
4. Shielding 101: Step-by-Step Application with Pro Tips! 📝 (The Method)
Alright, let’s get down to the nitty-gritty. Here’s a step-by-step guide to using a mascara shield like a pro:
Step 1: Prep Your Lashes:
- Curl your lashes: Use an eyelash curler to give your lashes a lift. This will help them look longer and more defined. Remember to curl before applying mascara to avoid damaging your lashes.
- Apply a lash primer (optional): Lash primer can help to thicken and lengthen your lashes, providing a base for your mascara.
Step 2: Position the Shield:
- Hold the shield: Grip the handle (if your shield has one) or hold the shield between your fingers.
- Position the shield: Place the curved edge of the shield against your upper eyelid, close to the lash line. Make sure the shield is positioned so that it covers your eyelid and any skin you want to protect from smudges. Experiment with the placement to see what works best for your eye shape.
- Angle the shield: Tilt the shield slightly upward to help lift your lashes as you apply mascara.
Step 3: Apply Mascara:
- Wiggle at the base: Start by wiggling the mascara wand at the base of your lashes. This will help to build volume and create a thicker lash line.
- Sweep upwards: Gently sweep the mascara wand upwards, coating each lash from root to tip. Use slow, controlled movements to avoid clumping.
- Apply multiple coats: Apply 2-3 coats of mascara, allowing each coat to dry slightly before applying the next. This will help to build volume and length.
Step 4: Lower Lashes (If Applicable):
- Reposition the shield: Hold the shield against your lower lash line, ensuring it covers your under-eye area.
- Apply mascara: Use the tip of the mascara wand to gently coat your lower lashes. Apply only one or two coats to avoid looking too dramatic.
Step 5: Clean Up (If Necessary):
- Remove the shield: Carefully remove the shield, wiping it clean with a makeup wipe or damp cloth.
- Check for smudges: If you have any smudges, use a Q-tip dipped in makeup remover to gently clean them up.
Pro Tips for Mascara Shield Mastery:
- Practice makes perfect: Don’t get discouraged if you don’t get it right away. Keep practicing, and you’ll eventually become a mascara shield pro.
- Experiment with different angles: Try tilting the shield at different angles to see what works best for your eye shape and lash length.
- Use a light touch: Applying too much pressure can cause the shield to slip.
- Clean your shield regularly: This will prevent the buildup of mascara and bacteria.
- Don’t be afraid to customize: You can trim or bend your shield to better fit your eye shape.
5. Beyond Basic: Advanced Techniques and Troubleshooting! 🤓 (The Mastery)
Now that you’ve mastered the basics, let’s explore some advanced techniques and troubleshoot common issues:
Advanced Techniques:
- Creating a Winged Effect: Use an angled shield to create a sharp, winged effect at the outer corners of your eyes. Simply angle the shield upwards and outwards as you apply mascara.
- Focusing on Specific Areas: Use the shield to focus on specific areas of your lashes, such as the outer corners for a more dramatic look, or the inner corners for a more natural look.
- Layering Different Mascaras: Use the shield to apply different types of mascara to different parts of your lashes. For example, you could use a volumizing mascara at the base and a lengthening mascara at the tips.
- False Lash Application Aid: Use the shield to help guide the application of false eyelashes. Position the shield along your lash line to create a clean, even base for the false lashes.
Troubleshooting:
| Problem | Solution |
|---|---|
| Shield slipping: | Use a lighter touch, ensure your skin is clean and dry, try a shield with a sticky backing. |
| Mascara still smudging: | Make sure the shield is positioned correctly, try a different type of shield, use a waterproof mascara. |
| Uneven application: | Experiment with different angles, use a mirror to ensure even application, apply multiple coats. |
| Shield is uncomfortable: | Try a different material (e.g., silicone instead of plastic), adjust the position of the shield, use a shield with a softer edge. |
| Hard to Clean: | Soak in warm soapy water. Use a toothbrush to gently scrub off dried mascara. For stubborn stains, try rubbing alcohol. Ensure completely dry before next use. |
6. Shield Maintenance: Keeping Your Guard in Tip-Top Shape! 🧼 (The Upkeep)
Just like your makeup brushes, your mascara shield needs regular cleaning to prevent the buildup of bacteria and ensure optimal performance. Here’s how to keep your shield in tip-top shape:
- Clean after each use: Wipe the shield clean with a makeup wipe or damp cloth after each use.
- Deep clean weekly: Once a week, wash the shield with warm soapy water. Use a gentle soap and a soft brush to remove any stubborn mascara residue.
- Disinfect regularly: Disinfect the shield with rubbing alcohol or a makeup brush cleanser.
- Store properly: Store the shield in a clean, dry place.
A clean shield is a happy shield, and a happy shield leads to happy lashes! 😊
7. The Verdict: Is a Mascara Shield Right for YOU? 🤔 (The Conclusion)
So, after this whirlwind tour of the mascara shield universe, the million-dollar question remains: is it right for you?
Consider these factors:
- Your skill level: Are you a makeup beginner or a seasoned pro?
- Your mascara struggles: Do you primarily struggle with smudging, clumping, or uneven application?
- Your eye shape: Do you have hooded eyes, deep-set eyes, or almond-shaped eyes?
- Your time commitment: Are you willing to invest the time to learn how to use a mascara shield effectively?
If you answered "yes" to most of these questions, then a mascara shield is definitely worth a try!
The Benefits of Using a Mascara Shield:
- Flawless, smudge-free application
- Defined, separated lashes
- Increased volume and length
- Faster application (once you get the hang of it!)
- More professional-looking results
- Fewer makeup mishaps (and less frustration!)
The Drawbacks of Using a Mascara Shield:
- Requires a learning curve
- Can be uncomfortable for some
- Requires regular cleaning
- Another tool to add to your makeup collection
Ultimately, the decision is yours. But I encourage you to give the mascara shield a try. You might just be surprised at how much it can elevate your lash game.
Class dismissed! Go forth and conquer those lashes! 🎓🎉
For detailed product specifications and purchases, please go to :https://zenamakeup.com/products/3-in-1-mascara-shield-guard-for-sensitive-eyes
Leave a Reply