Level Up Your Sparkle: Mastering the 5-Piece Glitter Cream Eyeshadow Stick Set for Intense Looks 🌟✨
Alright, glitter gurus and shimmer shamans! Welcome, welcome, WELCOME! Today, we’re ditching the drab and diving headfirst into a dazzling dimension of eye makeup artistry. We’re talking about the 5-Piece Glitter Cream Eyeshadow Stick Set – your secret weapon for creating eye looks so intense, they could stop traffic (probably best not to test that theory, though 😉).
Forget the fear, toss out the trepidation! This lecture is designed to transform you from a glitter novice to a shimmering sensation. We’ll unlock the secrets of layering these creamy, sparkly wonders to achieve looks that range from subtle daytime glimmer to full-on, red-carpet radiance.
Lecture Outline: A Roadmap to Glitter Glory
- Introduction: Why Cream Glitter Sticks? (Why they’re your new BFFs)
- The 5-Piece Set: Unveiling the Potential (Understanding your arsenal)
- Prep is Key: Laying the Groundwork for Sparkle Success (The boring but essential stuff)
- Layering 101: The Art of Building Intensity (Techniques and tips for mesmerizing depth)
- Color Theory for Glitter Gurus: Choosing the Right Combinations (Making those shades sing!)
- Application Techniques: From Subtle Shimmer to Show-Stopping Sparkle (Brushes, fingers, and beyond!)
- Troubleshooting: Glitter Gone Wrong (and How to Fix It!) (Common pitfalls and their sparkly solutions)
- Look Ideas: Inspiration to Ignite Your Imagination (Practical application and dazzling examples)
- Maintenance & Storage: Keeping Your Glitter Sticks Happy (Extending the life of your sparkly investments)
- Conclusion: Go Forth and Sparkle! (A final pep talk to unleash your inner glitter goddess)
1. Introduction: Why Cream Glitter Sticks? (Why They’re Your New BFFs)
Let’s be honest, glitter eyeshadow has a reputation. It’s messy, it’s prone to fallout, and it often ends up migrating to places it shouldn’t (like your cheeks, your hair, and possibly your sandwich). Powder glitters can be beautiful, sure, but they require the precision of a brain surgeon and the patience of a saint.
Enter the cream glitter eyeshadow stick! 🥳 These little wonders are a game-changer for several reasons:
- Ease of Application: They glide on smoothly and effortlessly, no brushes required (though we’ll talk about those later!).
- Less Fallout: The creamy formula helps to adhere the glitter particles to your eyelid, minimizing the dreaded glitter rain.
- Buildable Intensity: You can start with a sheer wash of shimmer and build up to a bolder, more dramatic look.
- Convenience: Portable and perfect for on-the-go touch-ups. Toss one in your purse and you’re ready to sparkle anytime, anywhere! 🚗💨
- Longevity: Cream formulas tend to last longer on the lids compared to some powder formulas.
Simply put, cream glitter sticks are the low-maintenance, high-impact answer to your glitter prayers. They’re your new best friends in the quest for dazzling eye looks.
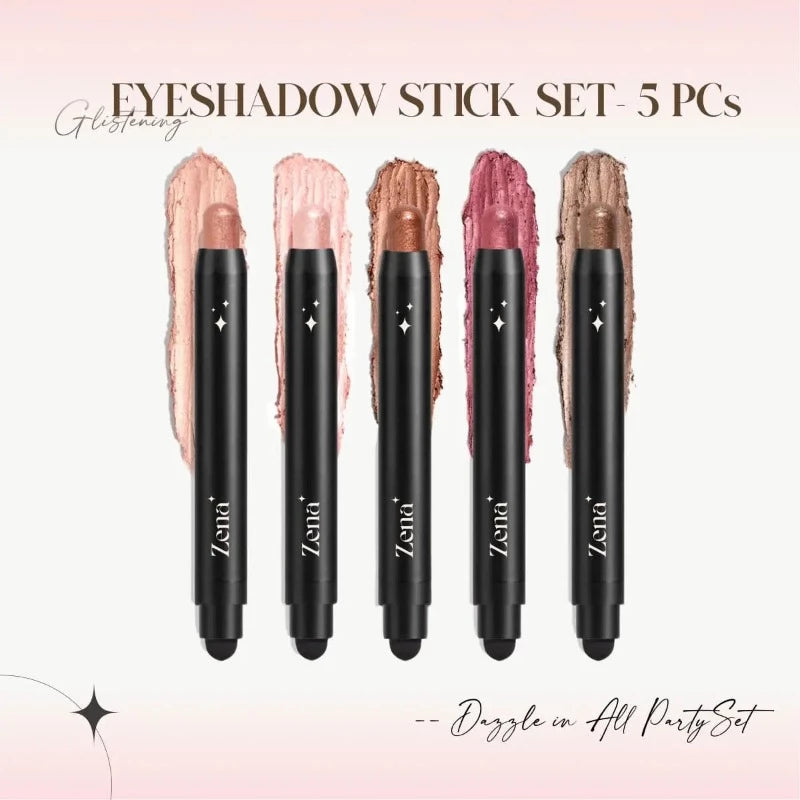
2. The 5-Piece Set: Unveiling the Potential (Understanding Your Arsenal)
Okay, so you’ve got your 5-Piece Glitter Cream Eyeshadow Stick Set. Let’s take a closer look at what you’re working with. While the exact shades will vary depending on the set, you can typically expect a range of colors that can be broadly categorized:
- Light Champagne/Ivory: Perfect for highlighting the inner corner of the eye and the brow bone.
- Rose Gold/Pink: Adds a touch of romance and warmth to any look.
- Bronze/Gold: Creates a sultry, sophisticated vibe.
- Taupe/Brown: A versatile neutral that can be used to add depth and definition.
- Deep Shade (Purple, Green, Blue, or Black): For adding drama and intensity to the outer corner or as a liner.
Table 1: Potential Shade Breakdown and Usage
| Shade Category | Potential Colors | Best For |
|---|---|---|
| Highlight | Light Champagne, Ivory | Inner corner highlight, brow bone highlight, all-over lid base (sheer application) |
| Warm Tone | Rose Gold, Pink | Lid color, crease color (blended), lower lash line |
| Neutral Metallic | Bronze, Gold | Lid color, crease color, smokey eye base |
| Contour/Definition | Taupe, Brown | Crease color, outer corner definition, smokey eye base, under eye shadow |
| Dramatic/Intense | Purple, Green, Blue, Black | Outer corner, eyeliner, lower lash line (smudged), all-over lid for a bold look |
Understanding the potential of each shade is crucial for creating cohesive and stunning eye looks. Think of them as your palette – ready to be mixed, matched, and layered to your heart’s content!
3. Prep is Key: Laying the Groundwork for Sparkle Success (The Boring but Essential Stuff)
Before you start slathering on the glitter, let’s talk about prep. Just like painting a house, a smooth and even base is essential for a flawless finish. Think of it as preparing your canvas for its sparkly masterpiece.
- Cleanse & Moisturize: Start with a clean, moisturized eyelid. This will help the eyeshadow stick glide on smoothly and prevent creasing.
- Eyeshadow Primer: Don’t skip this step! Eyeshadow primer is your secret weapon for long-lasting, crease-free glitter. It creates a tacky base that helps the glitter adhere to your lid and prevents it from fading throughout the day. I recommend a primer with a slight tack to really grab the glitter.
- Optional: Base Eyeshadow (Matte): If you want to add extra depth and dimension, you can apply a matte eyeshadow that is close to your skin tone or slightly darker. This creates a smooth canvas and helps the glitter eyeshadow pop.
Font: A word of warning! Oily lids are the enemy of glitter. Make sure your eyelids are properly primed to prevent your sparkle from sliding into your crease.
4. Layering 101: The Art of Building Intensity (Techniques and Tips for Mesmerizing Depth)
Now for the fun part! Layering is the key to achieving intense, multi-dimensional glitter looks. Here’s how to master the art of building intensity:
- Start Light: Begin with a sheer wash of a lighter shade all over the lid. This will create a base layer of shimmer.
- Build Gradually: Add more layers of the same shade or introduce darker shades to the crease and outer corner of the eye.
- Focus on Placement: Concentrate the glitter on the areas where you want the most impact. For example, you can apply a lighter shade to the inner corner of the eye to brighten it up, and a darker shade to the outer corner to add depth.
- Blend, Blend, Blend! Use a soft blending brush to blend the edges of the different shades together. This will create a seamless transition and prevent harsh lines.
- Pat, Don’t Swipe: When applying glitter eyeshadow, pat the product onto your lid instead of swiping. This will help to minimize fallout and create a more concentrated shimmer.
Table 2: Layering Techniques for Different Looks
| Look | Layering Technique |
|---|---|
| Subtle Shimmer | One layer of a light champagne or rose gold shade all over the lid. |
| Daytime Glam | Light champagne on the inner corner, rose gold on the lid, and a touch of taupe in the crease. |
| Evening Sparkle | Light champagne on the inner corner, gold on the lid, bronze in the crease, and a touch of deep purple on the outer corner. |
| Dramatic Glitter | Light champagne on the inner corner, rose gold on the lid, bronze in the crease, deep purple on the outer corner, and black as a smudged eyeliner. |
Emoji: Don’t be afraid to experiment! 🧪 There are no hard and fast rules when it comes to glitter. Play around with different layering techniques and find what works best for you.
5. Color Theory for Glitter Gurus: Choosing the Right Combinations (Making Those Shades Sing!)
Color theory might sound intimidating, but it’s actually quite simple. Understanding the basics of color harmony can help you create eye looks that are not only sparkly, but also visually appealing.
Color theory might sound intimidating, but it’s actually quite simple. Understanding the basics of color harmony can help you create eye looks that are not only sparkly, but also visually appealing.
- Monochromatic: Using different shades of the same color (e.g., light pink, rose gold, and deep burgundy). This creates a subtle and sophisticated look.
- Complementary: Using colors that are opposite each other on the color wheel (e.g., blue and orange, purple and yellow). This creates a bold and dramatic look.
- Analogous: Using colors that are next to each other on the color wheel (e.g., pink, rose gold, and bronze). This creates a harmonious and natural look.
Table 3: Color Combination Ideas
| Combination Type | Shade Examples | Look Description |
|---|---|---|
| Monochromatic | Light Champagne, Rose Gold, Pink | Soft and romantic, perfect for daytime or evening. |
| Complementary | Gold, Deep Blue | Bold and eye-catching, ideal for special occasions. |
| Analogous | Rose Gold, Bronze, Taupe | Warm and sophisticated, suitable for everyday wear. |
Icon: Think of your eyeshadow sticks as ingredients for a delicious cocktail. 🍹 Knowing which flavors complement each other is key to creating a masterpiece.
6. Application Techniques: From Subtle Shimmer to Show-Stopping Sparkle (Brushes, Fingers, and Beyond!)
While cream glitter sticks are designed for easy application, there are a few techniques you can use to enhance your results:
- Fingers: The warmth of your finger can help to melt the product and blend it seamlessly into your lid. This is a great option for creating a sheer wash of color.
- Brushes: Use a flat shader brush to pack the glitter onto your lid for a more intense shimmer. A blending brush can be used to soften the edges and create a seamless transition.
- Cotton Swab: Use a cotton swab to clean up any fallout or to create a sharp line.
Table 4: Tool Recommendations
| Tool | Best For |
|---|---|
| Fingers | Sheer application, blending |
| Flat Shader Brush | Intense shimmer, packing on color |
| Blending Brush | Softening edges, creating seamless transitions |
| Cotton Swab | Cleaning up fallout, creating sharp lines |
7. Troubleshooting: Glitter Gone Wrong (and How to Fix It!)
Even the most experienced glitter gurus encounter occasional mishaps. Here are some common problems and their solutions:
- Fallout: Use an eyeshadow primer, pat the product onto your lid instead of swiping, and use a setting spray to lock everything in place.
- Creasing: Make sure your eyelids are properly primed and use a setting powder to set your eyeshadow.
- Uneven Application: Blend, blend, blend! Use a soft blending brush to smooth out any harsh lines.
- Glitter Migration: Avoid applying glitter too close to your waterline or under your eyes.
Font: Top Secret Tip! Keep makeup remover wipes handy for quick and easy cleanup. You’ll thank me later! 😉
8. Look Ideas: Inspiration to Ignite Your Imagination (Practical Application and Dazzling Examples)
Alright, let’s get practical! Here are a few look ideas to inspire your creativity:
- The "Everyday Sparkle": Apply a light champagne shade all over the lid and blend a taupe shade into the crease. Add a touch of mascara and you’re good to go!
- The "Rose Gold Romance": Apply a rose gold shade all over the lid and blend a pink shade into the crease. Add a touch of eyeliner and a soft pink lip.
- The "Golden Goddess": Apply a gold shade all over the lid and blend a bronze shade into the crease. Add a touch of highlighter to your cheekbones and a nude lip.
- The "Smokey Glitter": Apply a black shade all over the lid and blend a deep purple shade into the crease. Add a touch of silver glitter to the inner corner of the eye and a bold red lip.
Icon: Think of these looks as starting points. 🚀 Feel free to customize them to your own personal style and preferences.
9. Maintenance & Storage: Keeping Your Glitter Sticks Happy (Extending the Life of Your Sparkly Investments)
To ensure your glitter eyeshadow sticks stay in tip-top shape, follow these simple tips:
- Close the Lid Tightly: This will prevent the product from drying out.
- Store in a Cool, Dry Place: Avoid storing your glitter eyeshadow sticks in direct sunlight or in a humid environment.
- Clean the Tip Regularly: Use a cotton swab to clean the tip of the stick after each use. This will prevent buildup and ensure smooth application.
Table 5: Dos and Don’ts for Glitter Stick Longevity
| Do | Don’t |
|---|---|
| Close the lid tightly | Leave the lid open |
| Store in a cool, dry place | Store in direct sunlight or humidity |
| Clean the tip regularly with a swab | Let product build up on the tip |
10. Conclusion: Go Forth and Sparkle! (A Final Pep Talk to Unleash Your Inner Glitter Goddess)
Congratulations, you’ve reached the end of our glittery journey! You are now equipped with the knowledge and skills to create stunning eye looks using your 5-Piece Glitter Cream Eyeshadow Stick Set.
Remember, makeup is all about experimentation and having fun. Don’t be afraid to try new things and push the boundaries of your creativity. So, go forth and sparkle! Unleash your inner glitter goddess and let your eyes shine! ✨💖
Final thought: The most important thing is to have fun and embrace the sparkle! Now go out there and make the world a little bit brighter, one glittery eyelid at a time. You got this! 💖
For detailed product specifications and purchases, please go to :https://zenamakeup.com/products/glimmer-glow-5-piece-glitter-cream-eyeshadow-stick-set
Leave a Reply