Lecture: Getting a Smooth, Even Application with ZenaMakeup’s Cooling Jelly Tint
(Welcome music playing softly in the background, a picture of the ZenaMakeup Cooling Jelly Tint gleaming on the screen)
Alright, beauty buffs, makeup maestros, and anyone who’s ever battled a patchy lip tint application, gather ’round! 👋 I’m your friendly neighborhood Product Manager, [Your Name], and today we’re diving deep into the glorious world of ZenaMakeup’s Cooling Jelly Tint! 💋✨
(The screen transitions to a slide titled "ZenaMakeup: Innovation Meets Beauty")
Here at ZenaMakeup, we’re not just about creating products; we’re about creating experiences. And what could be more refreshing and delightful than a lip tint that not only adds a beautiful flush of color but also cools your lips on contact? 🧊 Sounds dreamy, right? But even the dreamiest product can become a makeup nightmare if applied incorrectly. That’s where this lecture comes in!
(The screen transitions to a slide titled "The Cooling Jelly Tint: A Quick Intro")
What is ZenaMakeup’s Cooling Jelly Tint, you ask? Well, imagine this:
- A Lightweight, Jelly-Like Texture: Glides on like a dream, feels like a cloud. ☁️
- A Cooling Sensation: Like a mini spa treatment for your lips. Ahhh! 😌
- Build-able Color: From a subtle stain to a bold pop, you’re in control. 🎨
- Long-Lasting Wear: Keeps your lips looking luscious for hours. ⏳
- Hydrating Formula: No more dry, cracked lips! 💧
(A table appears on the screen showcasing the key ingredients and their benefits:)
| Ingredient | Benefit | Why It Matters for Application |
|---|---|---|
| Hyaluronic Acid | Intense hydration, plumps lips. | Creates a smooth canvas. |
| Glycerin | Humectant, attracts and retains moisture. | Prevents the tint from clinging to dry patches. |
| Menthol Derivative | Provides the cooling sensation, refreshing and invigorating. | Can affect the texture slightly, requiring even application. |
| Fruit Extracts (e.g., Strawberry, Cherry) | Rich in antioxidants, contribute to the color and overall lip health. | Natural pigments may vary slightly, impacting color payoff. |
(The screen transitions to a slide titled "The Application Gauntlet: Common Challenges")
Now, let’s be honest. Lip tints, while fantastic, can sometimes be tricky. We’ve all been there:
- The Dreaded Patchiness: Color concentrates in some areas, leaving others bare. 😱
- Uneven Coverage: One lip looking darker than the other. Mirror, mirror on the wall… 🤨
- Feathering: Color bleeding outside the lip line. 😫
- Dryness Amplification: Tint clinging to dry patches, making them even more noticeable. 🌵
(The screen transitions to a slide titled "Prep Talk: Laying the Foundation for Success")
But fear not, my friends! With a little prep and the right techniques, we can conquer these challenges and achieve that perfect, even application. Think of it like building a house: you need a solid foundation!
Here’s your pre-tint checklist:
-
Exfoliate! 🗣️ This is non-negotiable. Gently scrub away dead skin with a lip scrub (a toothbrush works in a pinch!). This creates a smooth surface for the tint to adhere to.
(A small animated GIF shows a toothbrush gently exfoliating lips)
-
Hydrate! 💧 Apply a hydrating lip balm and let it sink in for a few minutes. This will plump up your lips and prevent the tint from drying them out.
(A small animated GIF shows lip balm being applied)
-
Blot! 🧻 Gently blot away any excess balm. We want the lips hydrated, not greasy. Greasiness can prevent the tint from adhering properly.
(A small animated GIF shows blotting lips with a tissue)
(The screen transitions to a slide titled "The Arsenal: Tools of the Trade")
Okay, foundation laid! Now, let’s talk tools. While you can apply the Cooling Jelly Tint straight from the applicator, sometimes a little extra help can go a long way.
-
The Applicator (Provided): This is your primary weapon! Use the doe-foot applicator to precisely apply the tint.
(An image of the Cooling Jelly Tint applicator is shown)
-
Lip Brush: For precision and control, especially when creating a gradient lip. 🖌️
(An image of a lip brush is shown)
-
Finger: Yes, your finger! For gently blending and diffusing the color. 👆
(An image of a clean finger is shown)
-
Cotton Swab: For cleaning up any mistakes and creating a crisp lip line. 💡
(An image of a cotton swab is shown)
(The screen transitions to a slide titled "The Techniques: Mastering the Art of Application")
Alright, let’s get to the juicy part! We’re going to break down a few different application techniques, catering to different preferences and desired looks.
Technique #1: The Classic Stain (Effortless & Natural)
This is perfect for a "no makeup makeup" look or for those who prefer a subtle flush of color.
-
Dot & Dab: Apply a few small dots of the Cooling Jelly Tint to the center of your lower lip.
(An image illustrating dots on the lower lip is shown)
-
Smush & Blend: Gently press your lips together to distribute the color.
(An image illustrating pressing lips together is shown)
-
Finger Power: Use your fingertip to gently blend the color outwards, blurring the edges.
(An image illustrating blending with a finger is shown)
-
Repeat on Top: Repeat the process on your upper lip.
(An image illustrating the whole process is shown)
Pro-Tip: For a more intense stain, apply a second layer. But remember, less is more! You can always add, but it’s harder to take away.
Technique #2: The Gradient Lip (Korean Beauty Inspired)
Technique #2: The Gradient Lip (Korean Beauty Inspired)
This technique creates a soft, blurred effect that’s super popular in Korean beauty.
-
Conceal the Edges: Apply a small amount of concealer around the outer edges of your lips. This creates a blank canvas and helps the gradient stand out.
(An image illustrating applying concealer around the lips is shown)
-
Concentrate the Color: Apply the Cooling Jelly Tint to the inner part of your lips, both top and bottom.
(An image illustrating applying tint to the inner part of the lips is shown)
-
Blend, Blend, Blend!: Use a lip brush or your fingertip to gently blend the color outwards, creating a seamless gradient.
(An image illustrating blending the gradient is shown)
-
Clean Up: Use a cotton swab to clean up any harsh lines and perfect the gradient.
(An image illustrating cleaning up with a cotton swab is shown)
Pro-Tip: Use a lighter shade of the Cooling Jelly Tint for a more subtle gradient.
Technique #3: The Full Lip (Bold & Defined)
This technique is for those who want a more dramatic, defined lip.
-
Lip Liner (Optional): If you want extra definition, line your lips with a lip liner that matches the Cooling Jelly Tint or is slightly darker.
(An image illustrating lining the lips with lip liner is shown)
-
Precise Application: Use the doe-foot applicator to carefully apply the Cooling Jelly Tint to your entire lips, staying within your natural lip line (or the lip liner, if you used one).
(An image illustrating applying tint to the entire lips is shown)
-
Even Coverage: Make sure the color is evenly distributed across your lips.
(An image illustrating even coverage is shown)
-
Blot (Optional): If you want a more matte finish, gently blot your lips with a tissue.
(An image illustrating blotting the lips is shown)
Pro-Tip: Start with a thin layer and build up the color as needed. This will prevent the tint from looking too heavy or cakey.
(The screen transitions to a slide titled "Troubleshooting: Common Issues & Solutions")
Okay, even with the best techniques, sometimes things can go awry. Let’s address some common problems and how to fix them.
| Issue | Solution |
|---|---|
| Patchy Application | Exfoliate and hydrate your lips thoroughly before applying the tint. Apply in thin layers and blend well. |
| Uneven Coverage | Make sure you’re applying the same amount of product to both lips. Use a lip brush for more control. |
| Feathering | Use a lip liner to create a barrier. Apply a thin layer of translucent powder around your lips to prevent the tint from bleeding. |
| Dryness | Choose a more hydrating lip balm. Apply lip balm before and after applying the tint. Consider using a lip oil over the tint. |
| Too Much Color | Gently blot your lips with a tissue. Apply a small amount of concealer to the center of your lips to lighten the color. |
| Color Fading Quickly | Apply a lip primer before applying the tint. Avoid licking your lips excessively. Reapply the tint as needed. |
| Cooling Sensation Too Intense | Apply a thin layer of lip balm before applying the tint. Blend the tint well to distribute it evenly. |
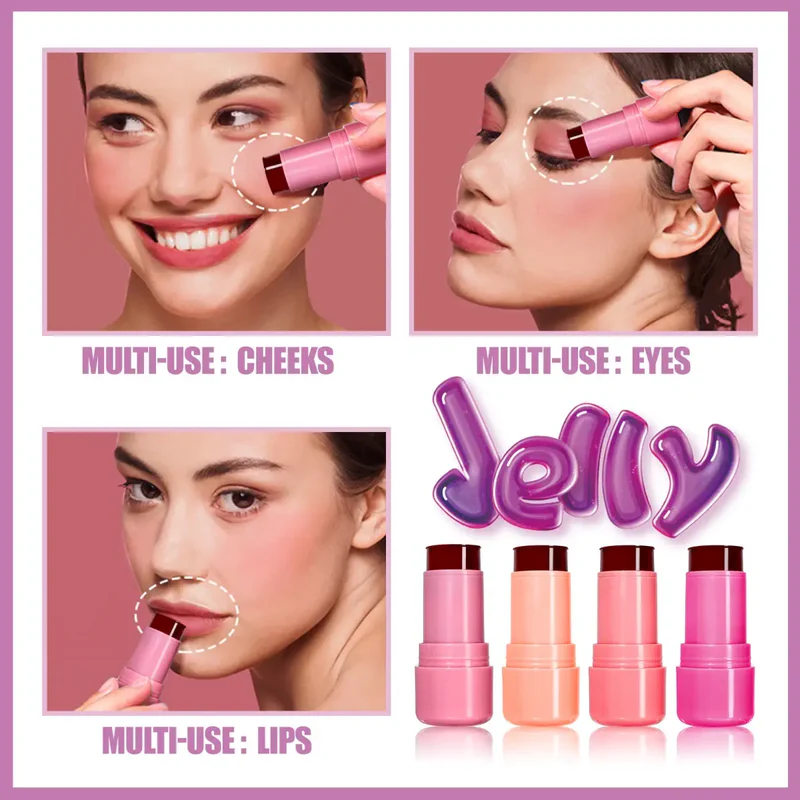
(The screen transitions to a slide titled "Beyond the Lips: Creative Uses for Cooling Jelly Tint")
Who says lip tints are only for lips? Get creative!
-
Cheek Tint: Dab a tiny amount onto the apples of your cheeks and blend quickly for a natural flush. 🍑
(An image illustrating applying tint to the cheeks is shown)
-
Eye Shadow Base: Apply a thin layer to your eyelids as a base for powder eyeshadow. This will help the eyeshadow adhere better and last longer. 👀
(An image illustrating applying tint to the eyelids is shown)
-
Color Corrector: Use a peach or orange-toned Cooling Jelly Tint to neutralize dark circles under your eyes. 🐼
(An image illustrating applying tint under the eyes is shown)
(The screen transitions to a slide titled "Care & Maintenance: Keeping Your Cooling Jelly Tint Happy")
To keep your Cooling Jelly Tint performing its best, follow these simple tips:
- Store Properly: Keep the tint in a cool, dry place away from direct sunlight. ☀️🚫
- Clean the Applicator: Wipe the applicator with a clean tissue after each use to prevent bacteria buildup. 🦠
- Check the Expiration Date: Like all cosmetics, the Cooling Jelly Tint has an expiration date. Pay attention to it! ⏳
(The screen transitions to a slide titled "Q&A: Your Burning Questions Answered")
Alright, folks! Now’s your chance to grill me! I’m ready for your questions about the Cooling Jelly Tint, application techniques, or anything else that’s been swirling around in your beautiful brains.
(The lecture transitions to a live Q&A session, if possible, or a pre-recorded segment answering frequently asked questions.)
(The screen transitions to a slide titled "Wrap-Up: Go Forth and Tint!")
And that, my friends, concludes our deep dive into the world of ZenaMakeup’s Cooling Jelly Tint! I hope you’ve learned some valuable tips and tricks that will help you achieve a flawless, even application every time. Now go forth, experiment, and rock those luscious, tinted lips! 💋
(The screen displays the ZenaMakeup logo and social media handles.)
Remember to tag us in your Cooling Jelly Tint looks using #ZenaMakeup #CoolingJellyTint! We can’t wait to see your creativity shine! ✨
(End music fades in.)
For detailed product specifications and purchases, please go to :https://zenamakeup.com/products/everglow-sculpting-cooling-jelly-tint-sheer-lip-face-stain
Leave a Reply