Lecture: Achieving Eyelash Nirvana: Mastering the Mascara Shield Guard & Comb Technique 👁️✨
Welcome, aspiring lash artists and mascara mavens! Today, we embark on a journey to conquer one of the most vexing, frustrating, yet ultimately rewarding aspects of makeup application: the art of perfectly separated, clump-free, utterly mesmerizing eyelashes. Forget your spidery legs, your gloppy messes, and your existential mascara crises! We’re here to talk about the Mascara Shield Guard and Comb – your secret weapons in the fight for lash supremacy.
(Disclaimer: No actual weapons will be used. Unless you consider a rogue mascara wand a weapon. In which case, proceed with caution.)
I. Introduction: Why Are My Lashes Rebelling? (And Why a Shield & Comb Can Save the Day!)
Let’s be honest, mascara is a temperamental beast. One day it’s your best friend, giving you the fluttery, doe-eyed look of your dreams. The next? It’s a gloopy, smudgy disaster, transforming you into a raccoon on a bad day. Why?
- Formulation Fallout: Mascara formulas vary wildly. Some are inherently prone to clumping.
- Application Aggravation: Over-pumping the wand introduces air, drying out the formula and causing it to thicken.
- Lash Labyrinth: Lashes are delicate, fine, and often overcrowded. They’re practically begging for a good separation.
- The Smudge Factor: Blinking before mascara dries, sneezing mid-application, or simply having oily lids can lead to unsightly smudges.
Enter the Mascara Shield Guard and Comb! These unassuming tools are game-changers. They offer a multi-pronged attack on common mascara woes:
- Shield of Protection: The shield prevents mascara from transferring to your eyelids during application. Say goodbye to panda eyes! 🐼
- Comb of Clarity: The comb separates and defines each lash, removing clumps and creating a fanned-out, voluminous effect. 👋 Clumps!
II. The Anatomy of Awesome: Understanding Your Tools
Before we dive into technique, let’s get acquainted with our star players:
| Tool | Description | Function | Benefits | Potential Drawbacks |
|---|---|---|---|---|
| Mascara Shield Guard | Typically made of plastic or silicone, shaped like a curved shield. Can have different angles and sizes. | Prevents mascara from smudging onto the eyelid during application. Acts as a guide for creating a clean, even coat. | Clean application. Saves time on cleanup. Allows for more aggressive mascara application (more coats!). Great for bottom lashes. | Can be tricky to hold in place. Requires a bit of practice to get the hang of. * May not fit all eye shapes perfectly. |
| Eyelash Comb | Small comb with fine, closely spaced teeth. Can be metal or plastic. | Separates and defines lashes. Removes clumps. Distributes mascara evenly. Can be used to separate lashes after curling. | Clump-free lashes. Defined, fanned-out look. Increased volume and length (by preventing lashes from sticking together). Professional finish. | Metal combs can feel cold. Plastic combs can be difficult to clean. Requires patience and a gentle hand. Can be time-consuming. |
Think of the shield as your personal bodyguard, protecting your meticulously applied eyeshadow. And the comb? That’s your lash stylist, giving each individual lash the attention it deserves.
III. The Prep Talk: Setting the Stage for Lash Success
Before you even think about picking up your mascara, let’s lay the groundwork:
- Clean Canvas: Ensure your eyelids are clean and free of excess oil. A little translucent powder can help absorb any lingering shine.
- Curl Power: Curl your lashes before applying mascara. This opens up your eyes and creates a beautiful, upward sweep. Use an eyelash curler carefully, holding it for a few seconds at the base of the lashes, then again in the middle and at the tips for a gradual curl.
- Mascara Matters: Choose a mascara that suits your needs. Volumizing, lengthening, defining – the options are endless! Consider the brush type, too. Some brushes are better at separating than others. If your current mascara is a clumpy offender, consider switching to a new formula.
- Mirror, Mirror: Find a well-lit mirror that allows you to see your lashes clearly. A magnifying mirror can be particularly helpful.
- Steady Hand, Steady Heart: Relax! Tension leads to shaky hands and messy application. Take a deep breath and channel your inner zen master. 🧘♀️
IV. The Mascara Shield Guard Masterclass: Techniques and Tips
Now for the main event! Let’s break down the application process step-by-step:
-
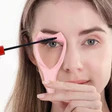
Positioning Perfection: Hold the mascara shield guard close to your upper lash line. The curved edge should follow the natural curve of your eyelid. Experiment with different angles to find the position that works best for your eye shape.
- Tip: For the outer corner lashes, angle the shield outwards slightly to prevent mascara from smudging towards your temples.
- Tip: For bottom lashes, hold the shield horizontally below your lower lash line. This is a game-changer for preventing mascara from transferring to your under-eye area!
-
Wand Wizardry: Apply your mascara as usual, using a wiggling motion at the base of your lashes to build volume and then sweeping upwards to the tips. Don’t be afraid to get close to the shield! That’s what it’s there for.
- Tip: Don’t pump the mascara wand! This forces air into the tube, drying out the formula and causing clumps. Instead, gently twist the wand inside the tube to load it with product.
- Tip: Apply mascara in thin, even coats. Building up gradually is better than applying one thick, goopy layer.
-
Shield Swap: Repeat the process on your other eye.
-
The Bottom Lash Ballet: Apply mascara to your bottom lashes, using the shield to prevent smudging. A thinner, more precise brush can be helpful for this step.
-
The Bottom Lash Ballet: Apply mascara to your bottom lashes, using the shield to prevent smudging. A thinner, more precise brush can be helpful for this step.
- Tip: Apply only one or two coats of mascara to your bottom lashes. Too much can make your eyes look heavy and tired.
V. The Eyelash Comb Commando: Separating and Defining
Now that your lashes are coated, it’s time to unleash the power of the comb!
-
Comb Commencement: Immediately after applying mascara (while it’s still wet), gently run the eyelash comb through your lashes from root to tip.
- Tip: Wipe the comb clean between passes to remove excess mascara. This prevents the mascara from clumping back onto your lashes.
- Tip: Use short, gentle strokes. Don’t force the comb through your lashes, as this can damage them.
-
Strategic Separation: Pay extra attention to areas where lashes tend to clump together, such as the inner and outer corners.
-
Angle Adjustment: Experiment with different angles to achieve the desired level of separation and definition.
-
Double Duty: You can also use the comb to separate lashes after curling them, before applying mascara. This can help to prevent the curler from pulling out any lashes.
VI. Troubleshooting: Taming the Mascara Mayhem
Even with the best tools and techniques, mascara application can still be tricky. Here are some common problems and their solutions:
| Problem | Solution |
|---|---|
| Clumpy Lashes | Use an eyelash comb to separate the lashes. Apply thinner coats of mascara. Try a different mascara formula. Clean your mascara wand regularly. * Replace your mascara every 3-6 months. |
| Smudged Eyelids | Use a mascara shield guard. Apply a thin layer of translucent powder to your eyelids before applying mascara. Use a waterproof mascara. Avoid rubbing your eyes. |
| Spider Lashes | Apply less mascara. Focus on the base of the lashes rather than the tips. * Use an eyelash comb to separate the lashes. |
| Uneven Application | Pay attention to the inner and outer corners of your eyes. Use a smaller brush for hard-to-reach areas. * Practice makes perfect! |
| Stiff/Dry Lashes | Use a lash primer before applying mascara. Avoid using waterproof mascara every day, as it can be drying. * Apply a lash serum at night to keep your lashes moisturized. |
VII. Advanced Lash Artistry: Taking Your Mascara Game to the Next Level
Once you’ve mastered the basics, you can experiment with more advanced techniques:
- Layering Mascaras: Combine different mascaras to achieve your desired look. For example, you can use a volumizing mascara followed by a lengthening mascara.
- Focusing on Specific Areas: Apply more mascara to the outer corner lashes to create a winged effect.
- Using Different Brushes: Experiment with different brush shapes and sizes to find the ones that work best for your lashes.
- Color Play: Try using colored mascaras for a fun and unexpected look.
- False Lash Fusion: Apply a thin layer of mascara to your natural lashes before applying false lashes to help them blend together seamlessly.
VIII. The Grand Finale: Achieving Eyelash Nirvana
Congratulations! You’ve reached the end of our mascara mastery course. By following these techniques and tips, you’ll be well on your way to achieving perfectly separated, clump-free, utterly mesmerizing eyelashes. Remember:
- Practice makes perfect. Don’t be discouraged if you don’t get it right away. Keep experimenting and refining your technique until you find what works best for you.
- Be patient. Mascara application can be time-consuming, but the results are worth it.
- Have fun! Makeup should be enjoyable, so relax and let your creativity shine. ✨
And finally, remember the most important rule of all: Confidence is the best mascara! Wear your beautiful lashes with pride and conquer the world, one flutter at a time. 🌎
Now go forth and lash out (in a good way!)! 😉
For detailed product specifications and purchases, please go to :https://zenamakeup.com/products/3-in-1-mascara-shield-guard-for-sensitive-eyes
Leave a Reply