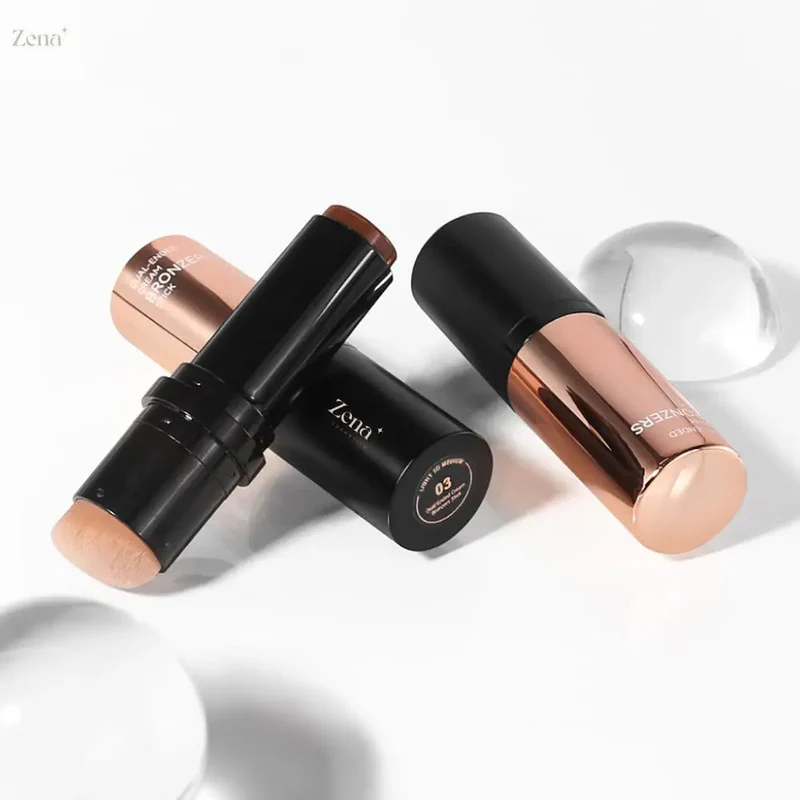
Alright, buckle up, beauty buffs and contouring connoisseurs! Prepare for a journey into the sculpted stratosphere, because ZenaMakeup is about to unleash a weapon of mass attraction – our Professional Cream Contour Stick! I’m your guide, your guru, your friendly neighborhood product manager here at ZenaMakeup, and I’m thrilled to spill the tea (or should I say, the cream?) on how this little stick of magic can transform your face from "meh" to "magnificent!"
Forget everything you think you know about contouring. We’re not talking about muddy streaks and obvious lines here. We’re talking about subtle shadows, enhanced features, and a natural-looking definition that will have people whispering, "Did she get work done?" (But you and I will know it’s just ZenaMakeup magic!).
Chapter 1: The Contour Conundrum – Why Bother? (And Why OURS is the Answer!)
Let’s be honest. Contouring can seem intimidating. All those complicated charts, the endless YouTube tutorials, the fear of looking like you rolled around in dirt… it’s enough to make anyone throw in the towel and reach for a bronzer. But hold on! Don’t give up on your dreams of sculpted cheekbones just yet!
Why bother with contouring in the first place? Simply put, it’s about enhancing your natural bone structure and creating the illusion of depth. Think of it as playing with light and shadow. You’re essentially tricking the eye into seeing more defined cheekbones, a slimmer nose, a stronger jawline – the possibilities are endless!
But here’s the catch: not all contour products are created equal. Some are too powdery, some are too orange, some are… well, let’s just say they’re better left untouched. That’s where ZenaMakeup’s Professional Cream Contour Stick comes in to save the day!
Why our cream contour stick? Let me count the ways:
- Creamy Dreamy Formula: Forget chalky powders that settle into fine lines and make you look like a dusty desert landscape. Our formula is luxuriously creamy, blending seamlessly into the skin for a natural, airbrushed finish. Think silk pajamas for your face!
- Foolproof Application: We’ve designed this stick with beginners in mind. The precise applicator allows for targeted placement, so you can easily sculpt and define without looking like you’ve been attacked by a rogue makeup brush.
- Buildable Coverage: Whether you want a subtle hint of definition or a dramatic, red-carpet-ready look, our cream contour stick can deliver. It’s buildable, blendable, and totally customizable to your desired intensity.
- Universal Shade Range: We understand that one shade does not fit all. That’s why we’ve carefully curated a range of shades to complement a variety of skin tones, from fair to deep. No more orange streaks or muddy messes! Find your perfect match and prepare to be amazed. Check our website https://zenamakeup.com/ for the full shade range!
- Long-Lasting Power: Our formula is designed to stay put all day long, without fading, smudging, or creasing. You can confidently rock your sculpted look from morning coffee to evening cocktails. (Unless you’re eating a particularly messy burger, in which case, all bets are off!)
- Enriched with Goodness: We’ve infused our formula with skin-loving ingredients that nourish and hydrate your skin while you contour. Think of it as a mini spa treatment with every application.
- Travel-Friendly: The convenient stick format makes it perfect for on-the-go touch-ups. Toss it in your purse, your gym bag, or your carry-on and you’ll always be ready to sculpt and define, no matter where life takes you.
Chapter 2: The Anatomy of a Sculpted Face – Where to Apply and Why
Okay, now that you’re convinced that our cream contour stick is the holy grail of contouring, let’s talk about application. This isn’t just about slapping some dark cream on your face and hoping for the best. It’s about understanding your unique facial structure and using contour to enhance your natural features.
Think of your face as a canvas. Contour is your shading, highlighting is your light, and together they create a masterpiece!
Here are the key areas to target:
- Cheekbones: This is the most common and arguably the most impactful area to contour. To find the perfect placement, suck in your cheeks (like you’re trying to make a fish face – feel free to practice in the mirror, we won’t judge!). You should see a hollow form beneath your cheekbone. Apply the contour stick directly into this hollow, starting from your ear and blending towards the corner of your mouth. Stop about two finger-widths away from your nose. Why? This creates the illusion of higher, more defined cheekbones, making your face look slimmer and more sculpted.
- Jawline: Contouring your jawline can create a more defined and angular appearance. Apply the contour stick along your jawline, starting from your ear and blending towards your chin. Why? This helps to create the illusion of a stronger, more chiseled jawline, which can be especially flattering in photos.
- Nose: Contouring your nose can make it appear slimmer, straighter, or shorter, depending on your desired effect. Apply thin lines of contour down the sides of your nose, starting from the inner corner of your brow and blending towards the tip. Why? This creates the illusion of a narrower nose bridge. You can also contour the tip of your nose to make it appear shorter.
- Forehead: If you have a larger forehead, you can use contour to make it appear smaller. Apply contour along your hairline, blending downwards towards your temples. Why? This helps to visually shorten the forehead and create a more balanced facial appearance.
- Double Chin (The Silent Enemy!): Let’s be real, we’ve all been there. If you’re looking to minimize the appearance of a double chin, apply contour along your jawline and blend downwards towards your neck. Why? This creates the illusion of a more defined jawline and helps to disguise any unwanted fullness.
Pro Tip: Remember the golden rule of contouring: blend, blend, blend! Use a damp beauty sponge or a dense brush to seamlessly blend the contour into your skin. There should be no harsh lines or obvious streaks. The goal is to create a subtle, natural-looking shadow.
Chapter 3: The Tools of the Trade – Your Contouring Arsenal
While our Professional Cream Contour Stick is a powerhouse on its own, having the right tools can take your contouring game to the next level. Here are a few essentials:
While our Professional Cream Contour Stick is a powerhouse on its own, having the right tools can take your contouring game to the next level. Here are a few essentials:
- Beauty Sponge: A damp beauty sponge is your best friend for blending cream contour products. Its soft, bouncy texture helps to seamlessly blend the product into the skin, creating a natural, airbrushed finish. We recommend our ZenaMakeup Blending Buddy – it’s super soft, latex-free, and the perfect shape for reaching all those hard-to-reach areas.
- Contour Brush: A dense, angled contour brush is another great option for blending cream contour. Look for a brush with soft, synthetic bristles that won’t absorb too much product.
- Highlighter: Don’t forget the highlighter! Highlighter is the perfect complement to contour, as it helps to brighten and illuminate the high points of your face, creating a sculpted, three-dimensional effect. Apply highlighter to your cheekbones, brow bone, the bridge of your nose, and the cupid’s bow. Check out our ZenaMakeup Starlight Illuminator for a radiant, lit-from-within glow!
- Setting Powder: To ensure your contour stays put all day long, set it with a light dusting of setting powder. This will help to prevent creasing and fading.
Chapter 4: Troubleshooting Your Sculpted Look – Common Mistakes and How to Fix Them
Even with the best products and tools, contouring can still be tricky. Here are some common mistakes and how to fix them:
- Using the Wrong Shade: Using a contour shade that is too dark or too warm can make your face look muddy or orange. Choose a shade that is two to three shades darker than your natural skin tone, and with a cool undertone.
- Applying Too Much Product: Less is more when it comes to contour. Start with a small amount of product and build up the coverage as needed.
- Not Blending Properly: As we mentioned before, blending is key to a natural-looking contour. Take your time and blend, blend, blend until there are no harsh lines or obvious streaks.
- Contouring in the Wrong Place: Applying contour in the wrong place can actually make your face look wider or flatter. Make sure you are targeting the correct areas, as outlined in Chapter 2.
- Forgetting to Highlight: Contour and highlight go hand-in-hand. Don’t forget to apply highlighter to the high points of your face to create a sculpted, three-dimensional effect.
Chapter 5: Unleash Your Inner Sculptor – Advanced Contouring Techniques
Once you’ve mastered the basics of contouring, you can start experimenting with more advanced techniques. Here are a few ideas to get you started:
- Contouring for Different Face Shapes: The best way to contour depends on your face shape. For example, if you have a round face, you may want to focus on contouring your cheekbones and jawline to create more definition. If you have a long face, you may want to contour your forehead and chin to make your face appear shorter.
- Contouring with Multiple Shades: For a more dramatic and sculpted look, you can use multiple shades of contour. Start with a lighter shade to create a base and then use a darker shade to add more definition.
- Contouring with Different Textures: You can also experiment with different textures of contour, such as powder, cream, and liquid. Each texture has its own unique benefits and can be used to create different effects.
Chapter 6: ZenaMakeup’s Promise – Quality, Innovation, and YOU!
At ZenaMakeup, we’re passionate about creating high-quality, innovative products that empower you to feel confident and beautiful. Our Professional Cream Contour Stick is just one example of our commitment to excellence. We believe that everyone deserves to have access to the tools and knowledge they need to achieve their best possible look.
We are constantly striving to improve our products and services, and we value your feedback. If you have any questions or comments, please don’t hesitate to contact us at [email protected]. We’d love to hear from you!
Final Thoughts (and a Sneaky Discount!)
So, there you have it – your ultimate guide to achieving a chiseled look with ZenaMakeup’s Professional Cream Contour Stick. We’ve covered everything from the basics of contouring to advanced techniques, and we’ve even shared some tips for troubleshooting common mistakes.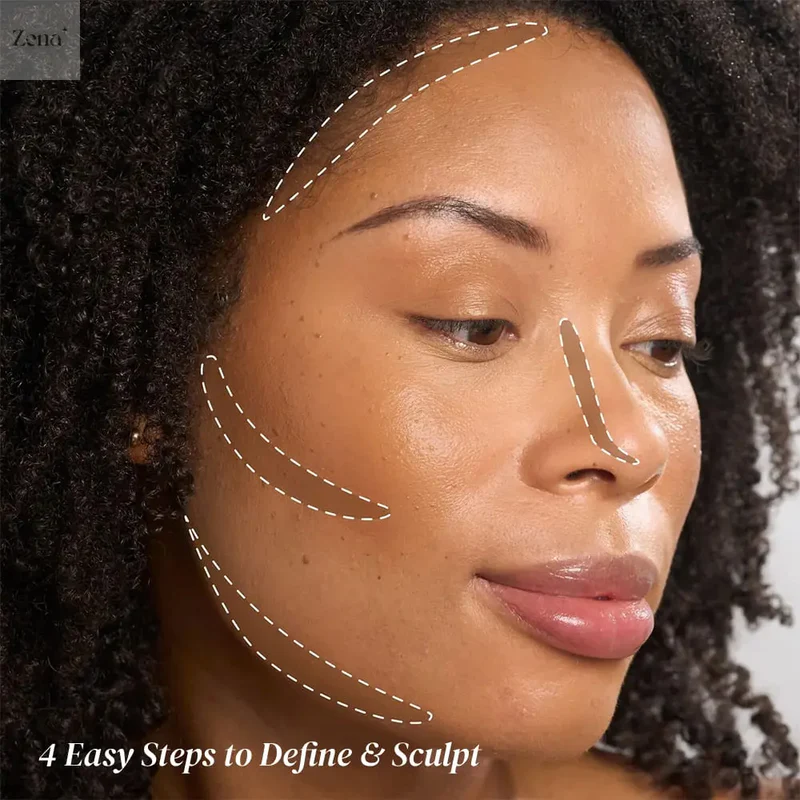
Now it’s time to put your newfound knowledge to the test! Head over to our website https://zenamakeup.com/ and grab your own Professional Cream Contour Stick today. And because you’ve read this far (you deserve a reward!), use the discount code zenamakeup2025 at checkout for a special discount!
Remember, contouring is all about enhancing your natural beauty and creating a look that makes you feel confident and empowered. So, go ahead, unleash your inner sculptor and create a masterpiece! We can’t wait to see what you create!
Happy contouring, beauties! And remember, with ZenaMakeup, you’re not just wearing makeup, you’re wearing confidence! Now go out there and sculpt the day! You got this! ✨💋
For detailed product specifications and purchases, please go to :https://zenamakeup.com/products/professional-cream-contour-stick
Leave a Reply