The Contour Conundrum: How to Blend This Contour Stick for Your Best Seamless, Undetectable Finish (The ZenaMakeup Guide to Sculpting Like a Pro)
Alright, beauties and handsomes! Let’s talk contour. The unsung hero of the makeup world, the chisel-master, the architect of cheekbones you never knew you had. But let’s be honest, contour can also be a fearsome beast. One wrong swipe, one moment of distracted blending, and BAM! You’re rocking the muddy stripe look, resembling less a sculpted goddess and more a… well, let’s just say less than ideal.
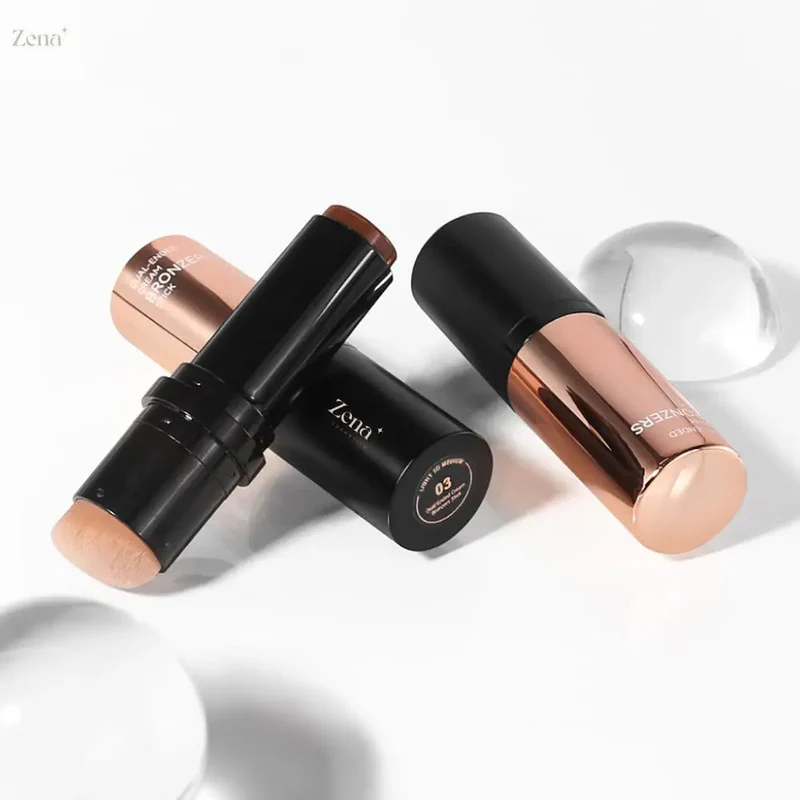
At ZenaMakeup, we understand the struggle. We’ve seen it all. We’ve lived it. That’s why we poured our hearts (and countless hours of research and development) into creating the perfect contour stick: the ZenaSculpt Defining Contour Stick.
This isn’t your grandma’s chalky, impossible-to-blend contour. This is a creamy, dreamy, pigment-packed wonder that glides on like a satin dream and blends like a… well, like a dream! But even the best product needs a little guidance. So, buckle up, buttercups! We’re about to embark on a journey to contour mastery, a journey that will leave you looking sculpted, snatched, and ready to conquer the world (or at least your next selfie).
Why Contour Matters (And Why You Should Care)
Before we dive into the blending bonanza, let’s address the elephant in the room: why bother with contour at all? Is it just another fleeting beauty trend? Is it just for Instagram influencers?
Absolutely not! Contour isn’t about changing your face; it’s about enhancing it. It’s about playing with light and shadow to create the illusion of depth and dimension. It’s about accentuating your best features and subtly minimizing the ones you’re not so keen on.
Think of it like this: contour is the sculptor, and your face is the clay. With a few strategic strokes, you can:
- Define your cheekbones: Hello, cheekbones you never knew existed!
- Slim your nose: Goodbye, bulbous tip!
- Soften your jawline: Sayonara, double chin! (Well, maybe not completely, but it’ll definitely look better!)
- Create the illusion of a higher forehead: Perfect for those of us with a five-head situation.
- Add overall dimension and structure to your face: Because who doesn’t want a little extra definition?
In short, contour is the secret weapon in your makeup arsenal. It’s the difference between looking good and looking amazing. And with the ZenaSculpt Defining Contour Stick, achieving that amazing look is easier than ever.
Introducing the ZenaSculpt Defining Contour Stick: Your New BFF
So, what makes the ZenaSculpt Defining Contour Stick so special? We’re glad you asked!
- Creamy, Dreamy Formula: Forget those dry, chalky contours that tug at your skin. Our formula is infused with moisturizing ingredients like shea butter and vitamin E, so it glides on smoothly and blends seamlessly.
- Pigment-Packed Perfection: A little goes a long way! The ZenaSculpt Defining Contour Stick is packed with pigment, so you only need a small amount to create a noticeable difference.
- Buildable Coverage: Whether you prefer a subtle, natural contour or a more dramatic, sculpted look, our formula is buildable to your desired intensity.
- Long-Lasting Power: We know you’re busy, so we formulated our contour stick to last all day (or all night!) without fading or smudging.
- Shade Range for Every Skin Tone: Finding the right contour shade can be tricky. That’s why we offer a range of shades to suit every skin tone, from fair to deep. Check out our shade matching guide on https://zenamakeup.com/ to find your perfect match!
- Convenient Stick Format: No messy powders or palettes here! Our stick format is easy to use and perfect for on-the-go touch-ups.
But the real magic of the ZenaSculpt Defining Contour Stick lies in its blendability. This is where the "seamless, undetectable finish" comes in. And that’s what we’re going to teach you how to achieve, step-by-step.
The Ultimate Guide to Blending the ZenaSculpt Defining Contour Stick
Okay, class is in session! Grab your ZenaSculpt Defining Contour Stick, your favorite blending tool, and let’s get started.
Step 1: Prep Your Canvas
Just like a painter needs a primed canvas, your face needs to be prepped before you start contouring. This means:
- Cleanse: Wash your face with a gentle cleanser to remove any dirt, oil, or makeup.
- Moisturize: Hydrated skin is happy skin! Apply a lightweight moisturizer to keep your skin smooth and supple.
- Prime: A primer will create a smooth base for your makeup and help it last longer. If you have oily skin, opt for a mattifying primer. If you have dry skin, choose a hydrating primer.
Step 2: Application is Key (But Don’t Go Overboard!)
Now for the fun part! Here’s where you apply the ZenaSculpt Defining Contour Stick to the areas you want to sculpt:
- Cheekbones: This is the most common area to contour. Suck in your cheeks (fish face, anyone?) and apply the contour stick in the hollows beneath your cheekbones, starting near your ear and blending towards the corner of your mouth.
- Jawline: To define your jawline, apply the contour stick along your jawline, starting near your ear and blending towards your chin.
- Temples: If you have a wider forehead, contouring your temples can help to narrow it. Apply the contour stick along your temples, blending upwards towards your hairline.
- Nose: To slim your nose, apply thin lines of contour down the sides of your nose, blending inwards.
- Double Chin (If Desired): Apply contour along the area where the double chin appears, blending downwards.
- Under the lip: Apply a little bit of the contour stick under the middle of the bottom lip to make it appear plumper.
Important Note: Less is more! Start with a small amount of product and build up as needed. It’s much easier to add more contour than to remove it.
Step 3: The Blending Bonanza (This is Where the Magic Happens!)
Alright, this is the moment of truth. The blending is what separates the contour queens from the muddy-stripe mishaps. Here are our top tips for achieving a seamless, undetectable finish:
-
Choose Your Weapon: There are several blending tools you can use, and it really comes down to personal preference. Here are a few popular options:
- Blending Sponge: A damp blending sponge is a great option for creating a soft, natural finish. We recommend using a stippling motion to blend the contour into your skin.
- Contour Brush: A dense, angled contour brush can provide more precision and control. Use circular motions to blend the contour into your skin.
- Foundation Brush: A flat or rounded foundation brush can also be used to blend contour. Use sweeping motions to blend the contour into your skin.
-
The Stippling Technique: Instead of dragging the product across your skin, gently stipple (or dab) the blending tool over the contour. This will help to blend the product seamlessly without creating harsh lines.
-
Blend Upwards: Always blend your contour upwards towards your hairline. This will help to lift your features and create a more youthful appearance.
-
Blend, Blend, Blend! Seriously, don’t stop blending until you can’t see any harsh lines. The goal is to create a soft, diffused effect.
-
Use Light Pressure: Applying too much pressure can make your contour look muddy and uneven. Use a light touch and let the blending tool do the work.
-
Use Light Pressure: Applying too much pressure can make your contour look muddy and uneven. Use a light touch and let the blending tool do the work.
-
Clean Edges (Optional): If you want to create a more defined contour, you can use a clean brush or sponge to clean up the edges. This will help to create a sharper, more sculpted look.
-
Work in Sections: Don’t try to blend all of your contour at once. Work in small sections, blending each area before moving on to the next. This will help you to achieve a more even and seamless finish.
-
Don’t Forget the Neck! To avoid a harsh line between your face and neck, blend a small amount of contour down onto your neck. This will help to create a more natural and cohesive look.
-
Patience is a Virtue: Blending takes time and practice. Don’t get discouraged if you don’t get it right away. Just keep practicing, and you’ll eventually become a contouring pro.
Step 4: Highlight to Illuminate (The Perfect Partner for Contour)
Contour and highlight are like peanut butter and jelly, Bonnie and Clyde, Beyoncé and Jay-Z. They’re better together! Highlighting the high points of your face will help to enhance your contour and create a more sculpted, luminous look.
Apply a highlighter to the following areas:
- Cheekbones: Above your contour, on the highest point of your cheekbones.
- Brow Bone: Underneath your eyebrow, to lift and define your brow.
- Inner Corner of the Eyes: To brighten your eyes and make them look more awake.
- Bridge of the Nose: To slim your nose and draw attention to the center of your face.
- Cupid’s Bow: Above your upper lip, to make your lips look fuller.
- Chin: In the center of your chin, to add dimension and balance.
Step 5: Set It and Forget It (Lock in Your Look)
To ensure that your contour and highlight last all day (or all night!), it’s important to set your makeup with a setting powder or spray.
- Setting Powder: Use a fluffy brush to apply a light layer of setting powder all over your face. Pay special attention to areas that tend to get oily, such as your T-zone.
- Setting Spray: Hold the setting spray about 8-10 inches away from your face and spray evenly. This will help to lock in your makeup and create a long-lasting finish.
Troubleshooting Your Contour: Common Mistakes and How to Fix Them
Even with the best products and techniques, mistakes can happen. Here are a few common contouring mistakes and how to fix them:
- Muddy Contour: If your contour looks muddy, you’re likely using a shade that’s too dark or applying too much product. Try using a lighter shade or applying less product. You can also use a clean blending brush to diffuse the edges of your contour.
- Harsh Lines: If you can see harsh lines in your contour, you’re not blending enough. Spend more time blending the contour into your skin until the lines disappear.
- Uneven Contour: If your contour looks uneven, you may be applying the product unevenly. Try using a lighter touch and blending the contour more carefully.
- Contour That’s Too Low: If your contour is too low on your face, it can make your face look droopy. Make sure to apply the contour in the hollows beneath your cheekbones, starting near your ear and blending towards the corner of your mouth.
- Contour That’s Too High: If your contour is too high on your face, it can make your face look flat. Make sure to apply the contour below your cheekbones, not on top of them.
The ZenaMakeup Promise: Confidence in Every Swipe
At ZenaMakeup, we believe that makeup is more than just a product; it’s a tool for self-expression, a confidence booster, and a way to enhance your natural beauty. The ZenaSculpt Defining Contour Stick is designed to empower you to create the look you’ve always dreamed of, effortlessly and flawlessly.
We’re so confident that you’ll love our contour stick that we offer a 100% satisfaction guarantee. If you’re not happy with your purchase for any reason, simply return it for a full refund.
Ready to Sculpt Your Dream Look?
Don’t wait any longer to experience the magic of the ZenaSculpt Defining Contour Stick. Head over to https://zenamakeup.com/ today and find your perfect shade.
Special Offer Just For You!
Use the discount code zenamakeup2025 at checkout to receive a special discount on your ZenaSculpt Defining Contour Stick. That’s right, we’re practically giving away cheekbones!
Stay Connected!
Follow us on social media for more tips, tricks, and exclusive offers!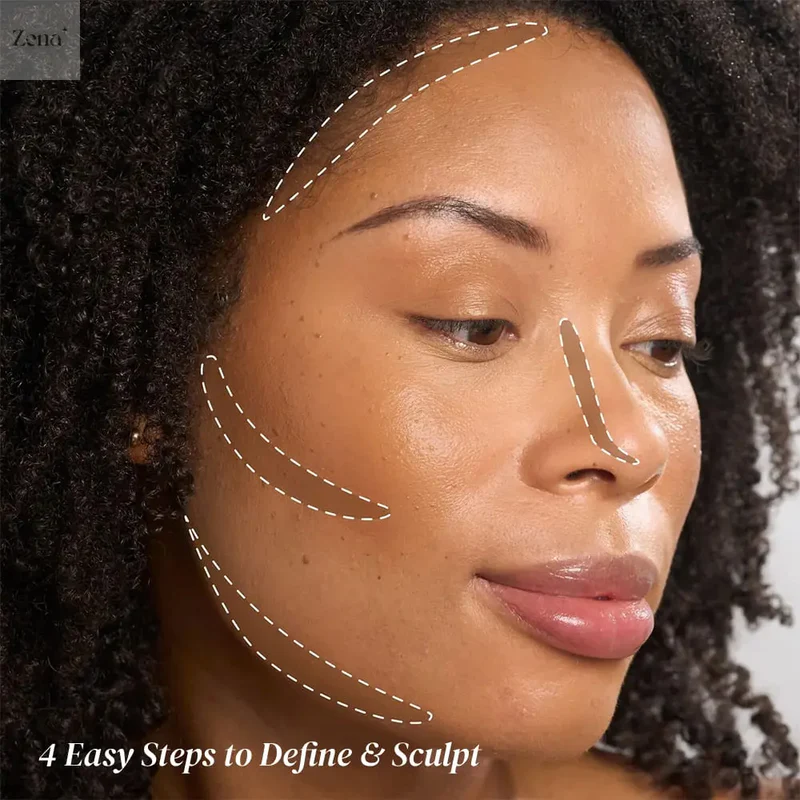
- Instagram: @ZenaMakeupOfficial
- Facebook: ZenaMakeup
- Twitter: @ZenaMakeup
And don’t forget to sign up for our email newsletter at [email protected] for exclusive content and early access to new product launches.
So there you have it! Your comprehensive guide to blending the ZenaSculpt Defining Contour Stick for your best seamless, undetectable finish. Now go forth and sculpt, my friends! And remember, at ZenaMakeup, we’re always here to help you unleash your inner beauty.
Now, go slay! You deserve it.
For detailed product specifications and purchases, please go to :https://zenamakeup.com/products/professional-cream-contour-stick
Leave a Reply