Decoding the Bottom Lash Line: Your ZenaMakeup Gel Eyeliner Guide to Mesmerizing Definition (Get Ready to Wink!)
Hold onto your makeup brushes, beauty enthusiasts! Because we’re about to embark on a journey that will transform your bottom lash line from a mere afterthought into a captivating focal point. As your friendly neighborhood Product Manager at ZenaMakeup, I’m thrilled to unveil the secrets to unlocking the full potential of our ZenaMakeup Gel Eyeliner for that smoldering, defined bottom lash line you’ve always dreamed of.
Forget everything you thought you knew about bottom eyeliner. This isn’t about harsh, unflattering lines that make you look like you’ve just survived a zombie apocalypse (unless, of course, that’s the look you’re going for – no judgment here!). We’re talking about subtle sophistication, sultry definition, and a touch of mystery that will leave everyone wondering, "What’s her secret?"
Why the Bottom Lash Line Matters (And Why You’ve Probably Been Neglecting It)
Let’s be honest, the bottom lash line often gets the short end of the makeup stick. We spend ages perfecting our winged liner on the upper lid, meticulously applying mascara, and contouring our cheekbones into oblivion. But the bottom lash line? It’s usually a quick swipe of whatever’s left on the brush, if we even bother at all.
But here’s the truth: the bottom lash line is a powerhouse of potential. It can:
- Enhance Eye Shape: Strategically placed liner can make your eyes appear bigger, brighter, more almond-shaped, or even more upturned. It’s like a visual illusion, and who doesn’t love a good illusion?
- Add Depth and Dimension: A well-defined bottom lash line adds depth to your overall eye look, creating a more dramatic and captivating effect. Think of it as the secret ingredient that elevates your makeup from "nice" to "WOW!"
- Balance the Upper Lid: If you’re rocking a bold winged liner on the top lid, a little definition on the bottom can help balance the look and prevent it from feeling top-heavy. It’s all about harmony, darling.
- Create a Sultry, Smoldering Effect: Want to unleash your inner femme fatale? The bottom lash line is your weapon of choice. A smudged, smoky liner is the epitome of sultry and irresistible.
- Complements a No-Makeup Makeup Look: Even if you prefer a natural, minimalist look, a touch of liner on the bottom lash line can add subtle definition and make your eyes pop without looking overdone. It’s the "I woke up like this" secret weapon.
The ZenaMakeup Gel Eyeliner: Your Bottom Lash Line’s New Best Friend
Now, let’s talk about the star of the show: our ZenaMakeup Gel Eyeliner. We didn’t just slap a formula together and call it a day. We meticulously crafted this product to be the ultimate tool for achieving flawless bottom lash line definition. Here’s why it’s a game-changer:
- Intense Pigmentation: One swipe, and you’ll be blown away by the rich, saturated color. No more struggling to build up the intensity! Our gel eyeliner delivers maximum impact with minimal effort.
- Creamy, Smooth Texture: This isn’t your grandma’s dry, crumbly eyeliner. Our formula glides on effortlessly, allowing for precise application and easy blending. It’s like butter, but for your eyes (don’t actually put butter on your eyes, please!).
- Long-Lasting Wear: We know you don’t have time for constant touch-ups. Our gel eyeliner is formulated to stay put all day and night, without smudging, fading, or transferring. It’s like a superhero for your bottom lash line.
- Waterproof and Smudge-Proof: Rain, sweat, tears (of joy, hopefully!), nothing can break this eyeliner’s resolve. You can confidently rock your defined bottom lash line, no matter what life throws your way.
- Versatile Application: Whether you prefer a precise line, a soft smudge, or a dramatic smoky effect, our gel eyeliner can do it all. It’s the chameleon of eyeliners, adapting to your every mood and makeup desire.
Key Features of ZenaMakeup Gel Eyeliner:
| Feature | Benefit | Why You’ll Love It |
|---|---|---|
| Intense Pigment | Delivers rich, saturated color in one swipe. | No more layering! Achieve maximum impact with minimal effort, saving you time and energy. |
| Creamy Texture | Glides on smoothly and effortlessly. | Precise application and easy blending make achieving your desired look a breeze, even for beginners. Say goodbye to tugging and skipping! |
| Long-Lasting Wear | Stays put all day and night without smudging or fading. | Confidence! Know that your bottom lash line will stay defined and flawless, no matter what your day brings. No more mid-day mirror checks! |
| Waterproof | Withstand rain, sweat, and tears. | Worry-free wear! Perfect for workouts, events, or any situation where you need your makeup to stay put. |
| Versatile | Can be used for precise lines, soft smudges, and dramatic smoky looks. | Endless possibilities! Experiment with different techniques and create a variety of looks to suit your mood and style. |
| Cruelty-Free | Not tested on animals. | Feel good about your purchase! You can enjoy beautiful makeup without compromising your values. |
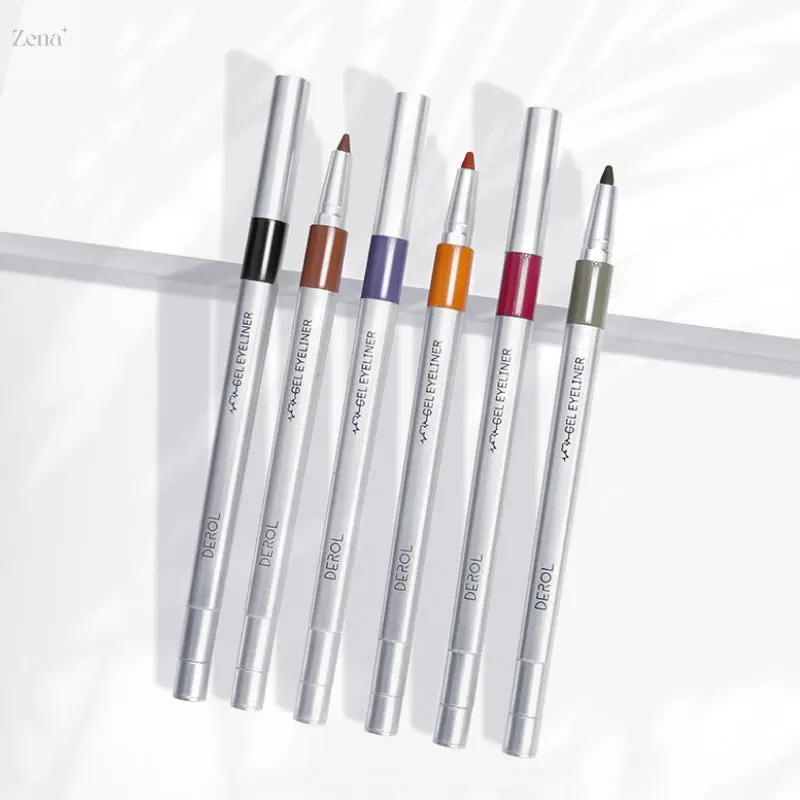
| Available Shades | Classic Black, Rich Brown, Deep Plum, Emerald Green (and more coming soon!) | Find the perfect shade to complement your eye color and create your desired look. From subtle definition to bold statements, we’ve got you covered. |
The Ultimate Guide to Bottom Lash Line Definition with ZenaMakeup Gel Eyeliner
Alright, let’s get down to business! Here’s a step-by-step guide to achieving your best bottom lash line definition ever, using our amazing ZenaMakeup Gel Eyeliner:
Step 1: Prep Your Canvas
Just like any great masterpiece, a flawless bottom lash line starts with a clean canvas. Make sure your under-eye area is clean, moisturized, and free of any excess oil. You can use a light eye cream or serum to hydrate the skin and prevent creasing.
Step 2: Choosing Your Weapon (aka Your Brush)
The right brush can make all the difference in the world. For precise application, we recommend using a fine-tipped eyeliner brush or an angled brush. For a softer, smudged effect, a small, dense eyeshadow brush will do the trick.
- Fine-Tipped Brush: Ideal for creating a thin, precise line along the lash line.
- Angled Brush: Perfect for creating a slightly thicker line or for filling in sparse lashes.
- Small Eyeshadow Brush: Best for smudging and creating a smoky effect.
Step 3: Application Techniques (Choose Your Adventure!)
Here’s where the fun begins! There are several ways to apply ZenaMakeup Gel Eyeliner to your bottom lash line, depending on the look you’re going for:
- The Tightline: This technique involves applying eyeliner to the waterline (the inner rim of your lower eyelid). It’s a great way to add subtle definition and make your lashes appear thicker. Be careful and gentle when applying to the waterline.
- Pro Tip: Use a cotton swab to dry the waterline before applying the eyeliner. This will help the product adhere better and last longer.
- The Lash Line Line: This is the most common technique, where you apply eyeliner directly along the lash line. You can create a thin, precise line for a subtle look, or a thicker line for a more dramatic effect.
- Pro Tip: Start with a thin line and gradually build up the thickness until you achieve your desired look.
- The Smudged Line: For a sultry, smoky effect, apply eyeliner along the lash line and then immediately smudge it out with a small eyeshadow brush or a cotton swab.
- Pro Tip: Use a Q-tip to clean up the edges and create a more defined shape.
- The "Invisible" Line: For the most natural, subtle, and imperceptible definition, apply the liner only between the bottom lashes themselves. This will make the lash roots appear darker and the eyes brighter, but without any visible line.
Step 4: Layering (Optional)
If you want to add even more depth and dimension to your bottom lash line, you can layer different products. For example, you can apply ZenaMakeup Gel Eyeliner along the lash line and then smudge a dark eyeshadow over it for a softer, smokier effect.
Step 5: Setting the Stage (aka Setting the Eyeliner)
To ensure your bottom lash line stays put all day, it’s important to set it with a translucent powder or a matching eyeshadow. This will help absorb any excess oil and prevent smudging.
Step 6: Mascara Magic
Finish off your bottom lash line look with a coat or two of mascara. This will help define your lashes and tie the whole look together.
Troubleshooting Tips & Tricks (Because We’ve All Been There)
- Smudging Issues: If you’re prone to smudging, try using a waterproof formula or setting your eyeliner with a translucent powder. You can also apply a thin layer of eyeshadow in the same shade as your eyeliner to help lock it in place.
- Uneven Lines: Don’t panic! Use a cotton swab dipped in makeup remover to clean up any mistakes and create a more even line. Practice makes perfect!
- Waterline Woes: If you find that eyeliner on your waterline tends to disappear quickly, try using a long-wearing, waterproof formula. You can also try applying a thin layer of eyeshadow to the waterline before applying the eyeliner.
- Sensitive Eyes: If you have sensitive eyes, be sure to use a hypoallergenic, fragrance-free eyeliner. You can also try applying a thin layer of eye cream to your waterline before applying the eyeliner to create a barrier.
ZenaMakeup Gel Eyeliner: Shade Selection Guide
Choosing the right shade of eyeliner can make a big difference in how your bottom lash line looks. Here are a few tips to help you find the perfect shade:
- Classic Black: A timeless choice that works well for almost everyone. It’s perfect for creating a dramatic, defined look.
- Rich Brown: A softer alternative to black that’s great for everyday wear. It’s particularly flattering on those with fair skin or light-colored eyes.
- Deep Plum: A unique and unexpected shade that can really make your eyes pop. It’s especially flattering on those with green or hazel eyes.
- Emerald Green: A vibrant and playful shade that’s perfect for adding a pop of color to your look. It’s especially flattering on those with brown eyes.
Marketing Magic: Why You NEED ZenaMakeup Gel Eyeliner in Your Life
Okay, let’s get real. You’ve read this far, so you’re clearly intrigued. But why should you actually invest in our ZenaMakeup Gel Eyeliner? Here’s the hard sell (but we promise, it’s worth it):
- Confidence Booster: Let’s face it, when you look good, you feel good. And a perfectly defined bottom lash line can do wonders for your confidence.
- Time Saver: Our highly pigmented formula and smooth application make achieving your desired look quick and easy.
- Versatile Tool: Whether you’re going for a natural look or a dramatic smokey eye, our gel eyeliner can do it all.
- Long-Lasting Results: No more worrying about smudging or fading. Our gel eyeliner will keep your bottom lash line looking flawless all day long.
- Affordable Luxury: We believe that everyone deserves to feel beautiful, which is why we offer high-quality products at a price that won’t break the bank.
Exclusive Offer for Our Loyal Readers!
As a special thank you for reading this guide, we’re offering an exclusive discount on our ZenaMakeup Gel Eyeliner! Use code zenamakeup2025 at checkout on our website: https://zenamakeup.com/ to receive a special discount on your purchase. Don’t miss out on this opportunity to transform your bottom lash line and unlock your inner beauty!
Connect with Us!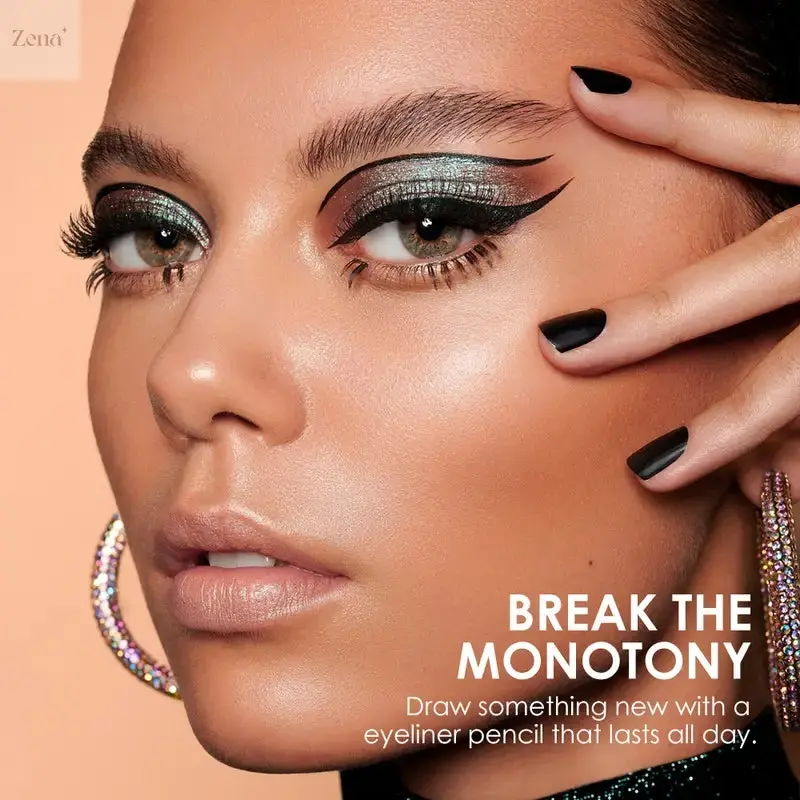
We love hearing from our customers! Follow us on social media for makeup tips, tutorials, and exclusive offers. You can also reach out to us with any questions or feedback at [email protected].
Final Thoughts: Embrace the Power of the Bottom Lash Line!
The bottom lash line is often overlooked, but it’s a powerful tool that can transform your entire eye look. With the right techniques and the right product (aka our ZenaMakeup Gel Eyeliner), you can achieve mesmerizing definition and unleash your inner beauty. So go ahead, experiment, play, and discover the magic of the bottom lash line! We can’t wait to see what looks you create. Get ready to wink your way to success!
For detailed product specifications and purchases, please go to :https://zenamakeup.com/products/precision-gel-eyeliner
Leave a Reply