ZenaMakeup University: Decoding the Delightful Jelly Texture Stain – Your Guide to Luscious, Layered Lips 💋✨
Alright, future makeup maestros! Gather ’round, because Professor (that’s me!) is about to drop some serious knowledge bombs on the hottest trend hitting the beauty scene: Jelly Texture Stains! 🤩 We’re not talking about your grandma’s grape jelly (though, that does smell amazing 🤔). We’re diving deep into the world of ZenaMakeup’s revolutionary Jelly Texture Stain, the ideal base for the most luscious, layered lip looks you can imagine.
Think of this lecture as your official ZenaMakeup University crash course. By the end, you’ll be a certified Jelly Stain aficionado, ready to create lip masterpieces that will make even Cupid jealous. 🏹
Course Outline:
- What IS a Jelly Texture Stain? (Hint: It’s not just a cute name!)
- Why Jelly? The Texture Revolution! (Spoiler alert: It’s all about hydration and comfort.)
- ZenaMakeup’s Jelly Texture Stain: The Star of the Show! (Prepare for a glowing review!)
- The Art of Layering: Jelly Stains + Gloss/Balm = Lip Nirvana! (Tips, tricks, and techniques galore!)
- Color Theory 101: Choosing the Right Jelly Shade for You! (Unlocking your inner lip artist!)
- Application Perfection: Mastering the Jelly Stain Technique! (No more patchy lips! 🙅♀️)
- Troubleshooting: Common Jelly Stain Woes (and How to Fix Them!) (We’ve got your back!)
- Beyond the Basics: Creative Jelly Stain Applications! (Think blush, contour, and more!)
- Jelly Stain Q&A: Ask Professor Anything! (Your chance to shine!)
So grab your notebooks (or your phones, we’re modern here! 📱), and let’s get started!
1. What IS a Jelly Texture Stain?
Okay, let’s break it down. A Jelly Texture Stain is exactly what it sounds like: a lip stain with a unique, bouncy, jelly-like consistency. 🍮 Unlike traditional liquid lipsticks or matte stains, it’s typically:
- Water-based: This means it’s lightweight and hydrating. Think refreshing drink for your lips! 💧
- Pigment-rich: Don’t let the "jelly" fool you. These stains pack a punch of color that lasts. 💥
- Build-able: You can go for a sheer wash of color or layer it up for more intensity. The choice is yours!
- Non-drying: Say goodbye to cracked, uncomfortable lips! Jelly stains are designed to keep your pout happy. 😄
But the real magic is in the texture. It glides on smoothly, feels incredibly comfortable, and gives your lips a natural, healthy flush. It’s like a lip tint, but with a serious upgrade.
2. Why Jelly? The Texture Revolution!
Why are jelly textures taking over the beauty world? Because they’re amazing! Here’s the lowdown on why everyone’s obsessed:
- Hydration is Key: The high water content keeps your lips moisturized, preventing that dreaded dry, cracked feeling. 💦
- Comfort is King (or Queen!): Forget heavy, sticky formulas. Jelly stains feel weightless and breathable on your lips. It’s like you’re wearing nothing at all…but with gorgeous color!
- Effortless Application: The smooth, gel-like texture makes application a breeze. No more struggling with streaky lines or uneven coverage.
- Natural-Looking Finish: Jelly stains melt into your lips, creating a natural, "bitten" effect. It’s the perfect "I woke up like this" lip look. 😉
- Perfect for Layering: This is the big one! The lightweight formula makes jelly stains the ideal base for layering with glosses, balms, and even other lipsticks. We’ll get into the nitty-gritty of layering later.
3. ZenaMakeup’s Jelly Texture Stain: The Star of the Show!
Alright, let’s talk about our baby! ZenaMakeup’s Jelly Texture Stain is designed to be the ultimate lip stain experience. We’ve taken all the best aspects of jelly textures and combined them with our signature high-quality ingredients and vibrant color range.
Here’s what sets our Jelly Texture Stain apart:
| Feature | Description | Benefit |
|---|---|---|
| Formula | Water-based, infused with Hyaluronic Acid & Vitamin E | Intense hydration, antioxidant protection, and a plumped-up pout! ✨ |
| Texture | Lightweight, bouncy, non-sticky | Comfortable wear all day long. You’ll forget you’re even wearing it! 😌 |
| Pigmentation | Highly pigmented, buildable coverage | From a subtle tint to a bold statement, you control the intensity. 🎨 |
| Longevity | Long-lasting stain that fades evenly | No more constant touch-ups! Your color stays put, even after eating and drinking. ☕ |
| Shade Range | A curated collection of universally flattering shades, from nudes to berries to reds. | There’s a perfect shade for every skin tone and occasion! 🌈 |
| Applicator | Precision doe-foot applicator | Easy and precise application, even for beginners. 🖌️ |
| Cruelty-Free & Vegan | We believe in beauty without cruelty. | Feel good about what you’re putting on your lips! 💖 |
| Price Point | Accessible luxury. High quality without breaking the bank! | You deserve the best, without emptying your wallet! 💰 |
Our Top Selling Shades:
- "Barely There" – A universally flattering nude for a natural, everyday look. 💋
- "Berry Kiss" – A juicy berry shade that adds a pop of color to any complexion. 🍓
- "Ruby Red" – A classic red that’s perfect for a night out. 💃
- "Peachy Keen" – A warm peach shade that gives your lips a sun-kissed glow. 🍑
- "Rose Petal" – A soft pink that’s perfect for a romantic look. 🌹
4. The Art of Layering: Jelly Stains + Gloss/Balm = Lip Nirvana!
Okay, this is where the real fun begins! Layering a jelly stain with a gloss or balm is the secret to achieving that coveted "glass lips" effect. Here’s how to do it like a pro:
The Basic Formula:
Jelly Texture Stain (Base) + Lip Gloss/Balm (Top) = Ultimate Lip Perfection!
Why does this work so well?
- The jelly stain provides a long-lasting base of color.
- The gloss or balm adds shine, hydration, and dimension.
- Together, they create a multi-dimensional lip look that’s both comfortable and gorgeous.
Layering Techniques:
- The jelly stain provides a long-lasting base of color.
- The gloss or balm adds shine, hydration, and dimension.
- Together, they create a multi-dimensional lip look that’s both comfortable and gorgeous.
Layering Techniques:
- The Classic: Apply a thin layer of jelly stain to your lips. Let it dry for a few seconds. Then, apply your favorite gloss or balm on top. Simple, yet stunning! ✨
- The Ombre: Apply a darker shade of jelly stain to the outer edges of your lips and a lighter shade to the center. Blend well. Then, apply a clear gloss or balm over the entire lip. This creates a plumping and defining effect. 👄
- The Glitter Bomb: Apply a jelly stain as a base. Then, layer a glitter gloss on top for a party-ready look! 🎉
- The Tinted Balm Boost: If you prefer a more subtle look, apply a jelly stain and then top with a tinted lip balm for added hydration and a hint of color. 🌸
Pro Tips for Layering:
- Choose complementary colors: A berry stain looks amazing with a pink gloss, while a nude stain pairs well with a golden shimmer gloss.
- Don’t overdo it: A little goes a long way. Start with thin layers and build up the intensity as needed.
- Consider the finish: A matte stain looks great with a high-shine gloss, while a satin stain pairs well with a more subtle balm.
- Experiment! The best way to find your perfect layering combination is to play around and see what works best for you.
5. Color Theory 101: Choosing the Right Jelly Shade for You!
Choosing the right lip color can be tricky, but don’t worry, Professor is here to guide you! Here’s a quick rundown of color theory basics:
- Warm Tones: Shades with yellow or orange undertones (e.g., peach, coral, warm reds). These tend to look best on warm skin tones.
- Cool Tones: Shades with blue or purple undertones (e.g., berry, pink, cool reds). These tend to look best on cool skin tones.
- Neutral Tones: Shades that are balanced between warm and cool (e.g., nudes, mauves, roses). These tend to look good on everyone!
Matching Jelly Stain to Your Skin Tone:
| Skin Tone | Recommended Jelly Stain Shades |
|---|---|
| Fair | Light pinks, peaches, nudes, soft berries. Avoid shades that are too dark or intense. |
| Light | Pinks, corals, roses, mauves, light reds. Experiment with brighter shades. |
| Medium | Berries, reds, corals, oranges, browns. You can pull off a wide range of shades! |
| Tan | Oranges, reds, browns, purples. Embrace bold and vibrant colors. |
| Deep | Deep reds, plums, berries, browns. Rich and saturated shades will look stunning. |
| Olive | Berry, orange, red. Shades with a slighty orange undertone. |
Beyond Skin Tone:
- Consider your undertones: Are you warm, cool, or neutral?
- Think about your overall look: Are you going for a natural, everyday look or a more dramatic, evening look?
- Don’t be afraid to experiment! The best way to find your perfect shade is to try different colors and see what makes you feel confident and beautiful.
6. Application Perfection: Mastering the Jelly Stain Technique!
Applying a jelly stain is easy, but here are a few tips to ensure a flawless finish:
- Exfoliate: Start with smooth, exfoliated lips. This will help the stain adhere evenly and prevent any patchiness. Use a lip scrub or a soft toothbrush to gently exfoliate your lips.
- Hydrate: Apply a lip balm to hydrate your lips before applying the stain. This will create a smooth canvas and prevent the stain from drying out your lips.
- Apply a thin layer: Use the doe-foot applicator to apply a thin, even layer of jelly stain to your lips. Start in the center of your lips and work your way outwards.
- Blend: Use your finger or a lip brush to blend the edges of the stain for a seamless finish.
- Let it dry: Allow the stain to dry for a few seconds before applying your gloss or balm.
- Build the color (optional): If you want a more intense color, apply a second layer of stain after the first layer has dried.
7. Troubleshooting: Common Jelly Stain Woes (and How to Fix Them!)
Even with the best products and techniques, you might encounter a few hiccups along the way. Here’s how to troubleshoot common jelly stain problems:
- Patchy Application: This usually happens when your lips are dry or unevenly exfoliated. Make sure to exfoliate and hydrate your lips before applying the stain. Also, try using a lip brush to blend the stain more evenly.
- Uneven Fading: This can happen if you apply too much stain or if your lips are not properly hydrated. Apply a thin layer of stain and make sure to keep your lips moisturized throughout the day.
- The Stain is Too Dark: If the stain is too dark for your liking, try applying it with a lighter hand or blotting it with a tissue after application.
- The Stain is Too Light: If the stain is too light, apply a second layer or choose a darker shade.
- The Stain is Bleeding: If the stain is bleeding outside your lip line, use a lip liner to create a barrier before applying the stain.
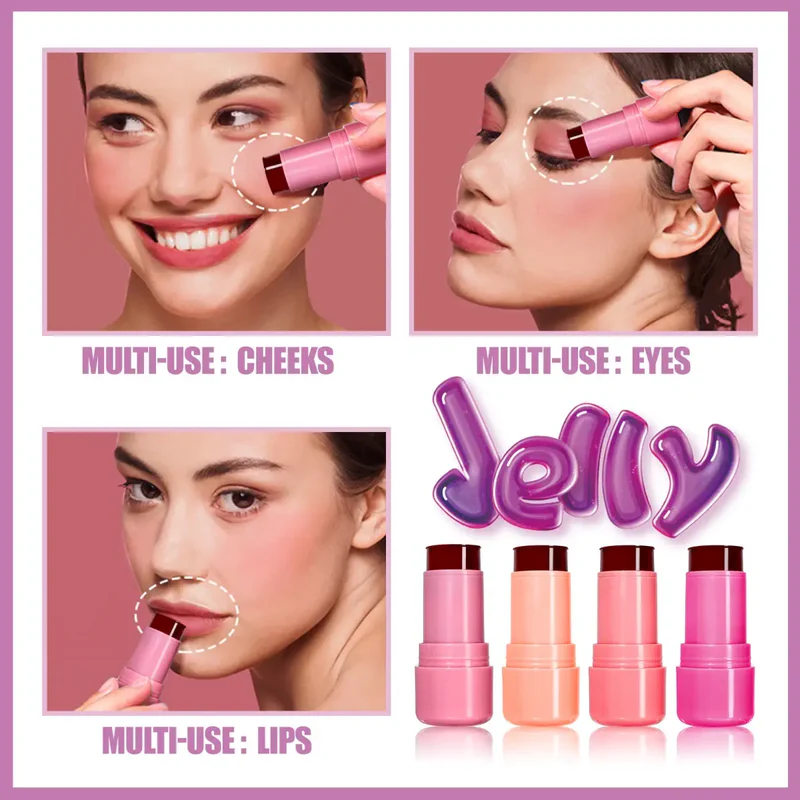
8. Beyond the Basics: Creative Jelly Stain Applications!
Who says jelly stains are just for lips? Get creative and use them on other parts of your face!
- Cream Blush: Dab a small amount of jelly stain onto your cheeks and blend well for a natural, dewy flush. 🌸
- Eye Shadow Base: Apply a thin layer of jelly stain to your eyelids and blend well. Then, apply your favorite eyeshadow on top for a long-lasting, vibrant look. 👁️
- Contour: Use a brown or taupe jelly stain to create a subtle contour on your cheekbones, jawline, and forehead.
9. Jelly Stain Q&A: Ask Professor Anything!
Alright, class! It’s time for your chance to shine. Do you have any burning questions about jelly stains? Now’s your chance to ask Professor anything! I’m here to help you become the ultimate Jelly Stain guru!
(Example Questions and Answers)
- Q: How do I remove a jelly stain?
- A: Use a gentle makeup remover or cleansing oil. You may need to let it sit on your lips for a few seconds to dissolve the stain.
- Q: Can I use a jelly stain on my cheeks if I have oily skin?
- A: Yes, but use a very small amount and blend well. You may also want to set it with a powder to prevent it from fading.
- Q: What’s the best way to store my ZenaMakeup Jelly Texture Stain?
- A: Store it in a cool, dry place away from direct sunlight.
Conclusion:
Congratulations, my beauty besties! You’ve officially completed ZenaMakeup University’s Jelly Texture Stain 101 course! 🎓 You’re now equipped with the knowledge and skills to rock this trend like a pro. So go forth, experiment, and create the most luscious, layered lip looks imaginable! And don’t forget to tag us in your creations! We can’t wait to see what you come up with! #ZenaMakeup #JellyTextureStain #LipGoals
Now go out there and spread some lip love! 😘
For detailed product specifications and purchases, please go to :https://zenamakeup.com/products/everglow-sculpting-cooling-jelly-tint-sheer-lip-face-stain
Leave a Reply