✨ Lecture: Glitterati 101 – Mastering the Art of Layering Pigmented Glitter Eyeshadow Cream ✨
Welcome, darlings, to Glitterati 101! 🍾🎉 I see a lot of eager faces, practically sparkling with anticipation. And rightly so! Today, we’re diving headfirst into the shimmering, dazzling, and sometimes treacherous world of layering pigmented glitter eyeshadow cream. Forget your boring beige mattes (for now, anyway). We’re talking about transforming your eyelids into miniature disco balls of divine delight! ✨
I’m your instructor, Professor Sparkle (yes, it’s a real title, I earned it!), and I’m here to guide you through the dos, don’ts, and "oh-no-you-didn’t" of glitter layering. So grab your brushes, your sponges, your glitter-encrusted hearts, and let’s get started!
Lecture Outline:
- The Allure of Glitter: Why We’re Obsessed 🤩
- Glitter 101: A Crash Course in Types & Textures 📚
- The Foundation is Key: Priming for Glitter Success 🔑
- The Base Shadow: Building Your Glitter Canvas 🎨
- Glitter Cream Deconstructed: Pigment, Formula, and Application 🔬
- Layering Like a Pro: Techniques and Tools of the Trade 🛠️
- Color Theory for Glitter: Making Your Eyes POP! 🌈
- Troubleshooting Glitter Catastrophes: Rescue Missions & Damage Control 🚑
- Glitter Removal: A Gentle Farewell, Not a War 🕊️
- Glitter Inspiration: Looks to Try & Trends to Watch 🌟
1. The Allure of Glitter: Why We’re Obsessed 🤩
Let’s face it, glitter speaks to something primal within us. It’s magpie-like attraction to shiny things, amplified. It’s the feeling of childhood wonder, bottled and sprinkled on our faces. Glitter is joy, rebellion, and a statement all rolled into one tiny, sparkly particle.
Think about it. From ancient Egyptian royalty adorning themselves with crushed gemstones to modern-day celebrities gracing red carpets with dazzling looks, glitter has always been associated with luxury, celebration, and a touch of otherworldly magic.
But beyond the aesthetics, glitter is about expression. It’s about daring to be different, to stand out from the crowd, to embrace your inner sparkle. And who doesn’t want a little more sparkle in their lives? ✨
2. Glitter 101: A Crash Course in Types & Textures 📚
Before we start slathering glitter on our faces, let’s understand what we’re working with. Not all glitter is created equal, and choosing the right type is crucial for a flawless (and safe!) application.
| Glitter Type | Description | Best For | Caveats |
|---|---|---|---|
| Cosmetic Grade Glitter | Specifically designed for use on skin. Typically made from PET or synthetic mica. | Eyes, lips, face, body. Safe for cosmetic use. | Can still be irritating if used improperly. Always check the ingredient list! |
| Craft Glitter | Made from metal or plastic. NOT safe for use on skin! | Literally, crafts. Christmas ornaments, scrapbooking, evil schemes to glitter-bomb your enemies (don’t do that!). | Sharp edges, can scratch the cornea, can be toxic if ingested. SERIOUSLY, DON’T PUT THIS ON YOUR FACE! 🙅♀️ |
| Biodegradable Glitter | Made from plant-derived materials. Breaks down naturally. | Eco-conscious glitter lovers! Suitable for face and body. | Can be more expensive than traditional glitter. Not all biodegradable glitters are created equal, so research your brands! |
| Glitter Cream/Gel | Loose glitter suspended in a cream or gel base. | Easier application, less fallout, great for beginners. | Can be less intense than loose glitter. Some formulas can dry out or get clumpy. |
| Pressed Glitter | Glitter pressed into a pan with a binder. | Convenient for on-the-go application. | Can be less pigmented than loose glitter. May require multiple layers for desired intensity. |
Key takeaway: Always, always use cosmetic-grade glitter on your face. Your eyes will thank you. 🙏
3. The Foundation is Key: Priming for Glitter Success 🔑
Think of your eyelids as a canvas. Would you paint a masterpiece on a dirty, uneven surface? Of course not! The same principle applies to glitter. Proper priming is essential for a smooth, long-lasting, and fallout-free glitter application.
Here’s the breakdown:
- Cleanse: Start with a clean, dry eyelid. Remove any traces of makeup or oil.
- Prime: Use an eyeshadow primer specifically designed to grip pigment. This will create a sticky base for the glitter to adhere to.
- Set (Optional): If you have oily eyelids, you can lightly set the primer with a translucent powder. This will help to prevent creasing.
Pro Tip: For extra grip, try using a glitter glue or adhesive specifically formulated for cosmetic use. These products are incredibly sticky and will hold even the most stubborn glitter in place.
4. The Base Shadow: Building Your Glitter Canvas 🎨
Now for the fun part! The base shadow is the foundation upon which your glitter masterpiece will be built. It’s the color that peeks through the glitter, adding depth and dimension to your look.
Choosing the Right Base Shadow:
- Complementary Colors: Use a base shadow that complements the color of your glitter. For example, a warm gold glitter will look stunning over a bronze or brown base.
- Contrast: Create a striking contrast by pairing a cool-toned glitter with a warm-toned base, or vice versa. Think silver glitter over a burgundy base.
- Matchy-Matchy: For a more subtle look, choose a base shadow that closely matches the color of your glitter.
Application Techniques:
- Apply a thin, even layer of eyeshadow to your entire eyelid.
- Blend well to avoid harsh lines.
- You can use a matte, shimmer, or satin finish, depending on your desired look.
Consider these combinations:
| Glitter Color | Suggested Base Shadow Colors |
|---|---|
| Gold | Bronze, brown, warm orange, deep red |
| Silver | Grey, black, cool purple, navy blue |
| Rose Gold | Dusty rose, mauve, champagne, warm brown |
| Blue | Navy, teal, deep purple, silver |
| Green | Olive green, forest green, gold, brown |
| Iridescent | Any color! Let the iridescent glitter shift and shine. |
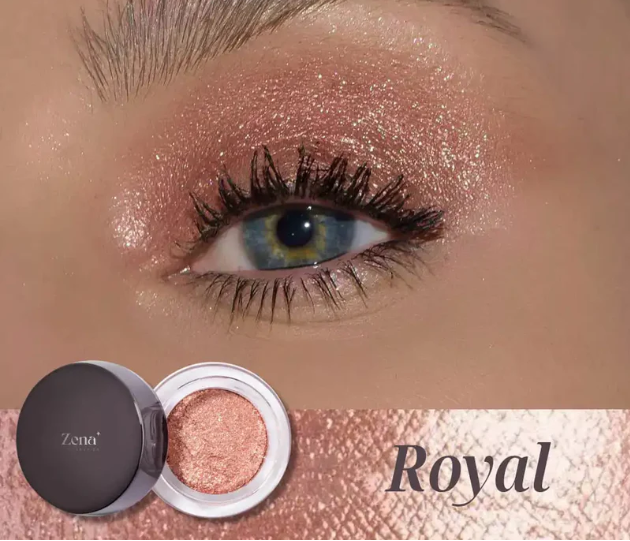
5. Glitter Cream Deconstructed: Pigment, Formula, and Application 🔬
Ah, glitter cream, the unsung hero of the glitter world! It’s the perfect option for those who want the sparkle without the mess (or the commitment of loose glitter). But understanding its composition is key to mastering its application.
| Glitter Color | Suggested Base Shadow Colors |
|---|---|
| Gold | Bronze, brown, warm orange, deep red |
| Silver | Grey, black, cool purple, navy blue |
| Rose Gold | Dusty rose, mauve, champagne, warm brown |
| Blue | Navy, teal, deep purple, silver |
| Green | Olive green, forest green, gold, brown |
| Iridescent | Any color! Let the iridescent glitter shift and shine. |
5. Glitter Cream Deconstructed: Pigment, Formula, and Application 🔬
Ah, glitter cream, the unsung hero of the glitter world! It’s the perfect option for those who want the sparkle without the mess (or the commitment of loose glitter). But understanding its composition is key to mastering its application.
- Pigment: The color of the glitter. This can range from subtle shimmers to bold, vibrant hues.
- Formula: The base that holds the glitter. This can be a cream, gel, or even a water-based formula.
- Application: This is where the magic happens!
Application Tips for Glitter Cream:
- Use a synthetic brush or your fingertip: Synthetic brushes are less likely to absorb the product and will provide a more even application. Your fingertip can also be a great tool for pressing the glitter onto the lid.
- Pat, don’t swipe: Swiping can disrupt the base shadow and create a patchy finish. Patting the glitter cream onto the lid will help it adhere better and create a more concentrated sparkle.
- Build in layers: Start with a thin layer and gradually build up the intensity until you achieve your desired look.
- Set with a setting spray: This will help to lock the glitter in place and prevent fallout.
6. Layering Like a Pro: Techniques and Tools of the Trade 🛠️
Now for the grand finale! Layering glitter cream over eyeshadow is an art form, and like any art form, it requires practice and the right tools.
Techniques:
- One-and-Done: Apply a single layer of glitter cream over your base shadow for a subtle shimmer.
- The Gradient: Apply glitter cream to the center of the lid and blend outwards for a gradual sparkle effect.
- The Cut Crease: Use a thin brush to apply glitter cream along the crease of your eye for a dramatic, defined look.
- The Halo Eye: Apply glitter cream to the center of the lid and blend outwards, leaving the inner and outer corners matte for a halo effect.
- The Pop of Sparkle: Apply a small amount of glitter cream to the inner corner of the eye or along the lower lash line for a subtle touch of sparkle.
Tools:
- Synthetic Eyeshadow Brushes: Flat shader brushes, detail brushes, blending brushes.
- Fingertips: For precise application and pressing glitter into place.
- Cotton Swabs: For cleaning up mistakes and defining edges.
- Makeup Sponges: For blending and smoothing.
- Glitter Glue/Adhesive: For extra grip and hold.
Layering Checklist:
- Apply base shadow.
- Pick up a small amount of glitter cream with your brush or fingertip.
- Pat the glitter cream onto your eyelid, starting at the center.
- Blend outwards, using light, tapping motions.
- Build up the intensity in layers, if desired.
- Clean up any fallout with a cotton swab.
- Set with a setting spray.
- Admire your sparkly creation! 🤩
7. Color Theory for Glitter: Making Your Eyes POP! 🌈
Color theory is your secret weapon in the world of glitter! Understanding how colors interact can take your glitter looks from "meh" to "magnificent!"
- Complementary Colors: These colors are opposite each other on the color wheel and create a striking contrast. For example, blue and orange, red and green, yellow and purple.
- Analogous Colors: These colors are next to each other on the color wheel and create a harmonious, blended look. For example, blue, blue-green, and green.
- Monochromatic Colors: These colors are different shades of the same hue. For example, light blue, medium blue, and dark blue.
Glitter Color Combinations to Try:
| Glitter Color | Complementary Base Shadow | Analogous Base Shadow | Monochromatic Base Shadow |
|---|---|---|---|
| Gold | Blue | Yellow, Orange | Light Gold, Bronze |
| Silver | Orange | Grey, Purple | Light Silver, Charcoal |
| Rose Gold | Green | Pink, Brown | Light Rose Gold, Mauve |
| Blue | Orange | Teal, Purple | Light Blue, Navy |
| Green | Red | Yellow, Blue | Light Green, Forest Green |
Don’t be afraid to experiment! Play around with different color combinations until you find what works best for you.
8. Troubleshooting Glitter Catastrophes: Rescue Missions & Damage Control 🚑
Even the most experienced glitter gurus encounter the occasional mishap. Here’s how to handle some common glitter emergencies:
- Fallout: Use a piece of tape or a lint roller to gently remove glitter from your face.
- Uneven Application: Use a clean brush or your fingertip to blend the glitter cream evenly.
- Clumping: Gently pat the glitter cream with your fingertip to break up any clumps.
- Creasing: Use a cotton swab to gently remove the glitter cream from the crease and reapply in a thinner layer.
- Glitter in Your Eye: Flush your eye with water immediately. If irritation persists, seek medical attention. (Seriously, don’t mess around with your eyes!)
Prevention is Key:
- Use a good primer and glitter glue.
- Apply glitter in thin layers.
- Set with a setting spray.
- Work in a well-lit area.
9. Glitter Removal: A Gentle Farewell, Not a War 🕊️
Removing glitter can be a pain, but it doesn’t have to be a battle. Here are some gentle and effective methods:
- Oil-Based Cleanser: A good oil-based cleanser will dissolve the glitter and make it easier to remove.
- Makeup Remover Wipes: Use makeup remover wipes to gently wipe away the glitter.
- Micellar Water: Micellar water is a gentle and effective way to remove glitter without irritating your skin.
- Tape: Gently press a piece of tape onto your skin to lift away any remaining glitter.
Important:
- Avoid rubbing your eyes aggressively.
- Be patient and persistent.
- Moisturize your skin after removing glitter.
10. Glitter Inspiration: Looks to Try & Trends to Watch 🌟
Now that you’re armed with the knowledge and tools, it’s time to unleash your inner glitter artist! Here are some trending glitter looks to inspire you:
- Euphoria-Inspired Glitter: Bold, graphic glitter designs that are all about self-expression.
- Minimalist Glitter: A subtle touch of glitter to enhance your natural beauty.
- Holographic Glitter: Iridescent glitter that shifts and changes color in the light.
- Festival Glitter: Bold, colorful glitter looks that are perfect for parties and events.
- Sustainable Glitter: Eco-friendly glitter options that are good for the planet.
The future of glitter is bright (and sparkly!) Keep an eye out for new formulas, colors, and application techniques. And most importantly, have fun and experiment!
Congratulations, graduates! 🎉 You’ve officially completed Glitterati 101! Now go forth and spread your sparkle upon the world! But remember, glitter responsibly! 😉 Now, if you’ll excuse me, I have a date with a vat of holographic glitter and a dream. Class dismissed! ✨
For detailed product specifications and purchases, please go to :https://zenamakeup.com/products/pigmented-glitter-eyeshadow-cream
Leave a Reply