Lecture: The Art of Radiance: Mastering Intensity with Deluxe Liquid Glitter Cream Eyeshadow Sticks ✨
(Professor Anya Sparkle, PhD in Shimmerology – self-proclaimed, but highly enthusiastic)
Alright, settle down, settle down, you future glitter gurus! Welcome to Intro to Sparkle 101. Today’s topic? The glorious, the magnificent, the utterly captivating: Deluxe Liquid Glitter Cream Eyeshadow Sticks and the art of building intensity.
Forget your brushes, forget your palettes of a thousand shades that you only use three of (we’ve all been there!), and prepare to unlock a world of effortless radiance. We’re talking about transforming from "mildly interesting" to "legitimately mesmerizing" with a single, portable stick of shimmering goodness.
Why are we focusing on these magical wands of wonder? Because, my dears, in a world obsessed with complicated contouring and intimidating eye looks, these sticks offer a shortcut to dazzling. They’re foolproof(ish), travel-friendly, and, dare I say, FUN!
(Professor Sparkle dramatically adjusts her oversized, glitter-encrusted glasses.)
So, let’s dive in! This isn’t just about slapping glitter on your eyelids (although, honestly, that’s a valid artistic choice sometimes). This is about understanding the nuances, the techniques, the philosophy of building intensity with these delightful devices.
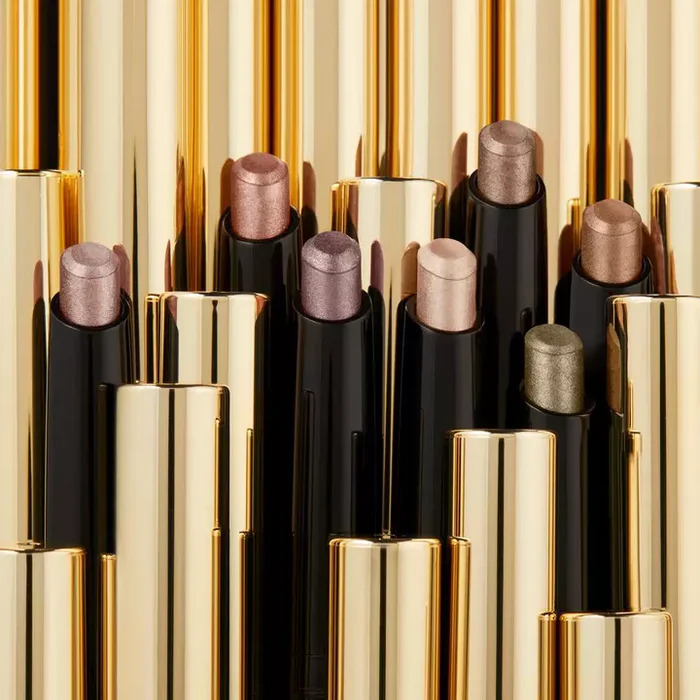
I. The Anatomy of Awesomeness: Understanding Your Glitter Stick
Before we start painting masterpieces on our faces, let’s understand what we’re working with. Not all glitter sticks are created equal, my friends. Knowing your tool is paramount.
(Professor Sparkle unveils a ridiculously large, anatomically-correct model of a glitter stick. The class stares in amused silence.)
Okay, maybe not this anatomically correct, but you get the picture! Let’s break it down:
| Feature | Description | Consideration |
|---|---|---|
| The Stick Itself | Usually a twist-up or retractable applicator. | Check for smooth operation! A sticky stick is a sad stick. Twist-up is generally preferred for longevity and less product breakage. 😩 |
| The Formula | A creamy, often slightly tacky base infused with glitter particles. The base anchors the glitter and helps it adhere to the eyelid. | Creamy is key! A dry formula will drag and crease. Look for ingredients like oils and waxes that provide slip and blendability. Avoid anything that feels chalky. 🚫 |
| The Glitter Particles | The stars of the show! Size, shape, and color variety are important. | Consider the glitter size. Chunky glitter can be fun for a statement look, but smaller, finer glitter is more versatile and easier to build intensity with. 🌈 |
| The Color Pigment | Some sticks are heavily pigmented with a base color, while others are more sheer and glitter-focused. | Think about your desired outcome. Do you want a wash of color with a hint of shimmer, or a full-on glitter explosion? 🤔 |
| The Cap | Protects the product from drying out. | Don’t lose it! Seriously. A dried-out glitter stick is about as useful as a chocolate teapot. 🫖 |
II. Priming for Perfection: Laying the Groundwork
(Professor Sparkle dramatically pulls out a makeup bag overflowing with primers.)
Before we unleash the glitter beast, we need to prepare the canvas! Priming is crucial for several reasons:
- Smooth Application: A primer creates a smooth, even surface, preventing the glitter stick from dragging or skipping.
- Increased Longevity: Primer acts as a glue, helping the glitter adhere to the eyelid and preventing fallout. No one wants glitter migrating to their cheeks! (Unless you’re going for a "glitter tears" look, in which case, go for it!)
- Enhanced Color Payoff: Primer can intensify the color of the glitter stick, making it pop!
Types of Primers (and when to use them):
| Primer Type | Benefits | Ideal for |
|---|---|---|
| Traditional Eyeshadow Primer | Smooths the eyelid, increases longevity, and enhances color. | Most skin types. A good all-around choice. 👍 |
| Glitter Glue | Specifically designed to hold glitter in place. Super sticky! | Chunky glitter or when you need maximum staying power. Use sparingly! It can be difficult to blend. ⚠️ |
| Cream Eyeshadow Base | Provides a colored base that can enhance the glitter’s overall look. | Creating a more dramatic, layered effect. Experiment with contrasting colors! Purple base + silver glitter = ✨MAGICAL✨ |
| Concealer | Can work in a pinch, but not ideal. It’s better than nothing, but may not provide the same level of grip or longevity as a dedicated primer. | When you’re caught without your usual primer. Set it with a translucent powder before applying the glitter stick. 😬 |
Pro-Tip: Apply your primer with a light hand and let it dry completely before applying the glitter stick. Patience, my friends, is a virtue!
III. The Art of Application: Techniques for Building Intensity
(Professor Sparkle grabs a volunteer – a student bravely sporting a "I Love Glitter" t-shirt – and begins demonstrating application techniques.)
Now, the fun part! Here’s where we transform from "meh" to "magnificent." Remember, the key to building intensity is layering.
A. The Single Swipe (The "I’m Running Late, But Still Want to Sparkle" Method):
- Simply swipe the glitter stick across your eyelid, from the inner corner to the outer corner.
- Blend the edges with your finger or a soft brush.
- This is a great option for a subtle, everyday shimmer.
B. The Layering Technique (The "I Have Time to Be Fabulous" Approach):
- Apply a thin layer of the glitter stick to your entire eyelid.
- Let it dry for a few seconds.
- Apply a second layer, focusing on the center of the eyelid or the outer corner for added intensity.
- Blend the edges to create a seamless transition.
- Repeat as needed until you achieve your desired level of sparkle.
(Professor Sparkle demonstrates, carefully blending each layer. The volunteer’s eyes begin to gleam.)
C. The Spot Application (The "Strategic Sparkle" Method):
C. The Spot Application (The "Strategic Sparkle" Method):
- Use the glitter stick to apply glitter to specific areas of the eyelid, such as the inner corner, the center of the lid, or along the lash line.
- This technique is great for adding dimension and highlighting specific areas.
- Think of it as "glitter contouring!" ✨
D. The Stippling Technique (The "Maximum Impact" Method):
- Instead of swiping, gently stipple the glitter stick onto the eyelid. This deposits a concentrated amount of glitter for intense sparkle.
- This is perfect for creating a dramatic, editorial look.
- Warning: May attract excessive attention. Proceed with caution. 😉
Important Considerations:
- Start Small: It’s always easier to add more glitter than it is to remove it.
- Blend, Blend, Blend: Harsh lines are a glitter faux pas. Blend those edges!
- Use a Clean Finger or Brush: This will help you achieve a smooth, even application.
- Don’t Overdo It: There is such a thing as too much glitter. (Although, I’m not entirely convinced.)
IV. Glitter Pairings: Unleashing Your Inner Artist
(Professor Sparkle unveils a chart showcasing various glitter stick colors and their complementary eyeshadow pairings.)
Glitter sticks are fantastic on their own, but they can also be used to enhance other eyeshadows. Let’s explore some winning combinations:
| Glitter Stick Color | Complementary Eyeshadow Colors | Effect | Example |
|---|---|---|---|
| Gold | Warm browns, bronzes, coppers, greens, reds | Adds warmth, dimension, and a touch of luxury. | Brown smokey eye with gold glitter in the center. 🏆 |
| Silver | Cool grays, blues, purples, pinks, blacks | Creates a cool, edgy, and futuristic look. | Gray smokey eye with silver glitter along the lash line. 🤖 |
| Rose Gold | Pinks, peaches, mauves, browns | Adds a romantic, feminine, and ethereal glow. | Peach eyeshadow with rose gold glitter on the lid. 🌸 |
| Holographic | Any color! Holographic glitter reflects a rainbow of colors, making it incredibly versatile. | Adds a playful, eye-catching, and multidimensional effect. | Simple wash of nude eyeshadow with holographic glitter all over. 🌈 |
| Champagne | Nude, beige, light browns, gold | Enhances natural beauty with a subtle, sophisticated shimmer. | Light brown crease with champagne glitter on the lid. 🥂 |
Pro-Tip: Use a matte eyeshadow as a base to create a more dramatic contrast with the glitter.
V. Troubleshooting Glitter Glitches: Common Problems and Solutions
(Professor Sparkle pulls out a first-aid kit labeled "Glitter Emergencies." The class chuckles.)
Even with the best techniques, glitter mishaps can happen. Don’t panic! Here’s how to handle some common glitter glitches:
| Problem | Solution |
|---|---|
| Glitter Fallout | Use a glitter glue or a sticky eyeshadow base. Set your makeup with a setting spray. Carry a lint roller for quick cleanups. 🧹 |
| Creasing | Apply a thin layer of primer. Avoid applying too much product. Set your eyeshadow with a translucent powder. |
| Uneven Application | Use a clean finger or brush to blend the glitter evenly. Apply multiple thin layers instead of one thick layer. |
| Glitter Overload | Use a clean, dry brush to gently buff away excess glitter. Apply a small amount of translucent powder to tone down the sparkle. Remember, less is often more! (Okay, maybe not always.) 😈 |
| Dried-Out Glitter Stick | Try warming the stick slightly between your fingers to soften the formula. If that doesn’t work, consider adding a drop of eye-safe oil or mixing medium to the formula. (Prevention is key! Always close the cap tightly!) 🔒 |
VI. The Ethical Sparkle: Responsible Glitter Usage
(Professor Sparkle adopts a serious tone.)
Before we conclude, let’s talk about responsible glitter usage. Traditional glitter is made from microplastics, which are harmful to the environment. Thankfully, there are eco-friendly alternatives!
Look for:
- Biodegradable Glitter: Made from plant-based materials like cellulose.
- Mica-Based Glitter: Mica is a natural mineral that can create a beautiful shimmer. Ensure the mica is ethically sourced.
Let’s be dazzling and environmentally conscious! ♻️
VII. Conclusion: Embrace the Sparkle!
(Professor Sparkle beams at the class.)
Congratulations, my glitterati! You’ve officially completed Intro to Sparkle 101. You now possess the knowledge and skills to confidently conquer the world, one shimmering eyelid at a time.
Remember, the key to building intensity with Deluxe Liquid Glitter Cream Eyeshadow Sticks is experimentation, practice, and a healthy dose of self-expression. Don’t be afraid to push the boundaries, break the rules, and most importantly, HAVE FUN!
Now go forth and sparkle! ✨
(Professor Sparkle throws confetti – biodegradable, of course – into the air as the class applauds. The volunteer, now radiating glittery goodness, smiles brightly.)
Assignment for Next Week: Create a glitter eye look inspired by your favorite animal. Bonus points for originality and excessive sparkle! Prepare to present your masterpieces. Class dismissed!
For detailed product specifications and purchases, please go to :https://zenamakeup.com/products/liquid-glitter-waterproof-eyeshadow-stick
Leave a Reply