Unlock Foundation Flawlessness: Mastering the Sponge & Beauty Blender with Your ZenaMakeup Foundation Stick! 🌟
Hey gorgeous! Ever feel like achieving that "lit-from-within" glow is more like wrestling a bear than applying makeup? We get it! Foundation can be a finicky friend, especially when you’re aiming for a natural, seamless finish.
That’s why we, your pals at ZenaMakeup, are here to spill the tea (and maybe a little foundation) on how to absolutely NAIL your foundation game using the dynamic duo: your trusty ZenaMakeup Foundation Stick and a sponge or beauty blender.
But before we dive into blending bliss, let’s talk about the star of the show:
(Drumroll, please!)
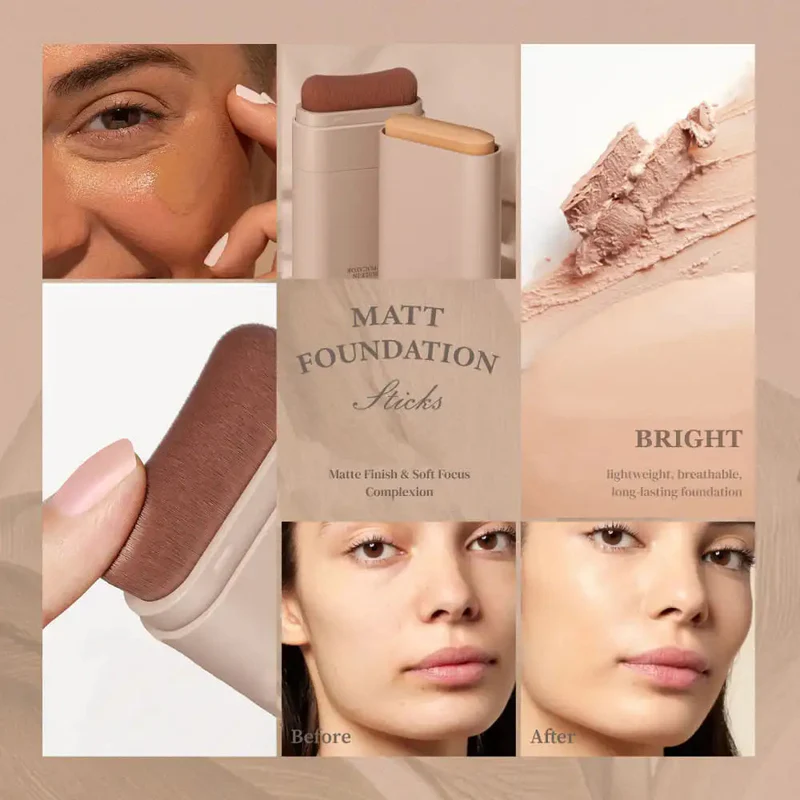
Introducing the ZenaMakeup Foundation Stick: Your Secret Weapon for Effortless Radiance 🤫

(Replace this with an actual image of the ZenaMakeup Foundation Stick)
Forget messy liquids and complicated application techniques! The ZenaMakeup Foundation Stick is your on-the-go, glide-and-go ticket to complexion perfection.
Why you’ll absolutely adore it:
- Creamy, Dreamy Texture: It melts into your skin like butter (but doesn’t clog pores, promise!).
- Buildable Coverage: Go from sheer and natural to full glam with just a few swipes.
- Perfect for Travel: Toss it in your bag and touch up anywhere, anytime. No spills, no fuss!
- Infused with Goodness: Packed with skin-loving ingredients like Vitamin E and Hyaluronic Acid to hydrate and nourish while you wear. (Because makeup should care about your skin!)
- Wide Shade Range: We’ve got a shade for every skin tone under the sun (and even for those who prefer to stay indoors!). ☀️
And the best part? It plays oh-so-nicely with sponges and beauty blenders, making application a breeze for makeup newbies and pros alike.
Ready to unleash your inner makeup artist? Let’s get blending!
Sponges vs. Beauty Blenders: Which One’s Right for You? 🤔
Okay, let’s settle this age-old debate. While both sponges and beauty blenders are fantastic tools for applying foundation, they offer slightly different results.
| Feature | Sponge (Traditional Wedge) | Beauty Blender (Egg-Shaped) |
|---|---|---|
| Shape | Wedge or rectangular | Egg-shaped with a pointed tip and rounded bottom |
| Material | Usually synthetic | Proprietary foam (often latex-free) |
| Coverage | Can provide fuller coverage, especially when dry | Generally offers a more sheer to medium, airbrushed finish |
| Application | Best for pressing and dabbing foundation onto the skin | Ideal for bouncing and stippling foundation for a seamless blend |
| Absorbency | Tends to absorb more product | Designed to absorb less product when dampened |
| Best For | Covering imperfections, oily skin types (can help absorb excess oil), budget-conscious | Achieving a natural, dewy finish, dry or mature skin types, those who prefer lighter coverage |
| Cleaning | Easier to clean thoroughly | Requires more frequent and thorough cleaning to prevent bacteria buildup |
| ZenaMakeup Tip | Great for targeted application in hard-to-reach areas like around the nose. | Perfect for all-over application and creating a soft, diffused look. |
The Bottom Line: It really boils down to personal preference! Experiment with both and see which one gives you the results you love.
The Ultimate Guide to Blending Your ZenaMakeup Foundation Stick with a Sponge or Beauty Blender: Step-by-Step
Alright, let’s get down to the nitty-gritty. Follow these steps for flawless foundation application every single time:
Step 1: Prep Your Canvas (aka Your Skin!) 🎨
This is crucial! No matter how amazing your foundation is, it won’t look its best on dry, flaky skin.
- Cleanse: Wash your face with a gentle cleanser to remove any dirt and oil.
- Moisturize: Apply a hydrating moisturizer to create a smooth base for your foundation. (Pro tip: Let it absorb completely before moving on to the next step.)
- Prime (Optional): If you have oily skin or want your makeup to last all day, use a primer to create a smooth, even surface. ZenaMakeup’s [insert primer name here] is a great option!
Step 2: Dot, Dot, Glide! ✍️
Instead of swiping the foundation stick directly across your face (which can lead to streaks), try this method:
- Dot: Apply a few dots of the ZenaMakeup Foundation Stick to your forehead, cheeks, nose, and chin. Start with a small amount – you can always add more later!
- Glide (Optional): If you prefer, you can lightly glide the foundation stick across these areas instead of dotting. Just be sure to use a light hand.
Step 3: Dampen Your Sponge/Beauty Blender 💧
This is KEY! A damp sponge or beauty blender will absorb less product and create a more natural, dewy finish.
- Soak: Run your sponge or beauty blender under warm water until it’s completely saturated.
- Squeeze: Squeeze out all the excess water. You want it to be damp, not dripping!
- Pro Tip: Some people prefer to spritz their sponge with a setting spray or hydrating mist instead of water. This can add an extra boost of hydration and help your makeup last longer.
Step 4: Bounce, Stipple, or Dab Your Way to Perfection! 💃
Now for the fun part! Here’s how to blend like a pro:
Now for the fun part! Here’s how to blend like a pro:
-
With a Beauty Blender: Use a bouncing or stippling motion to blend the foundation into your skin. Avoid dragging or wiping, as this can cause streaks. The pointed tip is perfect for getting into hard-to-reach areas like around the nose and eyes.
-
With a Sponge (Wedge): Use the flat side of the sponge to gently dab and press the foundation into your skin. For more targeted coverage, use the pointed edge.
General Blending Tips:
- Work in Sections: Focus on blending one section of your face at a time (e.g., forehead, cheek, chin) to ensure even coverage.
- Blend Outwards: Blend towards your hairline and jawline to avoid harsh lines.
- Use Light Pressure: Avoid pressing too hard, as this can irritate your skin and remove the foundation.
- Don’t Forget Your Neck! Blend the foundation down your neck to create a seamless transition. (Nobody wants a makeup line!)
Step 5: Build Coverage (If Needed) 🧱
If you want more coverage, simply add another layer of the ZenaMakeup Foundation Stick and repeat the blending process. Remember, less is more! Start with a small amount and build up gradually to avoid looking cakey.
Step 6: Set It and Forget It! (Almost) 🪄
To ensure your foundation lasts all day, set it with a light dusting of powder. ZenaMakeup’s [insert powder name here] is a great option for setting your foundation without adding extra texture or dryness.
- Pro Tip: Use a large, fluffy brush to apply the powder lightly all over your face. Focus on areas that tend to get oily, like your T-zone.
Step 7: Admire Your Flawless Face! ✨
You did it! Take a step back and admire your gorgeous, radiant complexion. Now go conquer the world!
Troubleshooting Common Foundation Woes 🛠️
Even with the best products and techniques, sometimes things can go awry. Here are some common foundation problems and how to fix them:
- Cakey Foundation: You’re probably using too much product! Try using a lighter hand and building up coverage gradually. Also, make sure your skin is properly moisturized.
- Streaky Foundation: You’re likely dragging the sponge or beauty blender across your skin instead of bouncing or stippling. Use a light touch and focus on pressing the foundation into your skin.
- Foundation Settling into Fine Lines: This usually happens when your skin is dry. Make sure you’re using a hydrating moisturizer and primer. You can also try using a damp sponge or beauty blender to apply your foundation, as this will help it blend more seamlessly.
- Foundation Oxidizing (Turning Orange): This can happen if your foundation is reacting with your skin’s natural oils. Try using a primer to create a barrier between your skin and the foundation. You can also try using a different foundation that is less likely to oxidize.
- Foundation Fading Throughout the Day: This can happen if your skin is oily or if you’re not setting your foundation properly. Use a primer to control oil and set your foundation with a light dusting of powder. You can also try using a setting spray to help your makeup last longer.
Cleaning Your Sponges and Beauty Blenders: A Must-Do! 🧼
This is non-negotiable! Dirty sponges and beauty blenders can harbor bacteria, which can lead to breakouts and skin irritation.
How to Clean:
- Daily: Rinse your sponge or beauty blender with warm water and a gentle cleanser after each use.
- Weekly: Deep clean your sponge or beauty blender with a brush cleanser or dish soap. Squeeze out all the excess water and let it air dry completely.
Pro Tip: You can also microwave your sponge or beauty blender for a few seconds to kill bacteria. Just be sure to dampen it first and keep a close eye on it!
Level Up Your Look with ZenaMakeup! 💖
Now that you’ve mastered the art of blending your ZenaMakeup Foundation Stick with a sponge or beauty blender, you’re ready to take your makeup game to the next level!
Check out these other amazing ZenaMakeup products:
- [Insert Concealer Name Here]: Perfect for concealing dark circles, blemishes, and other imperfections.
- [Insert Blush Name Here]: Add a pop of color to your cheeks with our highly pigmented and blendable blush.
- [Insert Eyeshadow Palette Name Here]: Create endless eye looks with our versatile and long-lasting eyeshadow palette.
- [Insert Lipstick Name Here]: Complete your look with our creamy and comfortable lipstick.
Ready to experience the ZenaMakeup difference? Shop our full collection today!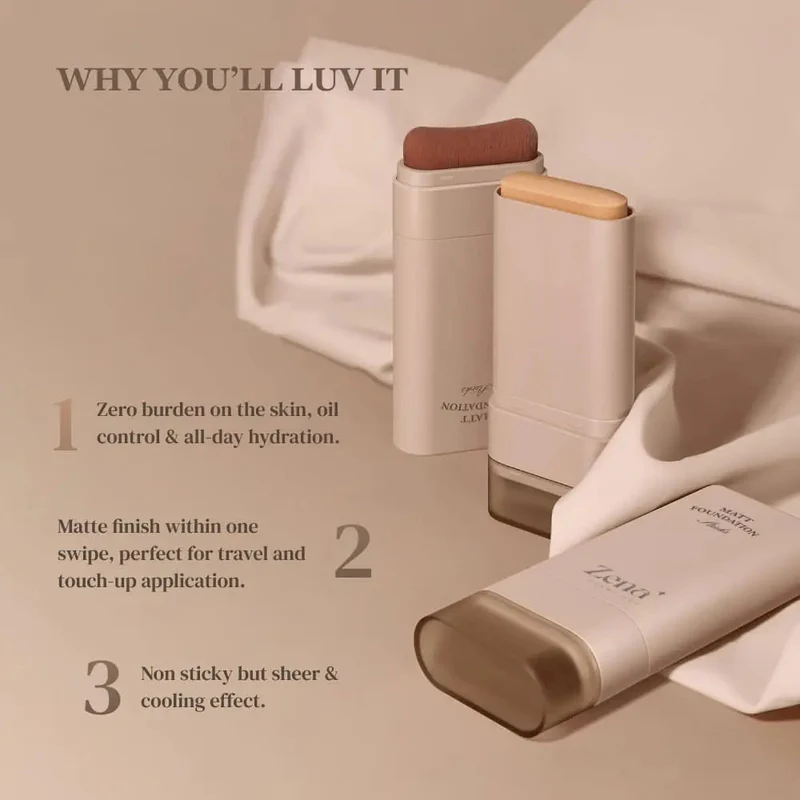
(Insert Link to ZenaMakeup Website Here)
Final Thoughts: Embrace the Blend! 💫
Achieving flawless foundation application is all about finding the right tools and techniques that work for you. With the ZenaMakeup Foundation Stick and a sponge or beauty blender, you can create a natural, radiant complexion that lasts all day. So go ahead, experiment, have fun, and embrace the blend!
Happy blending, beauties! 😘
For detailed product specifications and purchases, please go to :https://zenamakeup.com/products/traceless-matte-foundation-repair-stick
Leave a Reply