Lights, Camera, Glitter! Mastering Pigmented Glitter Eyeshadow Cream for Photography Makeup 📸✨
Alright, darlings! Settle in, grab your favorite beverage (mine’s a glitter-infused gin and tonic, naturally), because we’re about to dive headfirst into the sparkly, shimmer-tastic world of pigmented glitter eyeshadow cream for photography makeup. Forget everything you think you know about glitter – we’re elevating it, refining it, and making it absolutely pop on camera.
This isn’t your average eyeshadow tutorial; this is a masterclass in making glitter your best friend, not your frenemy, in the demanding realm of professional photography. We’ll explore the nuances of this unique product, from application techniques to camera-friendly color choices, all while keeping it fun and, dare I say, educational!
Lecture Outline:
- The Glitterati: Why Pigmented Glitter Eyeshadow Cream? (Understanding the product and its photographic advantages)
- Choosing Your Sparkle: Color Theory and Camera Compatibility (Selecting the right shades for different skin tones and lighting conditions)
- Prime Time: Prep and Prime for Glitter Longevity (Building a flawless base for maximum impact)
- Application Techniques: From Subtle Shimmer to Bold Bombastic (Mastering the tools and methods for diverse glitter looks)
- Blending is Your Bestie: Smoothing the Transition (Creating seamless gradients and avoiding harsh lines)
- Lock It Down: Sealing the Deal for All-Day Glam (Ensuring your glitter stays put, even under studio lights)
- Troubleshooting Glitter Mishaps: Prevention and Quick Fixes (Addressing common issues like fallout and patchiness)
- Photography Considerations: Lighting, Angles, and Post-Production (Adapting your glitter application for specific photographic needs)
- Glitter Gone Wild: Creative Applications Beyond the Lid (Exploring unconventional uses of glitter cream for photography)
- The Final Flourish: Elevating the Entire Look (Integrating glitter into a cohesive and stunning makeup design)
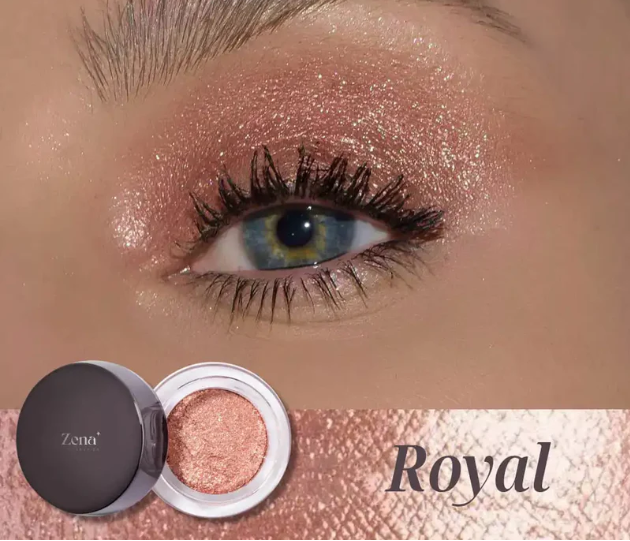
1. The Glitterati: Why Pigmented Glitter Eyeshadow Cream? 👑
Let’s be honest, glitter gets a bad rap. We’ve all been victims of glitter explosions, glitter fallout, and the dreaded feeling of finding rogue sparkles weeks after the party. But fear not! Pigmented glitter eyeshadow cream is here to redeem glitter’s reputation.
What exactly is it? Think of it as the sophisticated cousin of loose glitter. It’s a creamy, often emollient base saturated with fine, highly reflective glitter particles. The key difference lies in the suspension: the glitter is embedded within the cream, minimizing fallout and maximizing adhesion.
Why choose it for photography?
- Control, Control, Control! Unlike loose glitter, cream formulas offer unparalleled control. You can precisely place the glitter where you want it, without the risk of it migrating all over the face.
- Less Fallout, More Fabulous: The creamy base acts like a glue, keeping the glitter locked in place. This is crucial for long photoshoots where constant touch-ups are a nightmare.
- Photographic Friendliness: The pigment in the cream base ensures that the glitter isn’t just reflecting light; it’s also contributing color depth and dimension to the eye look. This translates beautifully on camera.
- Buildable Intensity: You can create anything from a subtle, ethereal shimmer to a full-on disco ball effect, depending on the amount you apply.
- Comfort Factor: Most glitter creams are formulated with moisturizing ingredients, making them more comfortable to wear for extended periods than traditional loose glitter.
| Feature | Pigmented Glitter Eyeshadow Cream | Loose Glitter |
|---|---|---|
| Fallout | Minimal | High |
| Application Control | High | Low |
| Pigment | Often pigmented base | Typically translucent |
| Wear Time | Longer | Shorter |
| Comfort | Higher | Lower |
| Photographic Result | Defined, dimensional sparkle | Potentially messy, flat |
2. Choosing Your Sparkle: Color Theory and Camera Compatibility 🌈
Now, let’s talk colors! This isn’t just about picking your favorite shade; it’s about understanding how colors translate on camera and complement different skin tones.
Skin Tone Considerations:
- Fair Skin: Pastel glitters, champagne tones, and light golds work beautifully without overwhelming the complexion. Avoid overly dark or saturated colors, which can look harsh.
- Medium Skin: You have a wider range to play with! Bronze, copper, rose gold, and jewel tones like emerald green and sapphire blue will enhance your natural glow.
- Deep Skin: Rich, saturated colors like gold, bronze, deep purple, and vibrant blues are your best friends. These colors will pop against your skin and create a stunning contrast.
Camera Compatibility:
- Matte vs. Shimmer: While we’re focusing on glitter, remember that a balance is key. Too much shimmer can wash out features on camera. Use matte shades to define the crease and add depth.
- Color Temperature: Consider the overall color temperature of the photoshoot. Warm-toned glitters (gold, bronze, copper) work well in warm lighting, while cool-toned glitters (silver, blue, purple) complement cool lighting.
- Avoid White Cast: Some glitters, particularly those with a high concentration of silver or white particles, can create a white cast under flash photography. Test your glitter under different lighting conditions before the shoot.
- Think About the Theme: The glitter color should align with the overall aesthetic of the photoshoot. A futuristic theme might call for holographic glitter, while a romantic theme might benefit from soft, champagne shimmer.
Pro Tip: Always swatch your glitter eyeshadow cream on your hand and take a picture with your phone’s flash. This will give you a good idea of how it will look on camera.
3. Prime Time: Prep and Prime for Glitter Longevity ⏳
Okay, glitter is fabulous, but it’s only as good as the base it’s built upon. Proper prep and priming are essential for ensuring your glitter stays put and looks flawless all day long.
The Steps:
- Cleanse and Moisturize: Start with a clean, moisturized canvas. Remove any excess oil with a toner.
- Eyeshadow Primer: This is non-negotiable! A good eyeshadow primer will create a smooth, even surface for the glitter to adhere to and prevent creasing. Choose a primer that’s specifically designed for glitter or shimmer.
- Transition Shade (Optional): Apply a matte eyeshadow in a transition shade slightly deeper than your skin tone to the crease. This will help blend the glitter seamlessly and add depth to the eye look.
- Cream Eyeshadow Base (Optional): For extra intensity and longevity, apply a cream eyeshadow in a similar color to your glitter as a base. This will amplify the glitter’s color and prevent it from fading.
Product Recommendations:
| Primer Type | Product Example | Benefit |
|---|---|---|
| Glitter Glue | NYX Professional Makeup Glitter Primer | Specifically designed for glitter adhesion, maximum hold. |
| Eyeshadow Primer | Urban Decay Eyeshadow Primer Potion | Creates a smooth base, prevents creasing, extends eyeshadow wear time. |
| Cream Eyeshadow Base | MAC Paint Pot in Painterly | Provides a color base, intensifies glitter, adds longevity. |
4. Application Techniques: From Subtle Shimmer to Bold Bombastic 💥
Alright, time to get our sparkle on! The application technique you choose will depend on the desired effect, from a subtle, ethereal shimmer to a full-on glitter explosion.
Tools of the Trade:
- Flat Synthetic Brush: Ideal for packing on glitter for maximum impact.
- Small Detail Brush: Perfect for precise placement and creating intricate designs.
- Finger: Yes, your finger! The warmth of your finger can help melt the glitter cream into the skin for a seamless blend.
- Sponge Applicator: Useful for applying a thin, even layer of glitter.
Techniques:
- Packing: Use a flat synthetic brush to pick up a generous amount of glitter cream and gently press it onto the eyelid. Avoid swiping, which can cause fallout.
- Dabbing: Use a small detail brush or your finger to dab the glitter cream onto specific areas, such as the inner corner of the eye or the center of the lid.
- Blending: Use a fluffy brush to gently blend the edges of the glitter cream into the surrounding eyeshadow.
- Layering: For extra intensity, apply multiple layers of glitter cream, allowing each layer to dry slightly before applying the next.
Pro Tip: Work in thin layers to avoid creasing and patchiness.
5. Blending is Your Bestie: Smoothing the Transition ✨
Blending is crucial for creating a polished and professional-looking glitter eye. You don’t want harsh lines or a stark contrast between the glitter and the surrounding eyeshadow.
Blending Techniques:
- Fluffy Brush: Use a clean, fluffy blending brush to gently soften the edges of the glitter cream.
- Transition Shade: Blend the glitter into the transition shade in the crease to create a seamless gradient.
- Circular Motions: Use small, circular motions to blend the edges of the glitter cream.
- Patience is Key: Blending takes time and effort. Don’t rush the process.
6. Lock It Down: Sealing the Deal for All-Day Glam 🔒
You’ve applied your glitter, blended it to perfection, now it’s time to lock it in place! This is especially important for long photoshoots.
Setting Sprays:
- Setting Spray with Glitter Glue Properties: These setting sprays contain polymers that help to adhere glitter to the skin.
- Traditional Setting Spray: Use a traditional setting spray to set the entire makeup look, including the glitter eyeshadow.
Application Technique:
- Hold the setting spray at arm’s length and lightly mist the face. Avoid spraying too close, which can cause the glitter to run.
- Allow the setting spray to dry completely before touching your face.
7. Troubleshooting Glitter Mishaps: Prevention and Quick Fixes 🚑
Even with the best techniques, glitter mishaps can happen. Here’s how to prevent and fix common problems:
| Problem | Solution | Prevention |
|---|---|---|
| Fallout | Use a piece of tape to gently lift the glitter from the skin. | Apply glitter over a sticky base, use a glitter primer, work in thin layers. |
| Creasing | Gently pat the crease with your finger to redistribute the glitter. | Use an eyeshadow primer, avoid applying too much glitter in the crease. |
| Patchiness | Apply a second layer of glitter cream to fill in any gaps. | Use a consistent application technique, blend the edges thoroughly. |
| Glitter Migration | Use a cotton swab dipped in makeup remover to clean up any stray glitter. | Use a glitter primer, set the glitter with a setting spray. |
8. Photography Considerations: Lighting, Angles, and Post-Production 💡
Remember, we’re creating makeup for photography, so we need to consider how the glitter will look on camera.
Lighting:
- Studio Lighting: Studio lighting can be unforgiving. Test your glitter under different lighting conditions to ensure it looks flattering.
- Natural Light: Natural light is generally more forgiving, but be aware of harsh shadows.
- Flash Photography: Flash photography can accentuate shimmer and glitter, but it can also create a white cast.
Angles:
- Eye Shape: Consider the model’s eye shape when applying glitter. Use glitter to accentuate the natural shape of the eye.
- Camera Angle: The angle of the camera can affect how the glitter looks. Experiment with different angles to find the most flattering one.
Post-Production:
- Retouching: Minor retouching can be done in post-production to remove any stray glitter or smooth out the skin.
- Color Correction: Adjust the colors in post-production to ensure the glitter looks its best.
9. Glitter Gone Wild: Creative Applications Beyond the Lid 🎨
Who says glitter is only for the eyes? Let’s get creative!
- Highlighter: Use a fine glitter cream as a highlighter on the cheekbones, brow bone, and cupid’s bow.
- Lip Topper: Apply a thin layer of glitter cream over your lipstick for a dazzling effect.
- Body Art: Use glitter cream to create intricate designs on the body.
- Hair Glitter: Apply a small amount of glitter cream to the hair for a touch of sparkle.
10. The Final Flourish: Elevating the Entire Look 🌟
Glitter eyeshadow is just one element of a larger makeup look. To create a cohesive and stunning look, consider the following:
- Skin: Ensure the skin is flawless and radiant. Use a foundation that provides good coverage and a natural finish.
- Brows: Define the brows to frame the face and balance the bold eye look.
- Lashes: Apply false lashes to add drama and enhance the eyes.
- Lips: Choose a lip color that complements the glitter eyeshadow. A nude lip will allow the eyes to be the focus, while a bold lip can create a more dramatic look.
- Balance: Ensure the overall look is balanced. If the eyes are bold, keep the rest of the makeup subtle.
Congratulations! You’ve officially completed your masterclass in pigmented glitter eyeshadow cream for photography makeup. Now go forth and create some sparkly magic! Remember, practice makes perfect, so don’t be afraid to experiment and have fun. And most importantly, embrace the glitter! ✨🎉
For detailed product specifications and purchases, please go to :https://zenamakeup.com/products/pigmented-glitter-eyeshadow-cream
Leave a Reply