Lecture: Illuminating Your Inner Goddess: Mastering Inner Corner and Brow Bone Highlights with the Liquid Dual-end EasyGlow Eyeshadow Set 🌟
(Welcome, Glamazons! Prepare for a sparkle injection!)
Alright, class, settle down, settle down! Today, we’re diving headfirst into the shimmering sea of highlighting. We’re talking about those magical little touches that take your makeup from "meh" to "magnificent," specifically focusing on the inner corner and brow bone. And our weapon of choice? The fabulous Liquid Dual-end EasyGlow Eyeshadow Set! 💥
Think of this set as your personal fairy godmother, ready to sprinkle you with radiant dust at a moment’s notice. We’re not just slapping on any old shimmer; we’re strategically placing light to sculpt, brighten, and awaken your face. Get ready to learn the secrets to achieving that effortless, lit-from-within glow! ✨
Lecture Outline:
- Why Highlight the Inner Corner & Brow Bone? (The "Glow Up" Rationale)
- Meet Your Weapon: The Liquid Dual-end EasyGlow Eyeshadow Set (A Deep Dive)
- Color Theory for Highlighting: Picking the Perfect Shade (No More Clown Face!)
- Application Techniques: Precision and Perfection (Tools & Tricks)
- Troubleshooting: Common Mistakes and How to Avoid Them (Don’t Panic!)
- The Complete Look: Integrating Highlighting into Your Overall Makeup (Blending is Your Friend!)
- Bonus Round: Beyond the Basics (Creative Highlighting & Experimentation)
- Conclusion: Glow Forth and Conquer! (Embrace Your Inner Radiance)
1. Why Highlight the Inner Corner & Brow Bone? (The "Glow Up" Rationale)
Let’s be honest, who doesn’t want to look more awake, refreshed, and just plain gorgeous? Highlighting these specific areas isn’t just about adding shimmer; it’s about strategically manipulating light to create the illusion of:
- Wider, Brighter Eyes: Applying a light, reflective shade to the inner corner instantly opens up the eyes, making them appear larger and more alert. Think of it as a caffeinated shot for your peepers! ☕
- Lifted Brow Bone: Highlighting under the brow bone creates the illusion of a higher, more sculpted brow. It’s like a mini brow lift, without the needles or the hefty price tag! 💸
- Enhanced Facial Structure: By strategically placing light, you can emphasize the natural contours of your face, making cheekbones pop and creating a more defined overall look. We’re talking instant model status! 💃
- A Youthful Glow: A touch of shimmer can soften fine lines and wrinkles, reflecting light away from imperfections and giving you a more youthful, radiant complexion. Hello, fountain of youth! ⛲
- Overall Polished Look: Even with minimal makeup, a touch of highlight in these key areas can instantly elevate your look, making you appear more put-together and confident. It’s the ultimate shortcut to looking fabulous! 💁♀️
In short, highlighting the inner corner and brow bone is like hitting the "perfect lighting" button in real life! ✨
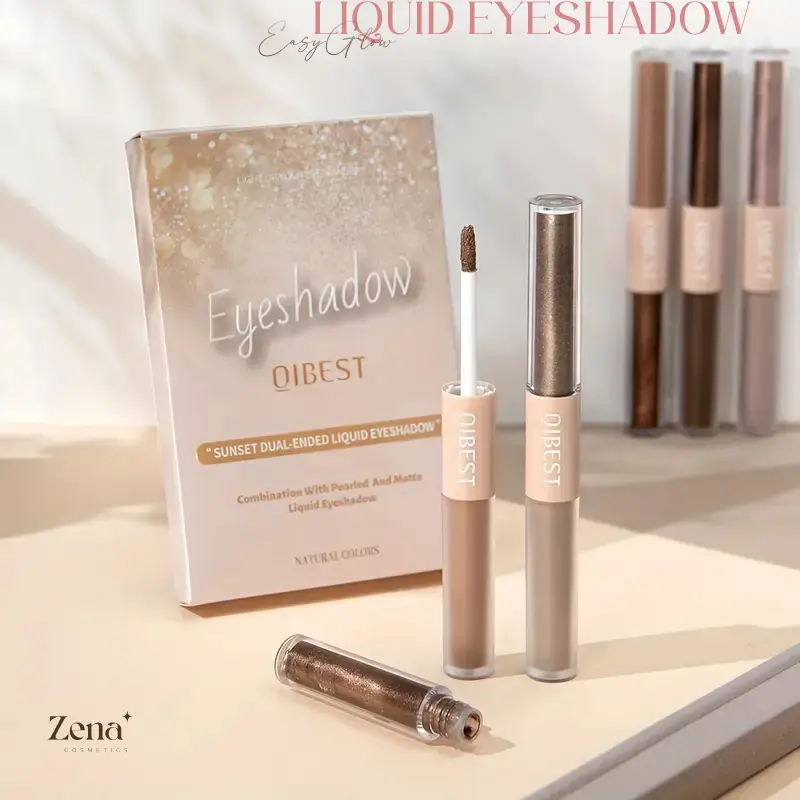
2. Meet Your Weapon: The Liquid Dual-end EasyGlow Eyeshadow Set (A Deep Dive)
Okay, let’s get familiar with our star player. The Liquid Dual-end EasyGlow Eyeshadow Set is more than just eyeshadow; it’s a versatile tool for creating stunning highlights. Here’s what makes it so special:
- Dual-Ended Design: Two shades in one convenient tube! This saves space in your makeup bag and gives you options for creating different highlighting effects. Think of it as a dynamic duo for your eyes! 👯♀️
- Liquid Formula: Liquid eyeshadows offer intense pigmentation and a smooth, blendable texture. They’re also less prone to fallout than powder shadows, making for a cleaner application. No more glitter bombs on your cheeks! 💣🚫
- Easy Application: The liquid formula glides on effortlessly, making it easy to apply and blend with your finger, a brush, or a sponge. Even makeup newbies can achieve professional-looking results! 👍
- Long-Lasting Wear: High-quality liquid eyeshadows are designed to stay put all day (or night!) without creasing or fading. You can dance the night away without worrying about your highlight disappearing. 💃🕺
- Variety of Finishes: The set likely includes a range of finishes, from subtle shimmers to dazzling glitters, allowing you to customize your highlight to suit your personal style and the occasion. From "office chic" to "clubbing queen," we’ve got you covered! 👑
Here’s a breakdown of potential features and benefits in a table format:
| Feature | Benefit |
|---|---|
| Dual-Ended | Versatility, saves space, multiple options |
| Liquid Formula | Intense pigmentation, smooth application, minimal fallout |
| Easy Application | Beginner-friendly, effortless blending |
| Long-Lasting Wear | Stays put all day/night, no creasing or fading |
| Variety of Finishes | Customizable highlight, suitable for different occasions and styles |
Pro Tip: Familiarize yourself with the specific shades and finishes in your Liquid Dual-end EasyGlow Eyeshadow Set. Experiment to see which combinations you like best! 🧪
3. Color Theory for Highlighting: Picking the Perfect Shade (No More Clown Face!)
Choosing the right shade for your highlight is crucial. You don’t want to end up looking like a disco ball or, worse, a clown. Here’s a guide to picking the perfect shade based on your skin tone:
- Fair Skin: Opt for champagne, pearl, or light gold shades. These will add a subtle glow without looking too harsh. Avoid anything too dark or bronze, as it can look muddy. Think delicate and ethereal! 🧚♀️
- Light to Medium Skin: Rose gold, peach, and bronze shades work beautifully. These warm tones will complement your complexion and add a healthy-looking radiance. Experiment with different intensities to find your sweet spot. 🍑
- Medium to Olive Skin: Gold, copper, and bronze shades will enhance your natural warmth and create a stunning sun-kissed glow. Don’t be afraid to go a little bolder with your highlight! ☀️
- Dark Skin: Deep gold, bronze, and copper shades will create a beautiful, luminous glow on darker skin tones. Look for shades with a rich, metallic finish for maximum impact. Own that glow! ✨
Here’s a quick reference table:
| Skin Tone | Recommended Highlight Shades | Shades to Avoid |
|---|---|---|
| Fair | Champagne, Pearl, Light Gold | Dark Bronze, Anything too Intense |
| Light to Medium | Rose Gold, Peach, Bronze | Anything too cool-toned or ashy |
| Medium to Olive | Gold, Copper, Bronze | Anything too pale or lacking pigment |
| Dark | Deep Gold, Bronze, Copper, Rich Metallics | Anything too light or ashy |
Important Note: Consider your undertones. Are you warm, cool, or neutral? This will further refine your shade selection. Warm undertones look best with gold and bronze, cool undertones with silver and pearl, and neutral undertones can rock almost anything! 🌈
Think of it like choosing the perfect wine pairing for your skin tone. You want something that complements and enhances, not clashes! 🍷
4. Application Techniques: Precision and Perfection (Tools & Tricks)
Now for the fun part: application! Here’s a step-by-step guide to achieving a flawless highlight on your inner corner and brow bone:
Now for the fun part: application! Here’s a step-by-step guide to achieving a flawless highlight on your inner corner and brow bone:
Tools You’ll Need:
- Liquid Dual-end EasyGlow Eyeshadow Set: Obviously!
- Small Eyeshadow Brush (Optional): A small, precise brush can help you apply the product with greater accuracy.
- Blending Brush (Optional): A fluffy blending brush will help you seamlessly blend the highlight into your surrounding eyeshadow.
- Your Finger (Always an Option!): Your fingertip can be surprisingly effective for applying and blending liquid eyeshadow.
- Makeup Sponge (Optional): A damp makeup sponge can be used to blend for an airbrushed finish.
Step-by-Step Guide:
- Prep Your Eyes: Apply your eyeshadow primer and base eyeshadow as usual. This will create a smooth canvas for your highlight.
- Inner Corner Application:
- Option 1 (Brush): Dip your small eyeshadow brush into the desired shade from your Liquid Dual-end EasyGlow Eyeshadow Set. Gently tap off any excess product.
- Option 2 (Finger): Dab a small amount of the product onto your fingertip.
- Apply to the Inner Corner: Gently press or pat the product onto the inner corner of your eye, starting at the tear duct and extending slightly onto the eyelid.
- Blend: Use your finger, a small blending brush, or a damp makeup sponge to blend the highlight seamlessly into your base eyeshadow. You want a soft, diffused effect, not a harsh line.
- Brow Bone Application:
- Option 1 (Brush): Using the same brush (or a clean one), dip into the desired shade from your Liquid Dual-end EasyGlow Eyeshadow Set. Tap off any excess product.
- Option 2 (Finger): Dab a small amount of the product onto your fingertip.
- Apply Under the Brow Bone: Apply the product directly under the arch of your eyebrow, following the natural curve of your brow bone.
- Blend: Use your finger, a fluffy blending brush, or a damp makeup sponge to blend the highlight upwards towards your brow and downwards into your eyeshadow. Again, aim for a soft, diffused effect.
- Check Your Work: Step back and take a look in the mirror. Make sure the highlight is evenly distributed and seamlessly blended. Add more product if needed, but remember, less is often more!
- Set (Optional): If desired, you can set your highlight with a light dusting of translucent powder. This will help to prevent creasing and extend the wear time.
Application Tips & Tricks:
- Start Small: It’s always easier to add more product than to take it away. Start with a small amount of highlight and build up the intensity as needed.
- Blend, Blend, Blend!: Blending is key to achieving a natural-looking highlight. Don’t be afraid to spend a little extra time blending the edges of the highlight into your surrounding eyeshadow.
- Consider Your Eye Shape: If you have hooded eyes, you may want to apply the highlight slightly higher on the brow bone to make your eyes appear more open.
- Experiment with Different Shades and Finishes: Don’t be afraid to try different combinations of shades and finishes from your Liquid Dual-end EasyGlow Eyeshadow Set. You might be surprised at what you discover!
Remember, practice makes perfect! Don’t get discouraged if you don’t nail it on your first try. Just keep practicing and experimenting until you find what works best for you. 💪
5. Troubleshooting: Common Mistakes and How to Avoid Them (Don’t Panic!)
Even the most seasoned makeup artists make mistakes. Here are some common highlighting faux pas and how to avoid them:
- Too Much Product: This is the most common mistake! Applying too much highlight can make you look shiny and unnatural. Start with a small amount and build up the intensity as needed.
- Solution: Use a light hand and build up the highlight gradually. If you accidentally apply too much, use a clean blending brush or a damp makeup sponge to soften the edges.
- Harsh Lines: Unblended highlight can look stark and unnatural.
- Solution: Blend, blend, blend! Use a blending brush or your finger to seamlessly blend the edges of the highlight into your surrounding eyeshadow.
- Using the Wrong Shade: Choosing the wrong shade can make you look ashy, muddy, or clownish.
- Solution: Refer to the color theory section above and choose a shade that complements your skin tone and undertones.
- Applying to the Wrong Areas: Highlighting the wrong areas can actually accentuate imperfections.
- Solution: Focus on the inner corner and brow bone. Avoid applying highlight to areas with wrinkles or texture.
- Ignoring Your Skin Type: If you have oily skin, you may want to avoid overly shimmery or glittery highlights, as they can accentuate oiliness.
- Solution: Opt for a more subtle shimmer or matte highlight. Use a setting powder to control shine.
- Creasing: Liquid eyeshadows can sometimes crease, especially on oily eyelids.
- Solution: Use an eyeshadow primer and set your highlight with a light dusting of translucent powder.
Don’t be afraid to experiment and learn from your mistakes. Makeup is all about having fun and expressing yourself! 🤪
6. The Complete Look: Integrating Highlighting into Your Overall Makeup (Blending is Your Friend!)
Highlighting the inner corner and brow bone is just one piece of the puzzle. To create a truly stunning look, you need to integrate your highlight seamlessly into your overall makeup.
- Eyeshadow: Choose eyeshadow shades that complement your highlight. For example, if you’re using a champagne highlight, pair it with warm neutral eyeshadows.
- Eyeliner: A well-defined eyeliner can help to frame your eyes and make them pop. Consider using a brown eyeliner for a softer look, or a black eyeliner for a more dramatic effect.
- Mascara: Mascara is essential for opening up your eyes and adding definition. Apply several coats of mascara to your top and bottom lashes.
- Concealer: Use concealer to brighten the under-eye area and cover any imperfections.
- Foundation: Apply a lightweight foundation to even out your skin tone and create a smooth canvas.
- Blush: Apply blush to the apples of your cheeks to add a touch of color and warmth.
- Lipstick: Choose a lipstick shade that complements your overall look.
Remember, balance is key. You don’t want your highlight to be the only thing people notice. You want it to enhance your overall look and make you feel confident and beautiful. 😊
7. Bonus Round: Beyond the Basics (Creative Highlighting & Experimentation)
Once you’ve mastered the basics, you can start experimenting with more creative highlighting techniques.
- Highlighting the Cupid’s Bow: Apply a small amount of highlight to the cupid’s bow (the V-shaped area above your upper lip) to make your lips appear fuller.
- Highlighting the Bridge of Your Nose: Apply a thin line of highlight down the bridge of your nose to make it appear longer and more defined. (Use sparingly!)
- Highlighting the Cheekbones: Use a powder or cream highlighter to highlight the tops of your cheekbones.
- Using Multiple Shades: Experiment with layering different shades of highlight to create a more dimensional effect.
- Using Highlight as Eyeshadow: Use your Liquid Dual-end EasyGlow Eyeshadow Set as an all-over eyeshadow for a quick and easy glam look.
Don’t be afraid to get creative and experiment with different techniques to find what works best for you. Makeup is all about having fun and expressing yourself! 🎨
8. Conclusion: Glow Forth and Conquer! (Embrace Your Inner Radiance)
Congratulations, class! You’ve officially completed your training in the art of inner corner and brow bone highlighting with the Liquid Dual-end EasyGlow Eyeshadow Set. Now it’s time to put your newfound knowledge to the test!
Remember, practice makes perfect. Don’t be afraid to experiment and try new things. Most importantly, have fun and embrace your inner radiance! ✨
Go forth and glow, my beautiful friends! The world is waiting to see your sparkle! 💖
For detailed product specifications and purchases, please go to :https://zenamakeup.com/products/liquid-dual-end-easyglow-eyeshadow-set-double-your-eye-sparkles-day-night
Leave a Reply